Worklist |
Accessibility Instructions |
Use your screen reader commands to navigate the elements on the page such as headings and links. |
Overview |
The Manager’s Worklist helps you or a Department Head keep track of the requests you are responsible for completing. The action is either to approve or deny a request initiated by an employee or a transaction initiated by a manager on one of their direct reports.
Specifically, there are three different types of approval/denial requests:
- Employee Initiated (1 level) - initiated by an employee and is only sent to you. Once this request is approved, the transaction is completed.
- Manager Initiated, Non-Pay Impacting - initiated by a manager for one of their direct reports. This workflow is sent to the initiator’s ‘Reports To’ manager for approval. This transaction will be completed and written to HHSAS once the next level manager approves the request.
- Manager Initiated, Pay Impacting - initiated by a manager for one of their direct reports. This workflow is first sent to the initiator’s ‘Reports To’ manager for approval. Once the manager approves the request, it is then sent to the Department Head for budgetary approval. When the Department Head approves the workflow, the transaction will be entered into HHSAS.
As a first level manager you will generally receive notifications indicating when the next level manager has approved or denied a transaction you have initiated. As a second level manager, or a Department Head, you will receive requests for approval based on transactions initiated by the managers that report to you. |
Step Actions |
The step actions for completing a transaction are presented in two ways: Text Only and Screen Samples:
- Text Only provides instructions for completing the transaction in order from beginning to end. It does not include screen samples.
- Screen Samples include detailed screen shots to help complete the transaction.
|
Transactions Covered in this User Guide |
- Rules of Workflow – Workflow items are routed to your worklist based on the workflow approval rules.
- Access My Worklist – View all of the action items and notifications that have been sent to your worklist.
- Review Worklist Items – Approve, deny, and/or mark worked worklist items.
- Designate a Workflow Alternate – Route a workflow that you would normally receive to your ‘Reports To’ manager for a period of time while you are out of the office.
- Key Things to Remember – Contact information and a summary of important things to help you with Worklist activities.
|
Key Terms |
For a complete glossary of terms, click here: CAPPS Glossary.
- Action Item - See Request.
- Notification - A message used to inform a manager of a transaction that has been submitted or approved/denied.
- Request - A message that requires some type of action to be performed. The action is either to approve or deny a request initiated by an employee or a transaction initiated by a manager on one of their direct reports.
- Transaction Effective Date - The date that the initiating manager or employee requests the transaction to be entered into HHSAS. This may not be the same day the request is approved. If the request is approved after the transaction effective date, this may result in the transaction being processed during the following payroll run, rather than the one originally requested.
- Workflow - A notification or a request for approval that is routed to a manager or department head (or budget authority).
- Workflow Administrator - A shared responsibility between the Service Center and HHS. The Workflow Administrator resolves various workflow issues that may require escalation.
- Workflow Alternate - A manager to whom your workflow notifications and requests are routed for a specific period of time (for example, if you go on leave). In CAPPS your ‘Reports To’ manager is the default workflow alternate and cannot be changed.
- Worklist - A page that keeps track of activities you are responsible for completing or notifications that are sent to you. The worklist is available only for managers. Items on the worklist can include both notifications and approval/denial requests.
|
|
 |
|
|
Workflow Approval Rules |
These workflow items are routed to your worklist based on the workflow approval rules.
- A workflow will always be routed to the next level ‘Reports To’ manager.
- If a position is vacant or if a manager is out of the office and has set a workflow alternate, the workflow will be automatically routed to the next level manager for approval.
- If a manager is out of the office and has not set a workflow alternate, the workflow will be escalated to the next level manager:
- For pay-impacting transactions, the workflow will be escalated after 3 calendar days
- For non-pay impacting transactions, the workflow will be escalated after 5 calendar days
- Once this escalation takes place, the workflow item will leave the initiating manager’s worklist and be transferred to the next level manager’s worklist. The initiating manager will not be able to view this request after it leaves his/her worklist.
- If the workflow is escalated twice as a result of a vacant position or no action being taken on a workflow item, the workflow will be sent to the Workflow Administrator.
Workflow administration is a shared responsibility between the Service Center and HHS. The Workflow Administrator will work to resolve certain workflow issues. For example: The first level approver (manager) is out of the office. So, the workflow is bounced to the next level (manager’s manager). If the next level approver does not approve/deny the transaction in the allotted time (3 or 5 days), then the workflow will be routed to the Workflow Administrator. At this point, the request will have to be re-submitted by the employee and the appropriate ‘Reports To’ positions should be identified.
For all pay-impacting transactions, the workflow will follow the management chain for approval, which includes being routed to the ‘Reports To’ manager and to the Department Head for budgetary approval. The Department Head is the last approver, and is responsible for ensuring the transaction meets the budget guidelines. Once the workflow is approved by the first level approver, the workflow will be sent to the Department Head to approve the request. If the workflow is denied by the first level approver, the Department Head will never receive a workflow.
When submitting transactions that require approval and are routed through workflow, timing is an important consideration. A transaction, regardless of its effective date, is not final until the last approver has approved the transaction via CAPPS. This means it is important to consider the payroll calendar and payroll deadlines when submitting transactions that affect pay. You must account for the time it will take for a workflow to route through the approval chain to the final approver and ensure the approvers have the opportunity to approve the transaction prior to any payroll cut-off dates. |
|
 |
|
|
Accessibility Instructions |
Use your screen reader commands to navigate the elements on the page such as headings and links. |
Introduction |
My Worklist is a page that keeps track of activities you are responsible for completing or notifications that are sent to you. The worklist is available only for managers. Items on the worklist can include both notifications and approval/denial requests. |
Step Actions |
The step actions for completing a transaction are presented in two ways: Text Only and Screen Samples:
- Text Only provides instructions for completing the transaction in order from beginning to end. It does not include screen samples.
- Screen Samples include detailed screen shots to help complete the transaction.
|
Key Terms |
For help with terms used in this User Guide, go to the top of the page. Top of Page |
Accessing My Worklist |
Follow the steps below to access My Worklist.
Steps

- Click the View Your Worklist Items link or Worklist from the left-navigation menu. Your worklist appears.
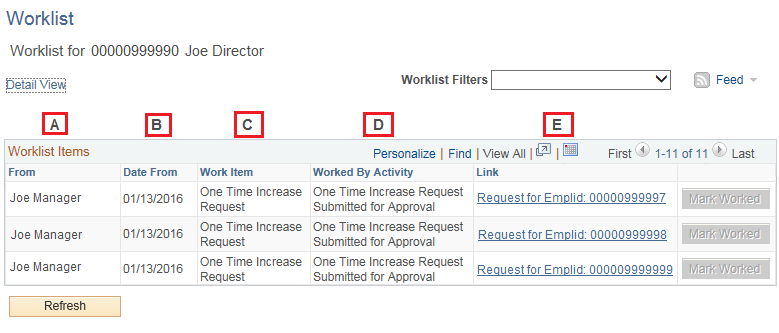
- View all of the action items and notifications that have been sent to your worklist. Any workflow items that have not been completed will be listed within this worklist.
A - The From column indicates the employee or manager that initiated the request or notification.
B - The Date From column indicates when the employee or manager initiated the request or notification.
C - The Work Item column lists what type of transaction is being requested.
D - The Worked By Activity column gives a more descriptive explanation of what is being requested.
E - The Link column will provide the link for you to access the actual workflow item. This link will provide key information about the particular worklist item. Once you are ready to complete the workflow item, click on the link. This will bring you to the workflow item and provide you with the notification information or the action you need to take.
|
|
 |
|
|
Accessibility Instructions |
Use your screen reader commands to navigate the elements on the page such as headings and links. |
Introduction |
When reviewing worklist items you will be able to approve or deny them, or mark them as worked. |
Step Actions |
The step actions for completing a transaction are presented in two ways: Text Only and Screen Samples:
- Text Only provides instructions for completing the transaction in order from beginning to end. It does not include screen samples.
- Screen Samples include detailed screen shots to help complete the transaction.
|
Key Terms |
For help with terms used in this User Guide, go to the top of the page. Top of Page |
Text Only Step Actions for Reviewing Worklist Items |
Follow the steps below to review worklist items.
Steps
- Click the View Your Worklist Items link or Worklist from the left-navigation menu. Your worklist appears.
- Click on the link in the worklist. This will open up the Notification Workflow page or the up the Workflow Request page.
- If the item is a notification, skip to step 5. If the item is a request (action item), it will require action and will have an Approve and a Deny button at the bottom of the page. To complete an action item workflow, you will need to select the appropriate button. The Confirmation message will display.
Helpful Hints:
- Approving: If you are approving a workflow, you have the option to fill out the comments section. However, this section is not required to complete an approval. Once you click the Approve button, if you are the last person to approve the request, then edit checks will run. These edit checks will make sure the request is a valid request. If the request is not valid, then the edits will not allow you to approve the transaction. You will need to click the Deny button to start the request over. If the request is approved and you are the last approver, a notification will be sent back to the manager who initiated the request (this only occurs for manager initiated requests).
- Denying: If you are denying a workflow you will be required to enter details into the Comments field. Once the comments have been entered you will be able to click on the Deny button. If this is a workflow that requires a Department Head’s approval and the interim manager denies the request, this workflow will never be sent to the Department Head. Instead a notification will be sent to the initiator of the request (this only occurs for manager initiated requests) notifying them the request has been denied. The initiating manager will be able to read the comments written by the manager.
- One thing to note about approval/denial requests is the transaction effective date versus the approval date. The transaction effective date is the date that the initiating manager or employee requests the transaction to be entered into HHSAS. This may not be the same day the request is approved. If the request is approved after the transaction effective date, this may result in the transaction being processed during the following payroll run, rather than the one originally requested.
- For approval/denial requests, there is an escalation process to make sure all requests are completed in a timely manner. For any workflow item that is pay-impacting and is escalated to your manager after 3 days, the workflow item will leave your worklist and be transferred to your manager’s worklist. You will not be able to view this request after it leaves your worklist.
- For any workflow item that is non-pay impacting and is escalated to your manager after 5 days, the workflow item will leave your worklist and be transferred to your manager’s worklist. You will not be able to view this request after it leaves your worklist.
- To avoid escalation to the next level use the Deny button. This will require the initiating party to resubmit the request. If an approver’s position is vacant the workflow will escalate automatically up to the approver’s manager.
- Click the OK button.
- When you finish viewing the item or have approved/denied it and no longer need this item in your worklist, you will need to click on the Mark Worked button to the right of the workflow item.
Helpful Hint: This item will remain in your worklist until the Mark Worked button is selected.
|
Reviewing Worklist Items |
Follow the steps below to review worklist items.
Steps

- Click the View Your Worklist Items link or Worklist from the left-navigation menu. Your worklist appears.
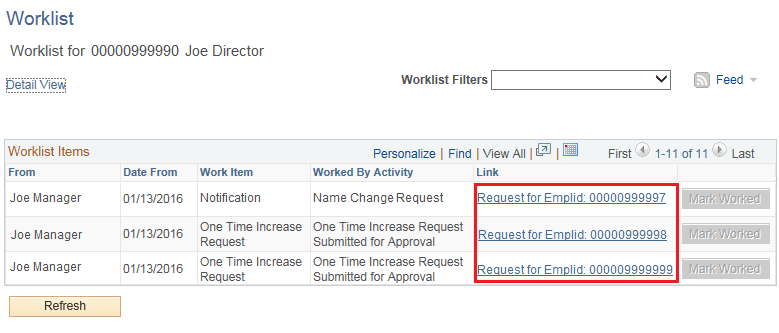
- Click on the link in the worklist. This will open up the Notification Workflow page or the up the Workflow Request page.
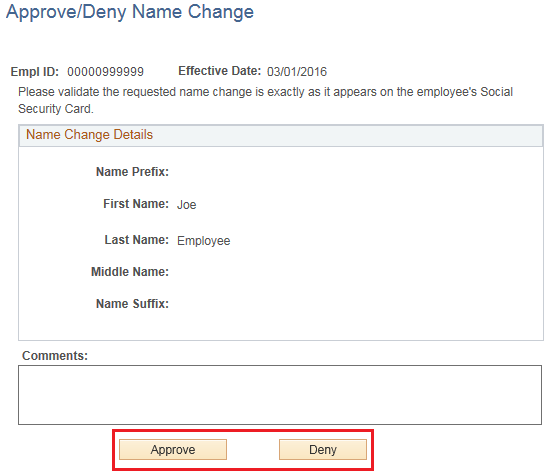
- If the item is a notification, skip to step 5. If the item is a request (action item), it will require action and will have an Approve and a Deny button at the bottom of the page. To complete an action item workflow, you will need to select the appropriate button. The Confirmation message will display.
Helpful Hints:
- Approving: If you are approving a workflow, you have the option to fill out the comments section. However, this section is not required to complete an approval. Once you click the Approve button, if you are the last person to approve the request, then edit checks will run. These edit checks will make sure the request is a valid request. If the request is not valid, then the edits will not allow you to approve the transaction. You will need to click the Deny button to start the request over. If the request is approved and you are the last approver, a notification will be sent back to the manager who initiated the request (this only occurs for manager initiated requests).
- Denying: If you are denying a workflow you will be required to enter details into the Comments field. Once the comments have been entered you will be able to click on the Deny button. If this is a workflow that requires a Department Head’s approval and the interim manager denies the request, this workflow will never be sent to the Department Head. Instead a notification will be sent to the initiator of the request (this only occurs for manager initiated requests) notifying them the request has been denied. The initiating manager will be able to read the comments written by the manager.
- One thing to note about approval/denial requests is the transaction effective date versus the approval date. The transaction effective date is the date that the initiating manager or employee requests the transaction to be entered into HHSAS. This may not be the same day the request is approved. If the request is approved after the transaction effective date, this may result in the transaction being processed during the following payroll run, rather than the one originally requested.
- For approval/denial requests, there is an escalation process to make sure all requests are completed in a timely manner. For any workflow item that is pay-impacting and is escalated to your manager after 3 days, the workflow item will leave your worklist and be transferred to your manager’s worklist. You will not be able to view this request after it leaves your worklist.
- For any workflow item that is non-pay impacting and is escalated to your manager after 5 days, the workflow item will leave your worklist and be transferred to your manager’s worklist. You will not be able to view this request after it leaves your worklist.
- To avoid escalation to the next level use the Deny button. This will require the initiating party to resubmit the request. If an approver’s position is vacant the workflow will escalate automatically up to the approver’s manager.
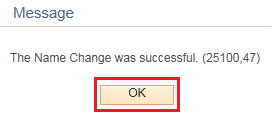
- Click the OK button.
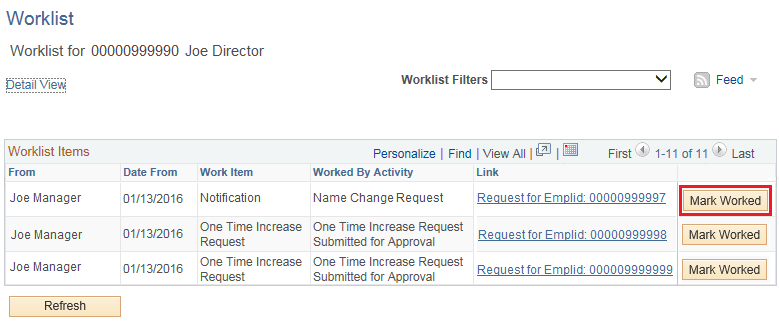
- When you finish viewing the item or have approved/denied it and no longer need this item in your worklist, you will need to click on the Mark Worked button to the right of the workflow item.
Helpful Hint: This item will remain in your worklist until the Mark Worked button is selected.
|
|
 |
|
|
Accessibility Instructions |
Use your screen reader commands to navigate the elements on the page such as headings and links. |
Introduction |
The Designate Workflow Alternate transaction is the process by which you can route a workflow you would normally receive to your ‘Reports To’ manager for a period of time while you are out of the office. Once you save the transaction, the ‘Reports To’ manager receives a workflow notification letting them know they will be receiving your workflow items for the specified time period. During that time period the ‘Reports To’ manager will receive all workflows originally intended for you and will have the ability to approve or deny all transactions as though the workflow had been sent directly to the ‘Reports To’ manager.
Helpful Hint: When you designate an alternate workflow agent within CAPPS, that designation will not affect the Hiring Center (requisitions). In order to move requisitions to an alternate approver, contact the Service Center at 1-888-894-4747. |
Step Actions |
The step actions for completing a transaction are presented in two ways: Text Only and Screen Samples:
- Text Only provides instructions for completing the transaction in order from beginning to end. It does not include screen samples.
- Screen Samples include detailed screen shots to help complete the transaction.
|
Key Terms |
For help with terms used in this User Guide, go to the top of the page. Top of Page |
Text Only Step Actions for Designating a Workflow Alternate |
Follow the steps below to designate a workflow alternate.
Steps
- Select the Manager Self-Servicelink from the left navigation menu.
- Select the Designate Workflow Alternate link. The Designate Workflow Alternate page displays.
- Enter the Effective Date for when the workflow reassignment should begin and the To Date for when the workflow reassignment should end or use the calendar icon to select the date.
Helpful Hints:
- The Reassign Work To field automatically defaults to the manager’s ‘Reports To’ manager and is un-editable. No other employee can be designated as a workflow alternate.
- If the manager’s ‘Reports To’ position is vacant, the next person in the reporting chain will be assigned as the workflow alternate.
- Only new workflow items will be routed to the workflow alternate as of the effective date of the workflow reassignment. As a result, you will need to take care of any workflow items pending in your work list prior to the effective date of the reassignment. The number of Pending Work List Entries is displayed at the bottom of this page.
- Click on the Save button at the bottom of the page to save the transaction. A Save Confirmation page appears.
Helpful Hint: At this point, a workflow notification is sent to your ‘Reports To’ manager, letting them know of the workflow reassignment. Your ‘Reports To’ manager will click the Alternate Workflow link for this worklist item, view the notification to see the timeframe, and click the Mark Worked button to remove the item from his/her worklist.
- Click the OK button to complete the manager’s portion of this process.
|
Designating a Workflow Alternate |
Follow the steps below to designate a workflow alternate.
Steps
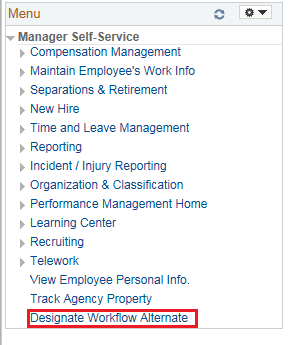
- Select the Manager Self-Servicelink from the left navigation menu.
- Select the Designate Workflow Alternate link. The Designate Workflow Alternate page displays.
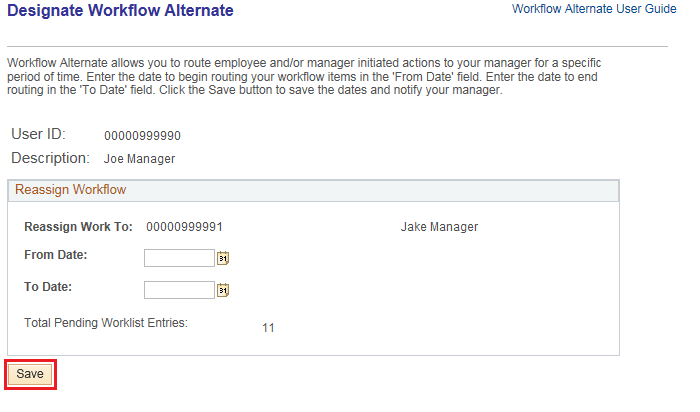
- Enter the Effective Date for when the workflow reassignment should begin and the To Date for when the workflow reassignment should end or use the calendar icon to select the date.
Helpful Hints:
- The Reassign Work To field automatically defaults to the manager’s ‘Reports To’ manager and is un-editable. No other employee can be designated as a workflow alternate.
- If the manager’s ‘Reports To’ position is vacant, the next person in the reporting chain will be assigned as the workflow alternate.
- Only new workflow items will be routed to the workflow alternate as of the effective date of the workflow reassignment. As a result, you will need to take care of any workflow items pending in your work list prior to the effective date of the reassignment. The number of Pending Work List Entries is displayed at the bottom of this page.
- Click on the Save button at the bottom of the page to save the transaction. A Save Confirmation page appears.
Helpful Hint: At this point, a workflow notification is sent to your ‘Reports To’ manager, letting them know of the workflow reassignment. Your ‘Reports To’ manager will click the Alternate Workflow link for this worklist item, view the notification to see the timeframe, and click the Mark Worked button to remove the item from his/her worklist.
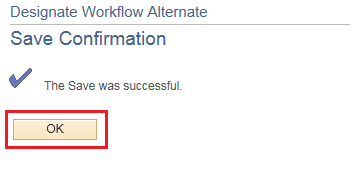
- Click the OK button to complete the manager’s portion of this process.
|
|
 |
|
Key Things to Remember |
Service Center Information:
- The Service Center operates between 7:00 a.m. and 7:00 p.m. Central Time, Monday through Friday. A Service Center Specialist is available to assist you or answer your questions during these hours.
- You may contact the Service Center at 1-888-TX-HHS-HR (1-888-894-4747), or TDD/TTY for the Hearing Impaired 1-866-839-2747.
- You may email your questions directly to the Service Center by selecting Ask Service Center on the CAPPS home page (must be logged in) using the online form to enter and submit your questions.
Reviewing Worlist Items:
- Approving: If you are approving a workflow, you have the option to fill out the comments section. However, this section is not required to complete an approval. Once you click the Approve button, if you are the last person to approve the request, then edit checks will run. These edit checks will make sure the request is a valid request. If the request is not valid, then the edits will not allow you to approve the transaction. You will need to click the Deny button to start the request over. If the request is approved and you are the last approver, a notification will be sent back to the manager who initiated the request (this only occurs for manager initiated requests).
- Denying: If you are denying a workflow you will be required to enter details into the Comments field. Once the comments have been entered you will be able to click on the Deny button. If this is a workflow that requires a Department Head’s approval and the interim manager denies the request, this workflow will never be sent to the Department Head. Instead a notification will be sent to the initiator of the request (this only occurs for manager initiated requests) notifying them the request has been denied. The initiating manager will be able to read the comments written by the manager.
Designating Workflow Alternate:
- Managers can only designate their ‘Reports To’ manager as the workflow alternate; no other employee can be designated as a workflow alternate. If the manager’s ‘Reports To’ position is vacant, the next person in the reporting chain will be assigned as the workflow alternate.
- Only new workflow items will be routed to the workflow alternate as of the effective date of the workflow reassignment. As a result, you will need to take care of any workflow items pending in your work list prior to the effective date of the reassignment. The number of Pending Work List Entries is displayed at the bottom of this page.
- The worklist will contain an item with a description of Assignment of Workflow Alternate.
- The notification displays with information on the timeframe and the manager for whom you, as the manager’s ‘Reports To’ manager, will act as the workflow alternate. Review the notification and be sure to monitor your worklist for these additional items during the timeframe specified.
|