Track Agency Property
|
Accessibility Instructions |
Use your screen reader commands to navigate the elements on the page such as headings and links. |
Overview |
This functionality allows you as a manager to enter information on agency property that is assigned to an employee and to track the property so it can be returned when the employee leaves the agency or no longer has any use for it. You can access the Track Agency Property functionality from the CAPPS home page. |
Step Actions |
The step actions for completing a transaction are presented in two ways: Text Only and Screen Samples:
- Text Only provides instructions for completing the transaction in order from beginning to end. It does not include screen samples.
- Screen Samples include detailed screen shots to help complete the transaction.
|
Transactions Covered in this User Guide |
- Assign Agency Property – Enter information on agency property that is assigned to an employee.
- Return Agency Property – Track agency property so it can be returned when the employee leaves the agency or no longer has any use for it
- Key Things to Remember – Contact information and a summary of important things to help you with Track Agency Property activities.
|
Key Terms |
For a complete glossary of terms, click here: CAPPS Glossary |
|
|
Accessibility Instructions |
Use your screen reader commands to navigate the elements on the page such as headings and links. |
Introduction |
This functionality allows you as a manager to enter information on agency property that is assigned to an employee.
|
Step Actions |
The step actions for completing a transaction are presented in two ways: Text Only and Screen Samples:
- Text Only provides instructions for completing the transaction in order from beginning to end. It does not include screen samples.
- Screen Samples include detailed screen shots to help complete the transaction.
|
Key Terms |
For a complete glossary of terms, click here: CAPPS Glossary |
Text Only Step Actions for Assigning Agency Property |
Follow the steps below to assign agency property.
Steps
- Select the Manager Self-Service link from the left navigation.
- Click the Track Agency Property link. The Select Employee page is displayed.
- Select the employee to which property is to be assigned.
Helpful Hint: Leave the Transaction Effective Date field as the current date. The transaction effective date for this transaction will not have an effect on when the information is processed. The information will be entered into the system as soon as the save button is pushed.
- Enter the type of property into the *Property field by clicking the look up icon located next to the *Property field. The *Property field is a required field. When you click the search icon, the Lookup Property page displays with a list of property types and descriptions.
- Either select the property type from the list of search results by clicking the appropriate link for the type of property (e.g., LAPTOP); or use the Search By options of Property Code, Description, or Property Type.
- After you make a selection, the property type and description pre-populates in the *Property and Description fields on the Agency Property page. If you select Other as the property type, provide a description of the agency property.
- You can also enter additional information, including the Issue Date and the Serial Number for the property assigned.
- Once you have entered all necessary information, click the Save button.
Helpful Hint: To assign additional agency property to the employee, click the Add Row icon that looks like a plus sign. To delete a piece of agency property, click on the Delete Row icon that looks like a minus sign.
|
Assigning Agency Property |
Follow the steps below to assign agency property.
Steps
- Select the Manager Self-Service link from the left navigation.
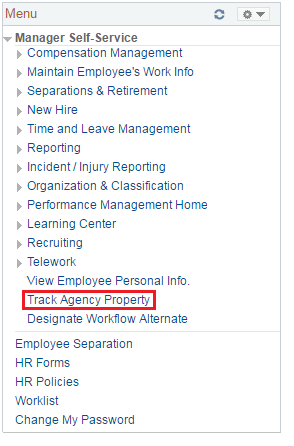
- Click the Track Agency Property link. The Select Employee page is displayed.
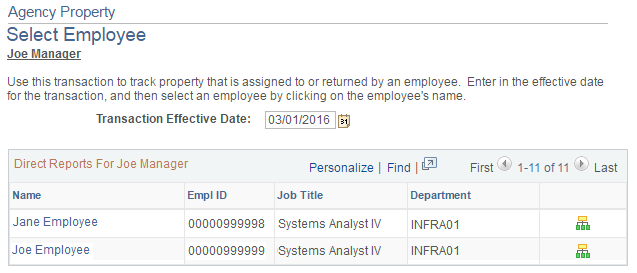
- Select the employee to which property is to be assigned.
Helpful Hint: Leave the Transaction Effective Date field as the current date. The transaction effective date for this transaction will not have an effect on when the information is processed. The information will be entered into the system as soon as the save button is pushed.
-
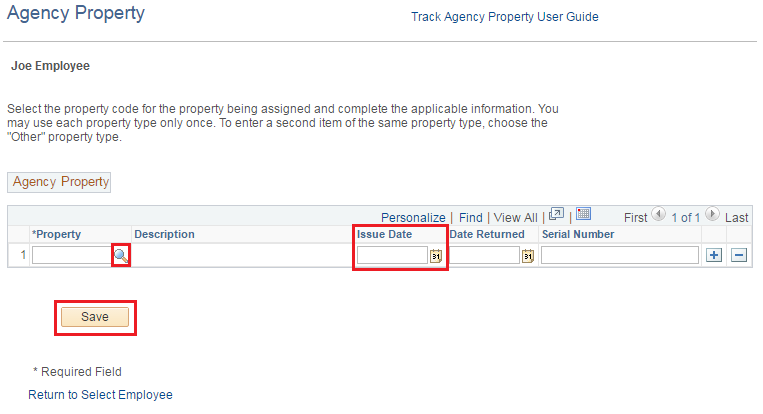
Enter the type of property into the *Property field by clicking the look up icon located next to the *Property field. The *Property field is a required field. When you click the search icon, the Lookup Property page displays with a list of property types and descriptions.
- Either select the property type from the list of search results by clicking the appropriate link for the type of property (e.g., LAPTOP); or use the Search By options of Property Code, Description, or Property Type.
- After you make a selection, the property type and description pre-populates in the *Property and Description fields on the Agency Property page. If you select Other as the property type, provide a description of the agency property.
- You can also enter additional information, including the Issue Date and the Serial Number for the property assigned.
- Once you have entered all necessary information, click the Save button.
Helpful Hint: To assign additional agency property to the employee, click the Add Row icon that looks like a plus sign. To delete a piece of agency property, click on the Delete Row icon that looks like a minus sign.
|
 |
|
|
Accessibility Instructions |
Use your screen reader commands to navigate the elements on the page such as headings and links. |
Introduction |
This functionality allows you as a manager to track agency property so it can be returned when the employee leaves the agency or no longer has any use for it.
|
Step Actions |
The step actions for completing a transaction are presented in two ways: Text Only and Screen Samples:
- Text Only provides instructions for completing the transaction in order from beginning to end. It does not include screen samples.
- Screen Samples include detailed screen shots to help complete the transaction.
|
Key Terms |
For a complete glossary of terms, click here: CAPPS Glossary |
Text Only Step Actions for Returning Agency Property |
Follow the steps below to return agency property.
Steps
- Select the Manager Self-Service link from the left navigation.
- Click the Track Agency Property link. The Select Employee page is displayed.
- Select the employee returning property.
Helpful Hint: Leave the Transaction Effective Date field as the current date. The transaction effective date for this transaction will not have an effect on when the information is processed. The information will be entered into the system as soon as the save button is pushed.
- Find the agency property that the employee is returning and enter the date returned in the Date Returned field, or click the Calendar icon to search for the date.
Helpful Hint: The Date Returned field is only to be completed after the agency property is returned by the employee.
- Click the Save button.
|
Returning Agency Property |
Follow the steps below to assign agency property.
Steps
- Select the Manager Self-Service link from the left navigation.
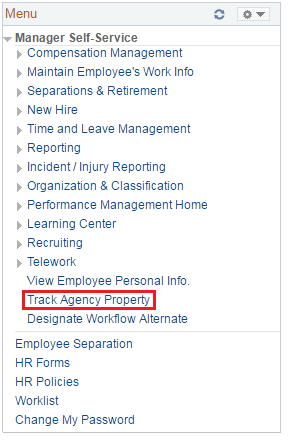
- Click the Track Agency Property link. The Select Employee page is displayed.
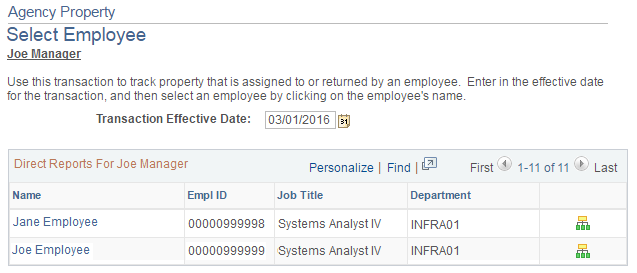
- Select the employee returning property.
Helpful Hint: Leave the Transaction Effective Date field as the current date. The transaction effective date for this transaction will not have an effect on when the information is processed. The information will be entered into the system as soon as the save button is pushed.
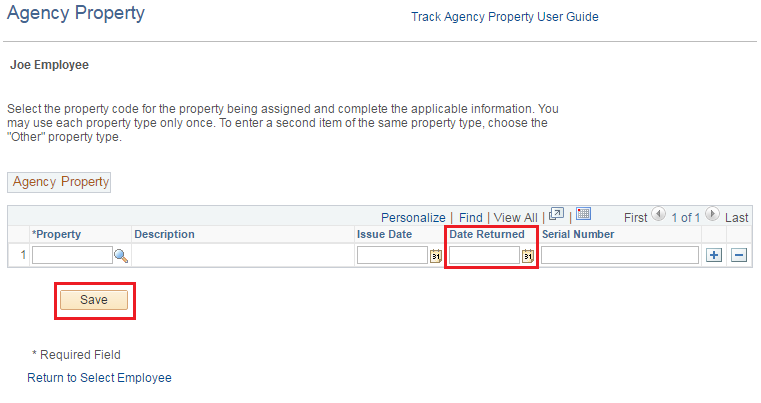
- Find the agency property that the employee is returning and enter the date returned in the Date Returned field, or click the Calendar icon to search for the date.
Helpful Hint: The Date Returned field is only to be completed after the agency property is returned by the employee.
- Click the Save button.
|

|
|
|
|
Key Things to Remember |
Service Center Information:
- The Service Center operates between 7:00 a.m. and 7:00 p.m. Central Time, Monday through Friday. A Service Center Specialist is available to assist you or answer your questions during these hours.
- You may contact the Service Center at 1-888-TX-HHS-HR (1-888-894-4747) or TDD/TTY for the Hearing Impaired 1-866-839-2747.
- You may email your questions directly to the Service Center by selecting Ask Service Center on the CAPPS home page (must be logged in) using the online form to enter and submit your question
|
|
 |