Time and Leave |
Accessibility Instructions |
Use your screen reader commands to navigate the elements on the page such as headings and links. |
Overview |
You have the ability to enter and edit time and leave transactions on behalf of your employees, including leave requests, requests to entering hours worked over their scheduled hours, and requests for payments for FLSA overtime or comptime (if eligible). You can also view employees’ leave balances, view employees’ scheduled workdays, and perform work schedule overrides.To do so, you must know how to use the CAPPS website and the My Time and Leave feature to view and update such information. |
Step Actions |
The step actions for completing a transaction are presented in two ways: Text Only and Screen Samples:
- Text Only provides instructions for completing the transaction in order from beginning to end. It does not include screen samples.
- Screen Samples include detailed screen shots to help complete the transaction.
|
Transactions Covered in This User Guide |
-
View and Edit Employee Timesheets The Manager Timesheet page allows you to enter and edit time and leave transactions on behalf of your employees, view employees’ leave balances, view employees’ scheduled workdays, and perform work schedule overrides.
-
Approve Time by Group The Summary Approval page allows you to approve your employees’ leave requests; approve or deny variations from employee’s work schedules; approve or deny employees’ requests to pay FLSA overtime, regular comptime, and/or holiday comptime; enter or change the FLSA overtime, regular comptime, or holiday comptime for payment; and link to employees’ timesheets.
-
Approve Time by Employee The Manager Timesheet page allows you to approve your employees’ time and leave transactions, including leave requests and requests to work FLSA overtime or comptime.
-
Certify Time for Employees The Manager Timesheet page allows you to certify time on behalf of your employees.
-
View Payable Time Summary – The View Payable Time Summary page provides HHS managers with a weekly view of their employees’ payable time. Managers access their employees’ payable time summary when they want to view how an employee’s hours were allocated for a specific time period.
-
Work Schedule Override – FLEXS entries and the Override Scheduled Workday page allows you to temporarily change your employees’ work schedules.
-
Submit Paid Overtime for Employees – The Request Payment of Hours section of the Manager Timesheet page allows you to submit paid overtime hours for employees.
-
View and Edit Time and Leave Setup The View/Edit Time & Leave Setup page allows you to view and modify time and leave setup data for your employees. You can modify your employees’ intermittent shift differential setup; you can also assign a new work schedule within seven days of an employee’s hire date.
-
Change Work Schedule – The View/Edit Time & Leave Setup page allows you to permanently change an employee’s work schedule within seven days of the employee’s hiring.
-
Manage Exceptions The Manage Exceptions page displays any inconsistencies between the time an employee enters and what the system is expecting.
-
Time and Leave Management Reports Time and leave management reports may assist you with managing exceptions, give you information regarding your direct reports’ leave balances or leave activity, and help identify eligibility for FMLA.
-
Key Things to Remember – Contact information and a summary of important things to help you with Time and Leave activities.
|
Key Terms |
For a complete glossary of terms, click here: CAPPS Glossary
-
Direct Reports Used interchangeably with reference to the employees a manager supervises.
-
Effective Date See Transaction Effective Date.
-
Fiscal Year The financial year of Health and Human Services (HHS). The fiscal year starts on September 1st and ends on August 31st.
-
HR Policies A link from the left-hand navigation found on the CAPPS homepage where employees can access the on-line Human Resources policies library.
-
Indirect Reports Employees that directly report to your direct reports.
-
Labor Account Code A 22-digit code signifying the agency, program code, department ID, department fund, program cost account, and comptroller fund.
-
Labor Distribution Amount An actual labor cost associated with reported time.
-
Manager A role assigned to an employee who has other employees reporting to them.
-
Payable Time Time generated by the system either in advance from schedules or during the course of the pay period from approved time entries.
-
Reports To Position A position that is directly above the employee’s position in the organizational structure. This position is often identified as the employee’s direct supervisor. The “reports to” position is used to route workflows up the management chain.
-
Taskgroup Represents a group of employees with similar time and task reporting requirements.
-
Time and Leave Management A link from the left navigation found on the CAPPS homepage where managers can view or perform time and leave transactions for their employees.
-
Time Reporter An employee that is set up in the Time and Leave system.
-
Time Reporting Code (TRC) A convention used to track hours on the job, vacation, sick time, or any other type of time tracked by HHS.
-
Transaction Effective Date The date that an employee or manager requests that a transaction take effect. This may not be the same date that the transaction is approved, if approval for the transaction is required. Therefore, the actual date when a transaction becomes effective may be based upon when it is approved.
-
TRC See Time Reporting Code.
-
Workflow Alternate A manager to whom your workflow notifications and requests are routed for a specific period of time (for example, if you go on leave). In CAPPS your “reports to” manager is the default workflow alternate and cannot be changed.
-
Workgroup Represents a group of time reporters who share identical compensation requirements.
-
Worklist A page that displays manager notifications and requests that managers are responsible for approving or denying.
|
|
 |
|
|
Accessibility Instructions |
Use your screen reader commands to navigate the elements on the page such as headings and links. |
Introduction |
The Manager Timesheet page provides managers with a 31-day view of their employees’ timesheets. Managers can use the page to enter and edit time and leave transactions on behalf of their employees (including leave requests, requests to work FLSA overtime or comptime, and requests for payments for FLSA overtime or comptime), view employees’ leave balances, view employees’ scheduled workdays, and perform work schedule overrides.
The majority of HHS employees are exception time reporters. They have an assigned schedule in HHSAS HRMS. Exception employees enter time in their timesheet when they request to take leave or request to work FLSA overtime or comptime, if eligible.
If your employees are positive time reporters, they must enter their time for each day they work or take paid leave. Positive time reporters do not receive payment for hours if the hours are not reported and approved. |
Step Actions |
The step actions for completing a transaction are presented in two ways: Text Only and Screen Samples:
- Text Only provides instructions for completing the transaction in order from beginning to end. It does not include screen samples.
- Screen Samples include detailed screen shots to help complete the transaction.
|
Key Terms |
For help with terms used in this User Guide, go to the top of the page. Top of Page |
Text Only Step Actions for Viewing and Editing Employees’ Timesheets |
To view and edit employees’ timesheets, follow these steps.
Steps
-
Select the Manager Self-Service link from the left navigation.
-
Select the Time and Leave Management drop-down menu.
-
Click the Manager Timesheet link. The Manager Timesheet Select Employee page opens.
-
The Transaction Effective Date defaults to the first date of the current month. Click an employee’s name to view their timesheet.
Helpful Hint: To view a list of an employee’s direct reports, click on the org chart icon. A list of your indirect reports displays. You may then view, edit, and approve their timesheets as well.
-
To make a time entry for the employee, click the Time Reporting Code (TRC) search icon. The Look Up Time Reporting Code window opens. Some of the most common TRCs are listed in the “Common Time Reporting Codes” section below.
-
Click on a TRC to select it. The TRC appears in the Time Reporting Code field on the timesheet.
-
Enter the hours in the field under the appropriate date.
-
For multiple entries with different TRCs, click the Add a New Line button. Each line should contain only one TRC.
-
If you add a line and decide the additional row is not necessary, click the Delete button located on the right side of the row. The line will be removed.
-
Click the E-Sign & Approve button. Your employee will be notified of your changes by e-mail.
-
A Save Confirmation page displays, letting you know that the save was successful.
-
Click the OK button.
|
Viewing and Editing Employees’ Timesheets |
To view and edit employees’ timesheets, follow these steps.
Steps
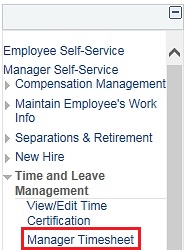
- Select the Manager Self-Service link from the left navigation.
- Select the Time and Leave Management drop-down menu.
- Click the Manager Timesheet link. The Manager Timesheet Select Employee page opens.
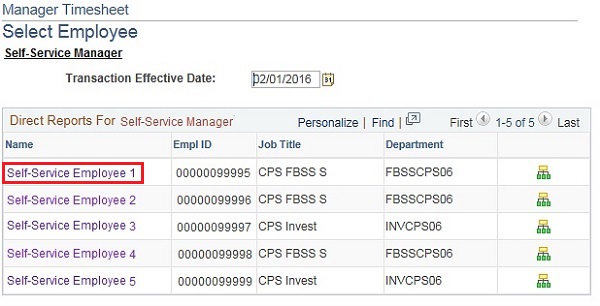
- The Transaction Effective Date defaults to the first date of the current month. Click an employee’s name to view their timesheet.
Helpful Hint:To view a list of an employee’s direct reports, click on the org chart icon. A list of your indirect reports displays. You may then view, edit, and approve their timesheets as well.
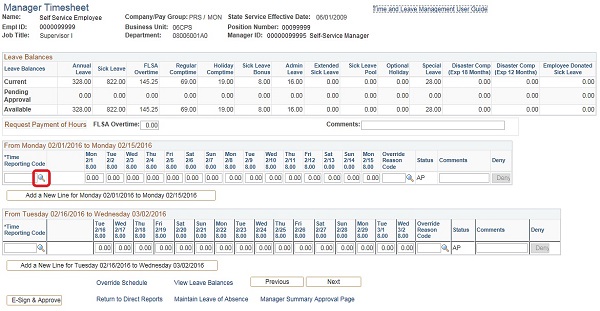
- To make a time entry for the employee, click the Time Reporting Code (TRC) search icon. The Look Up Time Reporting Code window opens. Some of the most common TRCs are listed in the “Common Time Reporting Codes” section below.
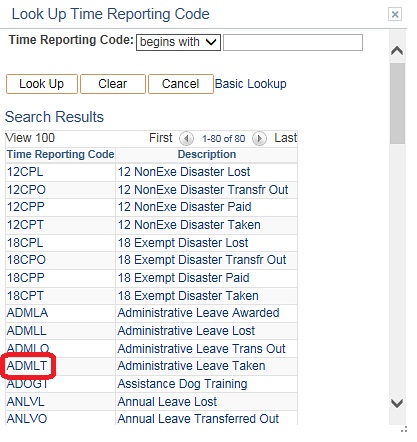
- Click on a TRC to select it. The TRC appears in the Time Reporting Code field on the timesheet.
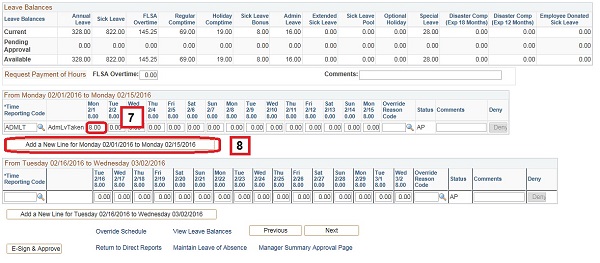
- Enter the hours in the field under the appropriate date.
- For multiple entries with different TRCs, click the Add a New Line button. Each line should contain only one TRC.
- If you add a line and decide the additional row is not necessary, click the Deny button located on the right side of the row. The line will be removed.

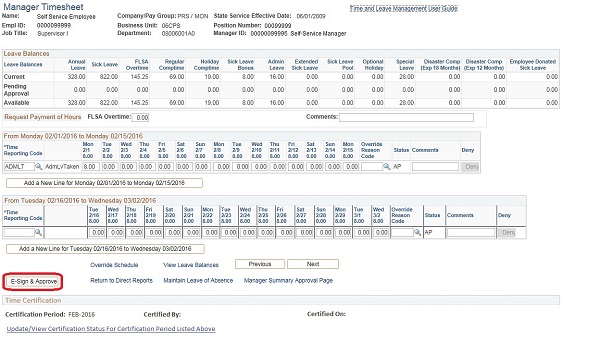
- Click the E-Sign & Approve button. Your employee will be notified of your changes by e-mail.
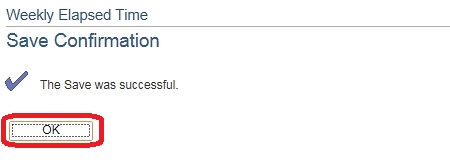
- A Save Confirmation page displays, letting you know that the save was successful.
- Click the OK button.
|
Contents on the Timesheet Page |
The following fields are displayed on the Timesheet page:
-
Name: Employee’s name.
-
Company/Pay Group: Agency and frequency of pay (e.g., monthly, semi-monthly, monthly hourly, semi-monthly hourly).
-
State Service Effective Date: Date that reflects the total combined years of service.
-
Empl ID: Employee’s ID number.
-
Business Unit: Number annotating employee’s work division.
-
Position Number: Employee’s current position number.
-
Job Title: Employee’s job title.
-
Department: Number annotating employee’s work department.
-
Manager ID: Manager’s ID number.
-
Current (Leave Balance): Leave balances resulting from all approved time and leave transactions entered before today and any future-dated approved leave transactions.
-
Pending Approval (Leave Balance): Amount of leave needing manager’s approval.
-
Available (Leave Balance): Leave balances available to take, excluding time and leave transactions pending manager’s approval or future leave transactions pending approval.
-
Annual Leave: One of the leave balances.
-
Sick: One of the leave balances.
-
FLSA Overtime: One of the leave balances (aka banked overtime).
-
Regular Comptime: One of the leave balances (aka compensatory time).
-
Holiday Comptime: One of the leave balances (aka holiday compensatory time).
-
Sick Leave Bonus: One of the leave balances.
-
Admin Leave: One of the leave balances (aka administrative leave).
-
Extended Sick Leave: One of the leave balances.
-
Sick Leave Pool: One of the leave balances.
-
Optional Holiday: One of the leave balances.
-
Special Leave: One of the leave balances
-
Disaster Comp (Exp 18 Months): One of the leave balances.
-
Disaster Comp (Exp 12 Months): One of the leave balances.
-
Employee Donated Sick Leave: One of the leave balances
-
Request Payment of Hours: Employee may request payment of FLSA Overtime, Regular Comptime (Compensatory Time), and/or Holiday Comptime (Holiday Compensatory Time) if eligible.
-
Comments (for Request Payment of Hours): Any additional comments.
-
Time Reporting Code (TRC): A code used to track hours on the job, vacation, sick time, or any other type of time tracked by HHS. TRCs are available on the Time Reporting Code look-up menu.
-
Short Description: A brief description of the TRC, displayed to the right of the TRC.
-
Work Schedule: Display of the employee’s work schedule for the 31-day period.
-
Override Reason Code: A code that states the reason for reported time.
-
ADOPT: For employees associated with "Adoption Promotion Admin," federal grant for DFPS.
-
CASA: For employees associated with "Court Appointed Spec. Advocate" for DFPS.
-
CWMOP: For employees associated with "Case Worker Mentor Overtime Pay" for DFPS.
-
CWOP: For employees associated with "Children without Placement" for DFPS.
-
EBOLA: Ebola Virus Activation
-
FACE: Indicates when an employee has a face-to-face interview.
-
FMLA: Indicates that the employee is on an FMLA-eligible absence from work.
-
MLT22: National Guard to Federal Active Duty SB1737
-
MLTRY: Indicates that the employee has been called to active military service.
-
OVSOM: Office of Violent Sex Offender Management
-
PARNT: Parental Leave
-
SOAR: Season of Adoptive Reg 4/09
-
TELEW: Indicates that the employee participated in tasks associated with Tele-working.
-
TXUAC: Unaccompanied Child Crossing Border
-
UNAUT: Indicates that the supervisor did not give permission for the employee to be absent and that the absence is to be considered as unauthorized.
-
WNSLV: Indicates that the employee is on Wellness Leave (Emergency Leave).
-
Comments (for TRCs): Any additional comments.
-
Deny: A button that allows you to delete a line for the period of dates displayed.
Note: The Deny button displays on the far right side of the screen. Use the bottom scroll bar to move across the screen. (Status Acronyms: Needs Approval [NA], Approved [AP], Deny [DN], and Submitted [SB]).
-
Add a New Line: A button that allows you to add a new line for the period of dates displayed.
-
Override Schedule: Link to Override Scheduled Workday page.
-
View Leave Balances: Link to View Leave Balance/Expirations page.
-
Previous: A button that displays your timesheet for the previous 31 days.
-
Next: A button that displays your timesheet for the following 31 days.
-
E-Sign & Approve: A button that electronically signs and submits your requests.
-
Return to Direct Reports: Link to a page displaying your direct reports.
-
Maintain Leave of Absence: Link to Request/Delete LOA page.
-
Manager Summary Approval Page: Link to Summary Approval page.
-
Time Certification: If you are viewing the timesheet for a month that has ended, this section shows the certification period, certifier, and certification date for the month.
-
Update/View Certification Status for Certification Period Listed Above: If you are viewing the timesheet for a month that has ended, this link allows you to certify your employee’s time for the month.
|
|
 |
_Common Time Reporting Codes |
Common Time Reporting Codes |
-
REGHR: Additional hours on a normal workday or hours worked on a day that you are scheduled to be off
Helpful Hint: Enter the total number of hours to be worked on the specified day (e.g., if you are scheduled to work 8 hours but work 2 hours over your scheduled hours, then you would enter 10 hours of REGHR).
-
REGHW: Hours worked on a holiday
Helpful Hint: If you are scheduled to work 8 hours and the total hours worked is greater than 8 hours, use REGHR to enter the additional hours worked. Example: The total hours worked is 10. Then 8 hours are entered using REGHW, and 2 hours are entered using REGHR. Similarly, if you are a part-time employee and you are scheduled to work 4 hours but work 2 hours over your scheduled hours, then you would enter 4 hours of REGHW and 2 hours of REGHR.
-
ADMLT: Administrative leave
-
ANLVT: Vacation leave
-
COMPT: Compensatory leave
-
FLSAE: Overtime hours banked at 1.5
-
FLSAT: FLSA overtime leave
-
HCMPT: Holiday compensatory leave
-
LWPEO: Leave Without Pay
-
SCKBT: Sick leave bonus
-
SICKT: Sick leave
|
|
 |
|
|
Accessibility Instructions |
Use your screen reader commands to navigate the elements on the page such as headings and links. |
Introduction |
The Summary Approval page provides HHS Managers a way to approve their employees’ leave requests; approve or deny variations from their employees’ work schedules; approve or deny employee requests to be paid for FLSA overtime, regular comptime, and/or holiday comptime; enter or change FLSA overtime, regular comptime, and/or holiday comptime for payment; and link to employee timesheets. |
Step Actions |
The step actions for completing a transaction are presented in two ways: Text Only and Screen Samples:
- Text Only provides instructions for completing the transaction in order from beginning to end. It does not include screen samples.
- Screen Samples include detailed screen shots to help complete the transaction.
|
Key Terms |
For help with terms used in this User Guide, go to the top of the page. Top of Page |
Text Only Step Actions for Approving Time by Group |
To approve time by group, follow these steps.
Steps
-
Select the Manager Self-Service link from the left navigation.
-
Select the Time and Leave Management drop-down menu.
-
Select the Manager Summary Approval Page link. The Summary Approval page displays your direct reports with pending time and leave transactions. If no direct reports are displayed, there are no pending transactions.
-
Approve or deny the requests by clicking the checkboxes in the Approve or Deny columns on the right side of the page. Click the Select All checkbox to approve or deny all the requests listed.
-
Click the E-Sign & Approve button. Your employees will be notified by email that you have approved or denied their requests.
-
A Save Confirmation page displays, letting you know that the save was successful.
-
Click the OK button.
|
Approving Time by Group |
To approve time by group, follow these steps.
Steps
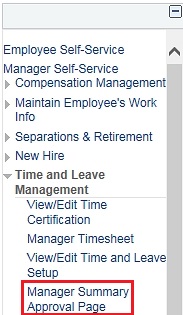
- Select the Manager Self-Service link from the left navigation.
- Select the Time and Leave Management drop-down menu.
- Select the Manager Summary Approval Page link. The Summary Approval page displays your direct reports with pending time and leave transactions. If no direct reports are displayed, there are no pending transactions.

- Approve or deny the requests by clicking the checkboxes in the Approve or Deny columns on the right side of the page. Click the Select All checkbox to approve or deny all the requests listed.

- Click the E-Sign & Approve button. Your employees will be notified by email that you have approved or denied their requests.
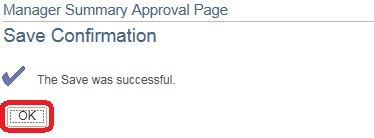
- A Save Confirmation page displays, letting you know that the save was successful.
- Click the OK button.
|
|
 |
|
|
Accessibility Instructions |
Use your screen reader commands to navigate the elements on the page such as headings and links. |
Introduction |
Managers can use the Manager Timesheet page to approve their employees’ time and leave transactions, including leave requests and requests to work FLSA overtime and/or comptime. |
Step Actions |
The step actions for completing a transaction are presented in two ways: Text Only and Screen Samples:
- Text Only provides instructions for completing the transaction in order from beginning to end. It does not include screen samples.
- Screen Samples include detailed screen shots to help complete the transaction.
|
Key Terms |
For help with terms used in this User Guide, go to the top of the page. Top of Page |
Text Only Step Actions for Approving Time by Employee |
To approve time by employee, follow these steps.
Steps
-
Select the Manager Self-Service link from the left navigation.
-
Select the Time and Leave Management drop-down menu.
-
Click the Manager Timesheet link. The Manager Timesheet Select Employee page opens.
-
The Transaction Effective Date defaults to the first date of the current month. Click an employee’s name to view their timesheet.
Helpful Hint: To view a list of an employee’s direct reports, click on the org chart icon. A list of your indirect reports displays. You may then view, edit, and approve their timesheets as well.
-
To deny all the entries in a row, click the Deny button to the right of the row.
-
To approve some entries in a row and deny other entries, click the Add a New Line button. Move all the items to be denied into a separate row and click the Deny button.
-
To approve the rest of the timesheet, click the E-Sign & Approve button. Your employee will be notified by email that you have approved the time request.
-
A Save Confirmation page displays, letting you know that the save was successful.
-
Click the OK button.
|
Approving Time by Employee |
To approve time by employee, follow these steps.
Steps
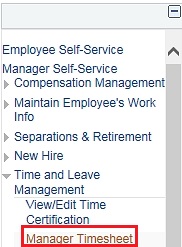
- Select the Manager Self-Service link from the left navigation.
- Select the Time and Leave Management drop-down menu.
- Click the Manager Timesheet link. The Manager Timesheet Select Employee page opens.
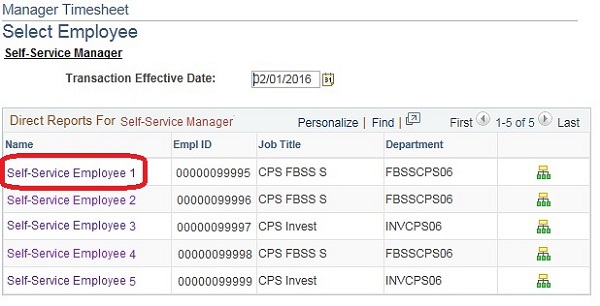
- The Transaction Effective Date defaults to the first date of the current month. Click an employee’s name to view their timesheet.
Helpful Hint: To view a list of an employee’s direct reports, click on the org chart icon. A list of your indirect reports displays. You may then view, edit, and approve their timesheets as well.
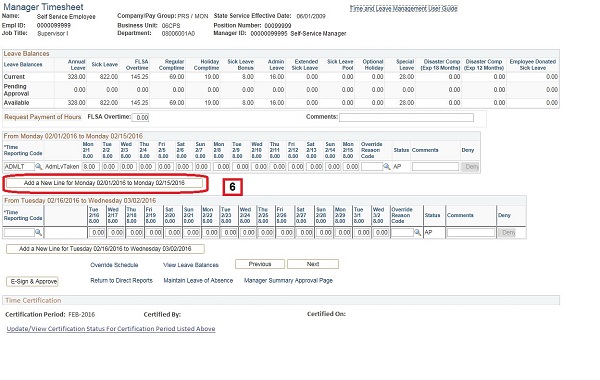
- To deny all the entries in a row, click the Deny button to the right of the row.
- To approve some entries in a row and deny other entries, click the Add a New Line button. Move all the items to be denied into a separate row and click the Deny button.
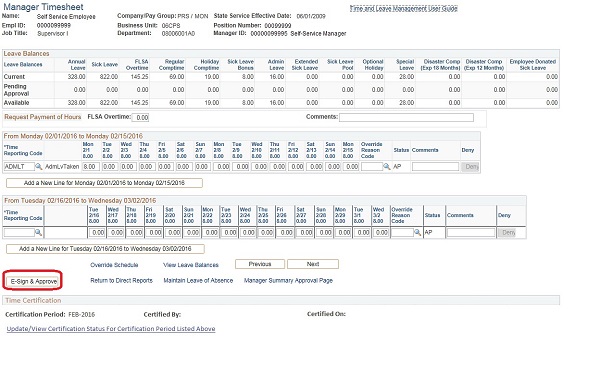
- To approve the rest of the timesheet, click the E-Sign & Approve button. Your employee will be notified by email that you have approved the time request.
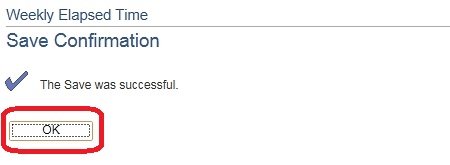
- A Save Confirmation page displays, letting you know that the save was successful.
- Click the OK button.
|
|
 |
|
|
Accessibility Instructions |
Use your screen reader commands to navigate the elements on the page such as headings and links. |
Introduction |
Most Health and Human Services employees are required to certify the accuracy of their timesheet each month. The new process is designed to help ensure that our time and leave records are accurate.
Each month, between the 2nd and 15th, all FLSA-covered (non-exempt) employees who have been in their current position for at least one calendar month will log in to CAPPS to e-sign and certify that, for the previous month, they:
-
Worked their scheduled hours or entered any deviation from scheduled hours.
-
Entered all hours worked over their schedule (for example, if scheduled to work eight hours but worked 10, entered 10 hours of REGHR).
-
Entered all leave taken.
Managers will receive a system generated reminder email on the 10th of each month. Upon receipt of the email, managers should:
-
Run the Certification Report to identify which FLSA non-exempt employees have not certified their time for the previous month.
-
Ensure all time and leave transactions have been entered on the timesheet, and certify on behalf of any direct reports who are out on leave (i.e., FMLA, ESL/SLP).
-
Ensure employees complete their monthly time certification process on the consolidated timesheet in CAPPS.
|
Step Actions |
The step actions for completing a transaction are presented in two ways: Text Only and Screen Samples:
- Text Only provides instructions for completing the transaction in order from beginning to end. It does not include screen samples.
- Screen Samples include detailed screen shots to help complete the transaction.
|
Key Terms |
For help with terms used in this User Guide, go to the top of the page. Top of Page |
Text Only Step Actions for Certifying Time for Employees |
To certify time for an employee, follow these steps.
Steps
-
Select the Manager Self-Service link from the left navigation.
-
Select the Time and Leave Management drop-down menu.
-
Click the View/Edit Time Certification link. The Time Certification Select Employee page opens.
-
Select the employee whose time you would like to certify. The Time Certification Select Time Period page opens.
-
Select the month you would like to certify. (Note: Only periods not certified will appear.) The Time Certification page opens.
-
An authorization statement automatically populates with the employee name, certifying manager name, and manager ID. Click the E-Sign & Certify button to certify on behalf of the employee.
-
A Save Confirmation page displays, letting you know that the save was successful.
-
Click the OK button.
-
Your name and a date/time stamp appear on the bottom of the Time Certification page, confirming certification.
-
The certification period, your name, and a date/time stamp also appear on the bottom of the Manager Timesheet page.
Helpful Hint: The Time Certification report can help you manage the certification process for your direct reports. For more information, see the “Time and Leave Management Reports” section in this guide.
|
Certifying Time for Employees |
To certify time for an employee, follow these steps.
Steps
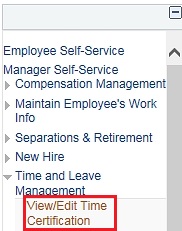
- Select the Manager Self-Service link from the left navigation.
- Select the Time and Leave Management drop-down menu.
- Click the View/Edit Time Certification link. The Time Certification Select Employee page opens.

- Select the employee whose time you would like to certify. The Time Certification Select Time Period page opens.
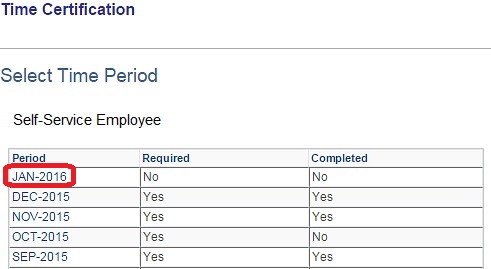
- Select the month you would like to certify.
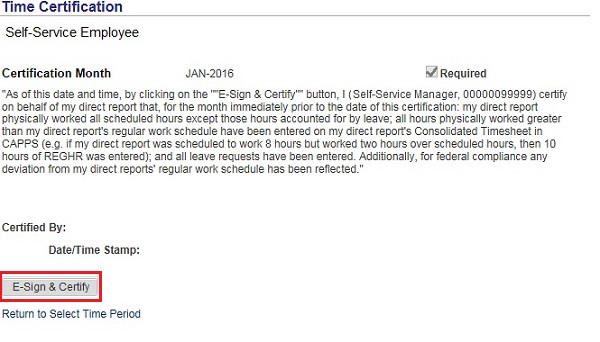
- An authorization statement automatically populates with the employee name, certifying manager name, and manager ID. Click the E-Sign & Certify button to certify on behalf of the employee.
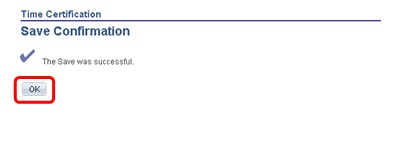
- A Save Confirmation page displays, letting you know that the save was successful.
- Click the OK button.
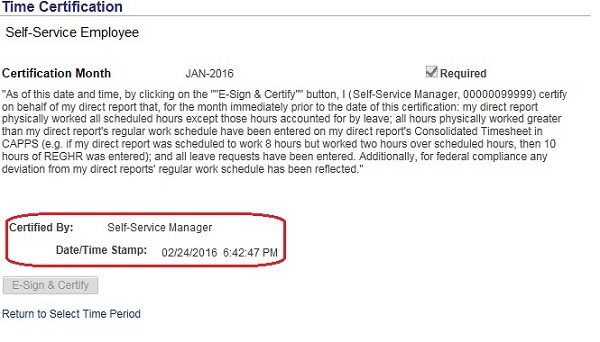
- Your name and a date/time stamp appear on the bottom of the Time Certification page, confirming certification.
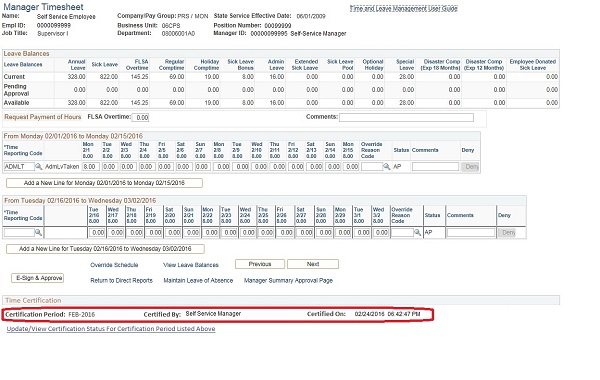
- The certification period, your name, and a date/time stamp also appear on the bottom of the Manager Timesheet page.
Helpful Hint: The Time Certification report can help you manage the certification process for your direct reports. For more information, see the “Time and Leave Management Reports” section in this guide.
|
|
 |
|
Accessibility Instructions |
Use your screen reader commands to navigate the elements on the page such as headings and links. |
Introduction |
The View Payable Time Summary page provides Health and Human Services (HHS) managers with a weekly view of their employees’ payable time. Payable time is generated in advance, from employee work schedules, or during the course of the pay period, from approved time entries. Managers access their employees’ payable time when they want to view how their employees’ hours are recorded and allocated for a specific time period. |
Step Actions |
The step actions for completing a transaction are presented in two ways: Text Only and Screen Samples:
- Text Only provides instructions for completing the transaction in order from beginning to end. It does not include screen samples.
- Screen Samples include detailed screen shots to help complete the transaction.
|
Key Terms |
For help with terms used in this User Guide, go to the top of the page. Top of Page |
Text Only Step Actions for Viewing Payable Time Summary |
Follow the steps below to view an employee’s payable time summary.
Steps
-
From the Main Menu, select the Manager Self-Service link. The Manager Self-Service page opens.
-
Click the Time and Leave Management link. The Time and Leave Management page opens.
-
Click the View Payable Time Summary link. The Select Employee page opens.
-
In the Transaction Effective Date field, enter the first date of the work week you wish to view.
Helpful Hint: The selected date and the following six days will be displayed.
-
Select the employee whose summary you wish to see. The employee’s time and leave for the selected week are displayed.
|
Viewing Payable Time Summary |
Follow the steps below to view an employee’s payable time summary.
Steps
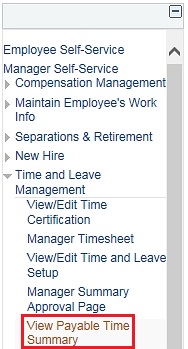
- From the Main Menu, select the Manager Self-Service link. The Manager Self-Service page opens.
- Click the Time and Leave Management link. The Time and Leave Management page opens.
- Click the View Payable Time Summary link. The Select Employee page opens.
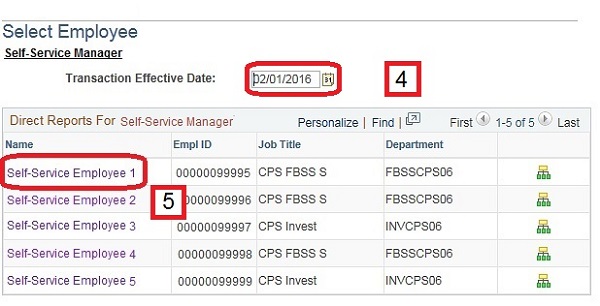
- In the Transaction Effective Date field, enter the first date of the work week you wish to view.
Helpful Hint: The selected date and the work week will be displayed.
- Select the employee whose summary you wish to see. The employee’s time and leave for the selected week are displayed.
|
|
 |
|
Accessibility Instructions |
Use your screen reader commands to navigate the elements on the page such as headings and links. |
Introduction |
The use of the Time Reporting Code (TRC) FLEXS and the Override Scheduled Workday page provides managers with a way to temporarily change their employees’ work schedules. Managers use these two functions when the employee has a set schedule but works different hours for a short period of time. Note: Employees have the ability to enter the FLEXS option with prior management approval. |
Step Actions |
The step actions for completing a transaction are presented in two ways: Text Only and Screen Samples:
- Text Only provides instructions for completing the transaction in order from beginning to end. It does not include screen samples.
- Screen Samples include detailed screen shots to help complete the transaction.
|
Key Terms |
For help with terms used in this User Guide, go to the top of the page. Top of Page |
Text Only Step Actions for Performing a Work Schedule Override |
To use the time reporting code (TRC) FLEXS, follow these steps.
Steps
-
On the first line of the timesheet, select the Time Reporting code REGHR (regular hours worked).
-
On the date of the deviations, enter the number of hours worked. In this example 10 hours on Tuesday, May 5th, 10 hours on Wednesday, May 6th, and 4 hours on Friday, May 8th. Comments should be entered to reflect the need to flex the schedule.
-
Select Add a New Line.
-
On the new line of the timesheet, select the Time Reporting Code FLEXS (flexing schedule).
Note: FLEXS is used to reflect hours taken, not worked.
-
On the date of the deviations, enter the number of hours that are not being worked (flexed out) using FLEXS. (In this example, there are 4 hours not being worked on Friday, May 8th.)
-
Select E-Sign and Submit.
To perform a work schedule override, follow these steps.
Steps
-
Select the Manager Self-Service link from the left navigation.
-
Select the Time and Leave Management drop-down menu.
-
Click the Override Scheduled Workday link. The Override Scheduled Workday Select Employee page opens.
-
In the Transaction Effective Date field, enter any date in the week you wish to view.
-
Click the name of the employee for whom you wish to perform an override. The Override Scheduled Workday page for that employee opens, showing their schedule for the selected work week. Work weeks begin with a Saturday or Sunday.
-
Make changes as needed in the fields below each date.
Helpful Hint: The total hours for the week must be the same as the total hours in the employee’s normal weekly schedule.
-
Click the E-Sign & Approve button. A Save Confirmation page confirms that the change has been made.
-
A Save Confirmation page displays, letting you know that the save was successful.
-
Click the OK button.
|
Performing a Work Schedule Override |
To perform a work schedule override, follow these steps.
Steps
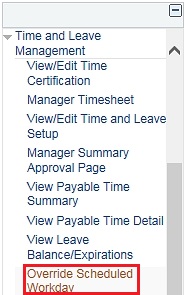
- Select the Manager Self-Service link from the left navigation.
- Select the Time and Leave Management drop-down menu.
- Click the Override Scheduled Workday link. The Override Scheduled Workday Select Employee page opens.
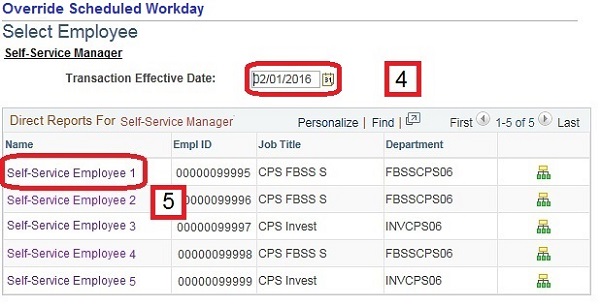
- In the Transaction Effective Date field, enter any date in the week you wish to view.
- Click the name of the employee for whom you wish to perform an override. The Override Scheduled Workday page for that employee opens, showing their schedule for the selected work week. Work weeks begin with a Saturday or Sunday.
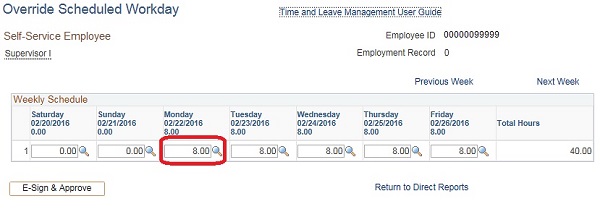
- Make changes as needed in the fields below each date.
Helpful Hint: The total hours for the week must be the same as the total hours in the employee’s normal weekly schedule.
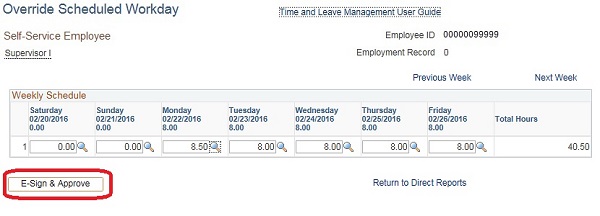
- Click the E-Sign & Approve button. A Save Confirmation page confirms that the change has been made.
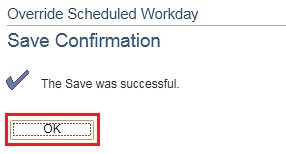
- A Save Confirmation page displays, letting you know that the save was successful.
- Click the OK button.
|
|
 |
|
Accessibility Instructions |
Use your screen reader commands to navigate the elements on the page such as headings and links. |
Introduction |
All requests for FLSA overtime and comptime require manager approval. Employees enter the number of hours requested for payment in the Request Payment of Hours section of the timesheet, and managers approve them as part of the normal timesheet approval process.
Note: The Department of State Health Services (DSHS) and the Department of Aging and Disability Services (DADS) are the only agencies with employees eligible to be paid for regular comptime and holiday comptime for employees who work in critical shortage occupation positions. (Note: Critical shortage occupation positions are identified in the HHS HR Manual.)
In the event of a federal or state declared disaster, for hours worked in support of disaster relief efforts, an employee may earn disaster comptime hours (expires in 18 months for FLSA Exempt employees and expires in 12 months for FLSA Non-Exempt employees), which may be approved for payment if approved by the HHS Executive and Agency Commissioners. |
Step Actions |
The step actions for completing a transaction are presented in two ways: Text Only and Screen Samples:
- Text Only provides instructions for completing the transaction in order from beginning to end. It does not include screen samples.
- Screen Samples include detailed screen shots to help complete the transaction.
|
Key Terms |
For help with terms used in this User Guide, go to the top of the page. Top of Page |
Text Only Step Actions for Submitting Paid Overtime for Employees |
To submit paid overtime for employees, follow these steps.
Steps
-
Select the Manager Self-Service link from the left navigation.
-
Select the Time and Leave Management drop-down menu.
-
Click the Manager Timesheet link. The Manager Timesheet Select Employee page opens.
-
The Transaction Effective Date defaults to the first date of the current month. Click an employee’s name to view their timesheet.
Helpful Hint: To view a list of an employee’s direct reports, click on the org chart icon. A list of your indirect reports displays. You may then view, edit, and approve their timesheets as well.
-
In the Request Payment of Hours section, you can view or enter the number of hours to be paid in the FLSA Overtime, Regular Comptime, and Holiday Comptime fields.
-
Click the E-Sign & Approve button.
Helpful Hint: After you click E-Sign & Approve, the requested hours for payment are moved to the last day of the current month and automatically assigned TRCs: FLSAP for FLSA Overtime, COMPP for Regular Comptime, and HCMPP for Holiday Comptime.
-
A Save Confirmation page displays, letting you know that the save was successful.
-
Click the OK button.
|
Submitting Paid Overtime for Employees |
To submit paid overtime for employees, follow these steps.
Steps
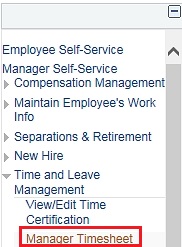
- Select the Manager Self-Service link from the left navigation.
- Select the Time and Leave Management drop-down menu.
- Click the Manager Timesheet link. The Manager Timesheet Select Employee page opens.
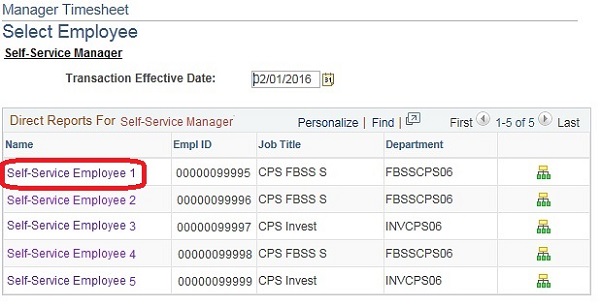
- The Transaction Effective Date defaults to the first date of the current month. Click an employee’s name to view their timesheet.
Helpful Hint: To view a list of an employee’s direct reports, click on the org chart icon. A list of your indirect reports displays. You may then view, edit, and approve their timesheets as well.
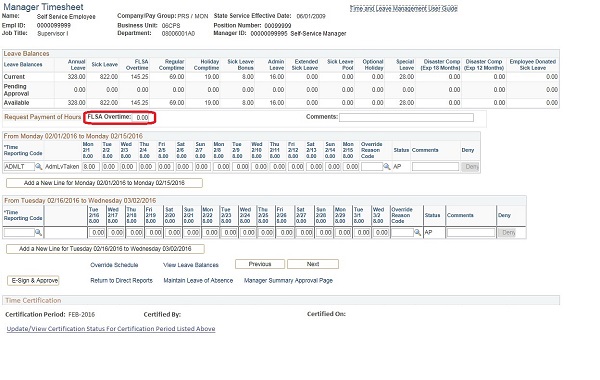
- In the Request Payment of Hours section, you can view or enter the number of hours to be paid in the FLSA Overtime, Regular Comptime, and Holiday Comptime fields.
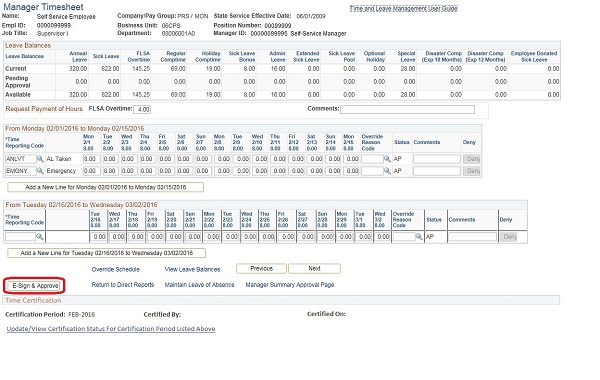
- Click the E-Sign & Approve button.
Helpful Hint: After you click E-Sign & Approve, the requested hours for payment are moved to the last day of the current month and automatically assigned TRCs: FLSAP for FLSA Overtime, COMPP for Regular Comptime, and HCMPP for Holiday Comptime.
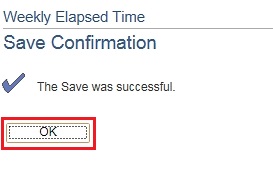
- A Save Confirmation page displays, letting you know that the save was successful.
- Click the OK button.
|
|
 |
|
Accessibility Instructions |
Use your screen reader commands to navigate the elements on the page such as headings and links. |
Introduction |
The View/Edit Time & Leave Setup page allows managers to view and modify time and leave setup data for their employees. Managers can modify the employee’s intermittent shift differential setup; they can also assign a new work schedule within seven days of the employee’employee's hire date or view differential pay rate. |
Step Actions |
The step actions for completing a transaction are presented in two ways: Text Only and Screen Samples:
- Text Only provides instructions for completing the transaction in order from beginning to end. It does not include screen samples.
- Screen Samples include detailed screen shots to help complete the transaction.
|
Key Terms |
For help with terms used in this User Guide, go to the top of the page. Top of Page |
Text Only Step Actions for Viewing and Editing Time and Leave Setup |
To view and edit an employee's time and leave setup, follow these steps.
Steps
-
Select the Manager Self-Service link from the left navigation.
-
Select the Time and Leave Management drop-down menu.
-
Click the View/Edit Time and Leave Setup link. The Select Employee page opens.
-
Click the name of the employee whose work schedule you would like to change. The View/Edit Time & Leave Setup page opens.
-
The Time Reporter Data area is populated automatically and is displayed for validation only. If any changes need to be made to one of these fields, contact the Service Center.
-
The Assign Schedules area can be edited by managers within seven days of an employee’s hire date. See the “Change a Work Schedule” section for more information.
-
To change the intermittent shift differential for an eligible employee, click the Add Intermittent Shift Rate button. The Effective Date, Evening Shift, Night Shift, and Weekend Shift fields become active.
-
Click the E-Sign & Approve button.
-
A Save Confirmation page displays, letting you know that the save was successful.
-
Click the OK button.
|
Viewing and Editing Time and Leave Setup |
To view and edit an employee’s time and leave setup, follow these steps.
Steps
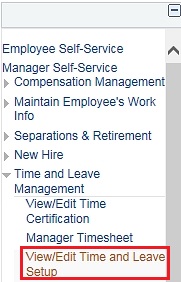
- Select the Manager Self-Service link from the left navigation.
- Select the Time and Leave Management drop-down menu.
- Click the View/Edit Time and Leave Setup link. The Select Employee page opens.
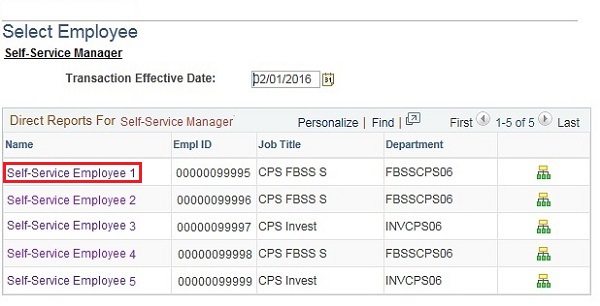
- Click the name of the employee whose work schedule you would like to change. The View/Edit Time & Leave Setup page opens.
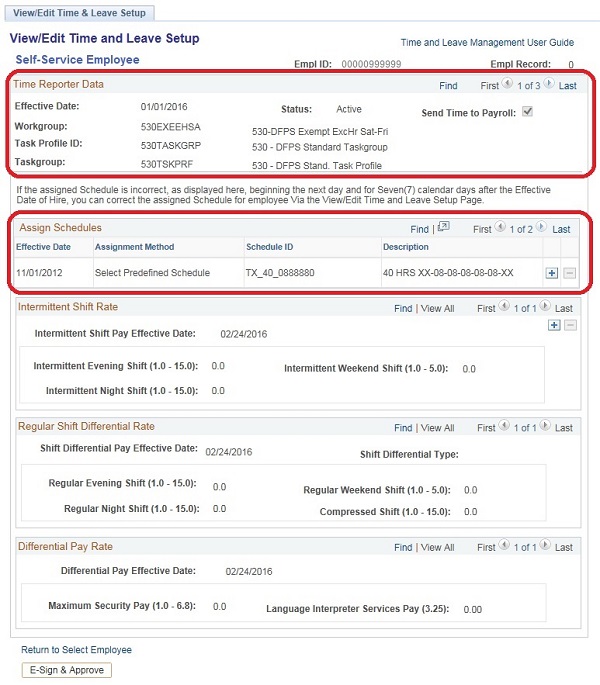
- The Time Reporter Data area is populated automatically and is displayed for validation only. If any changes need to be made to one of these fields, contact the Service Center.
- The Assign Schedules area can be edited by managers within seven days of an employee's hire date. See the “Change a Work Schedule” section for more information.

- To change the intermittent shift differential for an eligible employee, click the Add Intermittent Shift Rate button. The Effective Date, Evening Shift, Night Shift, and Weekend Shift fields become active.
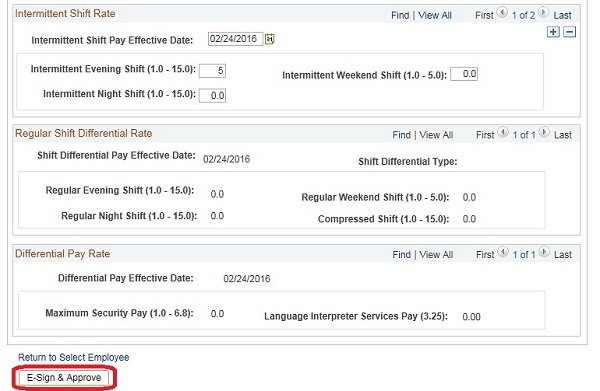
- Click the E-Sign & Approve button.
- A Save Confirmation page displays, letting you know that the save was successful.
- Click the OK button.
|
Contents on the View/Edit Time & Leave Setup Page |
The Time Reporter Data section contains the following fields:
-
Effective Date: The effective date for the change in information.
-
Status: The status is Active by default, and should remain active for current employees.
-
Send Time to Payroll: This checkbox should always be selected for an active time reporter.
-
Workgroup: The workgroup represents a group of time reporters who share identical compensation requirements, such as agency, FLSA status, and FLSA workweek.
-
Task Profile ID: Task profiles define the tasks to which a person’s reported time is allocated automatically.
-
Taskgroup: The taskgroup represents a group of employees with similar time and task reporting requirements, such as employees in the same agency.
The Assign Schedules section contains the following fields:
-
Effective Date: The date the work schedule came into effect.
-
Assignment Method: The default setting is Select Predefined Schedule.
-
Schedule ID: The schedule code consists of a mix of alphanumeric characters. The ID “TX_40_0888880” indicates a 40-hour work week with Saturday and Sunday off.
-
Description: A brief description of the weekly schedule. The description “40 HRS XX-08-08-08-08-08-XX” describes a 40-hour work week with Saturday and Sunday off.
Intermittent Shift Rate: This is used to set up payment for intermittent shift differential for eligible employees.
Regular Shift Differential Rate: This is used to set up payment for regular shift differential for eligible employees.
Differential Pay Rate: This is used to set up payment for maximum security pay and language interpreter services payment for eligible employees. |
|
 |
|
Accessibility Instructions |
Use your screen reader commands to navigate the elements on the page such as headings and links. |
Introduction |
The View/Edit Time & Leave Setup page allows managers to permanently change an employee’s work schedule within seven days of the employee’s hiring. After seven days, only the Service Center can permanently change an employee’s schedule. (To temporarily change an employee’s schedule, managers can use the Work Schedule Override function.) |
Step Actions |
The step actions for completing a transaction are presented in two ways: Text Only and Screen Samples:
- Text Only provides instructions for completing the transaction in order from beginning to end. It does not include screen samples.
- Screen Samples include detailed screen shots to help complete the transaction.
|
Key Terms |
For help with terms used in this User Guide, go to the top of the page. Top of Page |
Text Only Step Actions for Changing a Work Schedule |
To change a work schedule, follow these steps.
Steps
-
Select the Manager Self-Service link from the left navigation.
-
Select the Time and Leave Management drop-down menu.
-
Click the View/Edit Time and Leave Setup link. The Select Employee page opens.
-
Click the name of the employee whose work schedule you would like to change. The View/Edit Time & Leave Setup page opens.
-
Click the Add New Schedule button. The Effective Date and Schedule ID fields become active.
-
Choose a start date for the new schedule in the Effective Date field.
Helpful Hint: This effective date must be the first day of the employee’s FLSA workweek, which will be either Saturday or Sunday.
-
Choose a predefined schedule by clicking the search icon next to the Schedule ID field. The Look Up Schedule ID window opens, allowing you to search or scroll through a list of predefined schedules and their descriptions.
Helpful Hint: The new schedule must have the same number of weekly hours as the employee’s existing schedule.
-
Click the appropriate schedule. It will display in the Schedule ID field, and a description will display in the Description field.
-
Click the E-Sign & Approve button. A Save Confirmation page confirms that the change has been made.
-
A Save Confirmation page displays, letting you know that the save was successful.
-
Click the OK button.
|
Changing a Work Schedule |
To change a work schedule, follow these steps.
Steps
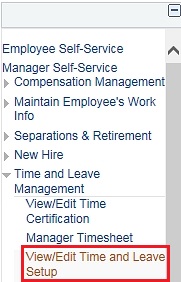
- Select the Manager Self-Service link from the left navigation.
- Select the Time and Leave Management drop-down menu.
- Click the View/Edit Time and Leave Setup link. The Select Employee page opens.
- Click the name of the employee whose work schedule you would like to change. The View/Edit Time & Leave Setup page opens.
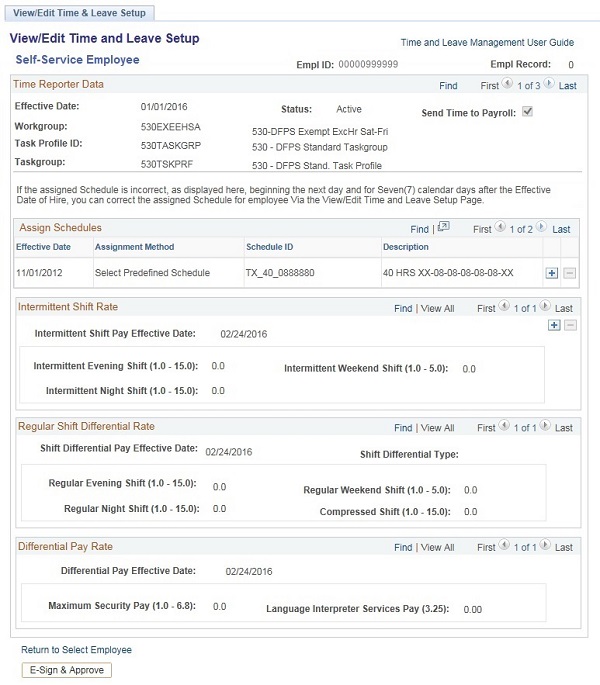
- Click the Add New Schedule button. The Effective Date and Schedule ID fields become active.

- Choose a start date for the new schedule in the Effective Date field.
Helpful Hint: This effective date must be the first day of the employee’s FLSA workweek, which will be either Saturday or Sunday.
- Choose a predefined schedule by clicking the search icon next to the Schedule ID field. The Look Up Schedule ID window opens, allowing you to search or scroll through a list of predefined schedules and their descriptions.
Helpful Hint: The new schedule must have the same number of weekly hours as the employee’s existing schedule.
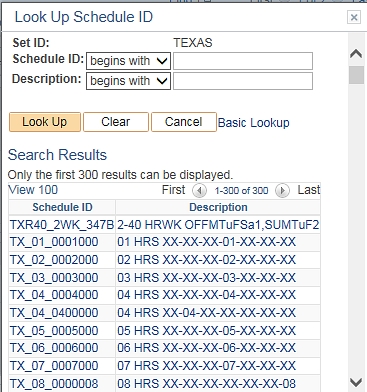
- Click the appropriate schedule. It will display in the Schedule ID field, and a description will display in the Description field.
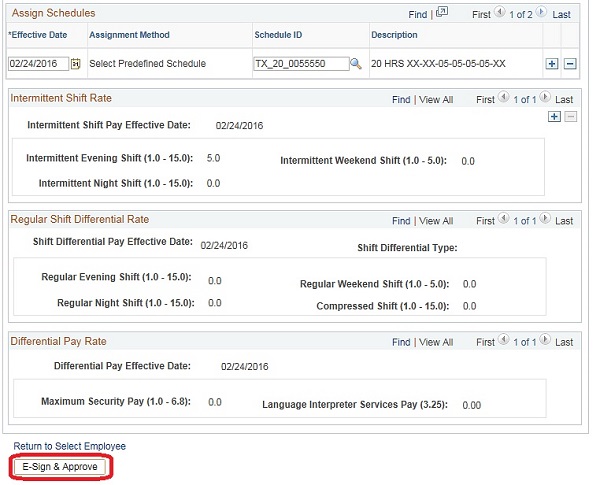
- Click the E-Sign & Approve button. A Save Confirmation page confirms that the change has been made.
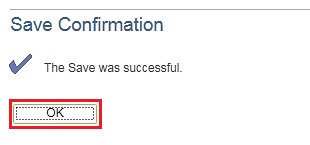
- A Save Confirmation page displays, letting you know that the save was successful.
- Click the OK button.
|
|
 |
|
Accessibility Instructions |
Use your screen reader commands to navigate the elements on the page such as headings and links. |
Introduction |
Exceptions occur when there is an inconsistency between the time an employee enters and what the system is expecting. Many exceptions are prevented by error messages that pop up when a manager tries to approve an employee’s time, prompting the manager to edit the Timesheet page. Managers are responsible for resolving their employees’ exceptions by contacting the Service Center. |
Step Actions |
The step actions for completing a transaction are presented in two ways: Text Only and Screen Samples:
- Text Only provides instructions for completing the transaction in order from beginning to end. It does not include screen samples.
- Screen Samples include detailed screen shots to help complete the transaction.
|
Key Terms |
For help with terms used in this User Guide, go to the top of the page. Top of Page |
Text Only Step Actions for Managing Exceptions |
To manage exceptions, follow these steps.
Steps
-
Select the Manager Self-Service link from the left navigation.
-
Select the Time and Leave Management drop-down menu.
-
Click the Manage Exceptions link. The Select Employees page opens.
-
Select the employees whose exceptions you wish to view by clicking in the checkboxes next to their names.
-
Click Continue.
-
The Manage Exceptions page opens, allowing you to view any exceptions for your direct reports. Click the Details tab to see more information.
Helpful Hint: Exceptions that are resolved do not appear on the Manage Exceptions page once Time Administration is run, which occurs nightly.
|
Managing Exceptions |
To manage exceptions, follow these steps.
Steps
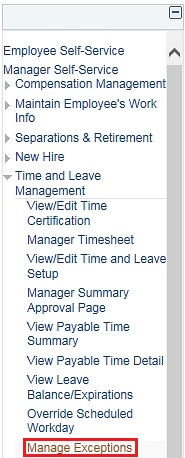
- Select the Manager Self-Service link from the left navigation.
- Select the Time and Leave Management drop-down menu.
- Click the Manage Exceptions link. The Select Employees page opens.
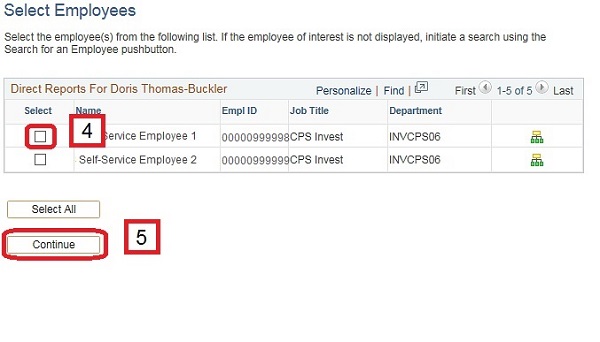
- Select the employees whose exceptions you wish to view by clicking in the checkboxes next to their names.
- Click Continue.
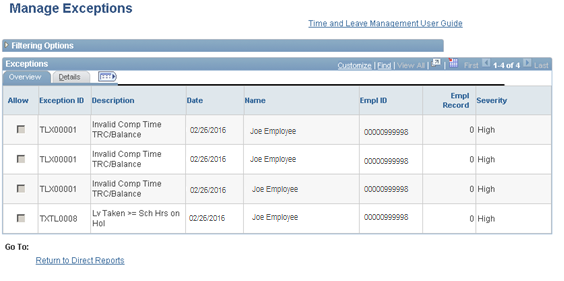
- The Manage Exceptions page opens, allowing you to view any exceptions for your direct reports. Click the Details tab to see more information.
Helpful Hint: Exceptions that are resolved do not appear on the Manage Exceptions page once Time Administration is run, which occurs nightly.
|
|
 |
|
Accessibility Instructions |
Use your screen reader commands to navigate the elements on the page such as headings and links. |
Introduction |
CAPPS enables you, as a manager, to easily produce time and leave management reports related to a specific direct report or all of your direct reports. Time and leave management reports may assist you with managing exceptions, give you information regarding your employees’ leave balances or leave activity, and help identify eligibility for FMLA. |
Step Actions |
The step actions for completing a transaction are presented in two ways: Text Only and Screen Samples:
- Text Only provides instructions for completing the transaction in order from beginning to end. It does not include screen samples.
- Screen Samples include detailed screen shots to help complete the transaction.
|
Key Terms |
For help with terms used in this User Guide, go to the top of the page. Top of Page |
Text Only Step Actions for Time and Leave Management Reports |
To generate time and leave management reports, follow these steps.
Steps
-
Select the Manager Self-Service link from the left navigation.
-
Select the Reporting drop-down menu.
-
Click the Run Reports link. The Reports Home page opens.
-
Click the report you would like to run. The Reports page for that report opens.
-
You will be asked to enter date parameters and, for some reports, to select employees to include.
-
Click the Process Report button.
-
A message confirms that the report has been scheduled. Click the OK button.
-
Click the View Reports button. The report opens.
|
Time and Leave Management Reports |
To generate time and leave management reports, follow these steps.
Steps
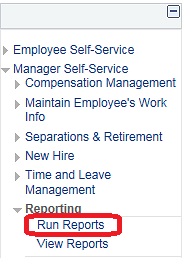
- Select the Manager Self-Service link from the left navigation.
- Select the Reporting drop-down menu.
- Click the Run Reports link. The Reports Home page opens.
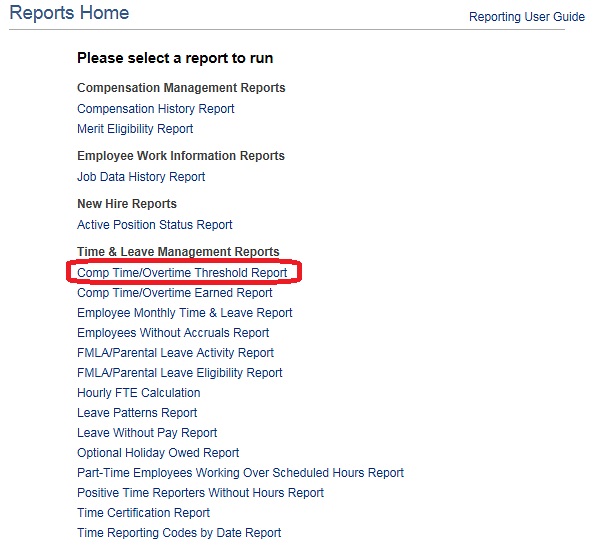
- Click the report you would like to run. The Reports page for that report opens.
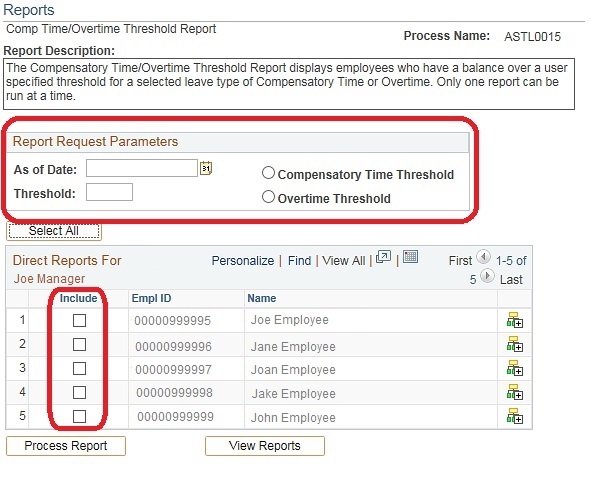
- You will be asked to enter date parameters and, for some reports, to select employees to include.
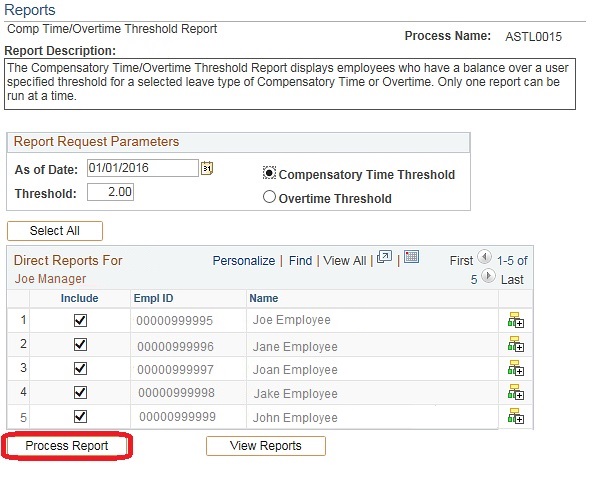
- Click the Process Report button.
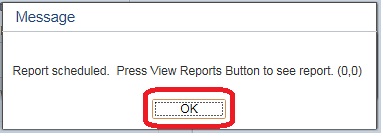
- A message confirms that the report has been scheduled. Click the OK button.
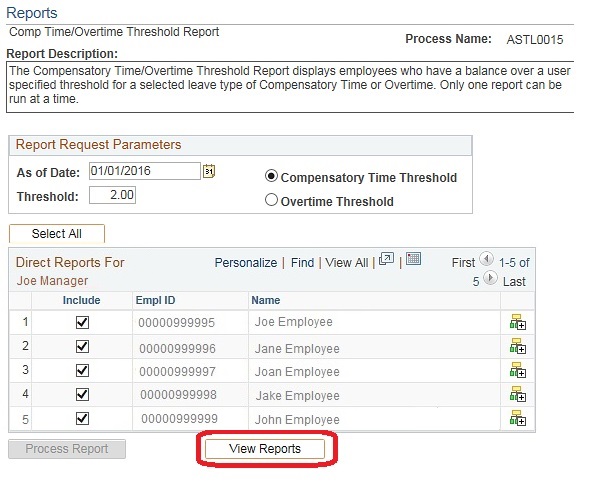
- Click the View Reports button. The report opens.
|
|
 |
|
Time Entry for DSHS Employees |
DSHS employees whose salaries are funded via federal grants have two additional fields that are available to complete on their timesheet (Task and Labor Account Code). Each employee has defaulted Task and related Labor Account Codes. If the employee does not deviate from their defaulted Task and related Labor Account Code, then no timesheet entry is required. However, if an employee deviates from their defaulted Task and Labor Account Code schedule, then time entry is required.
The hours worked by a DSHS employee are allocated to a specific Labor Account Code when a Task is assigned. Normally, hours are allocated to an employee’s default task profile, which consists of at least one labor account code. If your employee is not performing activities identified in his or her default task profile, you or your employee must enter the code that identifies the activity performed by selecting it from the Labor Account Code drop-down list. |
|
 |
|
Documentation
Required for Specific Types of Leave |
If additional documentation is required for the type of leave entered, you will receive a warning message. Your employee will then need to provide the necessary documentation to you.
The following TRCs require additional documentation:
-
ADOGT: Assistance Dog Training
-
DNRBL: Blood Donor
-
DNRBM: Bone Marrow Donor
-
DNROG: Organ Donor
-
EDULV: Education Leave
-
EMGNY: Emergency Leave
-
EMTTR: Volunteer EMT Training
-
ESCKT: Extended Sick Leave
-
FMDTH: Family Death
-
FPRNT: Foster Parent Leave
-
JURYD: Jury Duty
-
MLTRY: Military Leave
-
RDCRS: Red Cross Disaster Service
-
SCKPT: Sick Leave Pool
-
SICKT: Sick Leave Taken (This TRC only requires documentation when the leave requested is greater than three days. Note: A warning message appears when the sick leave request is entered on the third consecutive day to alert you documentation will be required if additional days are requested.)
-
VFFTR: Volunteer Firefighter Training
-
WTNSS: Witness in Official Capacity
|
|
 |
|
Key Things to Remember |
Service Center Information:
-
The Service Center operates between 7:00 a.m. and 7:00 p.m. Central Time, Monday through Friday. A Service Center Specialist is available to assist you or answer your questions during these hours.
-
You may contact the Service Center at 1-888-TX-HHS-HR (1-888-894-4747), or TDD/TTY for the Hearing Impaired 1-866-839-2747.
-
You may email your questions directly to the Service Center by selecting Ask Service Center on the CAPPS home page (must be logged in) using the online form to enter and submit your questions.
View and Edit Employee Timesheets:
-
You can edit your employees’ time 90 days in the past as well as 90 days in the future.
-
Once employees’ time has been approved, you can make changes to it, but they cannot.
-
If your employee is a positive time reporter, they must enter their time for each day they work or take paid leave. These employees do not receive payment if their hours are not reported and approved.
Perform Work Schedule Override:
-
Once you complete an override, the total number of hours in the work schedule must equal the number of hours on the employee’s original work schedule.
-
Remember, multiple overrides may be necessary in the same workweek.
View and Edit Time and Leave Setup:
-
Managers can permanently change an employee’s work schedule within seven days of the employee’s hiring. After seven days, they must contact the Service Center.
-
To temporarily change an employee’s schedule, managers can use the Work Schedule Override function.
-
The Workgroup, Taskgroup, and Task Profile ID fields are defaulted from an employee’s job information. Contact the Service Center if these fields need to be changed.
-
The effective date of a schedule change must be the first work day of the FLSA workweek.
-
The DFPS, DARS, HHSC, and DSHS FLSA workweek begins on Saturday and ends Friday.
-
The DADS and DSHS hospitals FLSA workweek begins on Sunday and ends Saturday.
Manage Exceptions:
-
View the Manage Exceptions link daily.
-
Coordinate changes with employee when changing employee time entries.
-
Unresolved exceptions could cause a delay in certain payments.
-
Once an exception has been logged, an error message will be displayed at the top of that employee’s timesheet, and you will be locked out of the timesheet.
|
|
 |
