My Profile |
Accessibility Instructions |
Use your screen reader commands to navigate the elements on the page such as headings and links. |
Overview |
As an employee, you have the ability to view and maintain your profile information. This includes viewing and updating your personal information such as your personal contact information and emergency contact information, updating your information release indicator, requesting a name change, maintaining your disability status, selecting BRP Leveling, completing and submitting an I-9 form, updating your login password hints, and setting the accessibility flag. |
Step Actions |
The step actions for completing a transaction are presented in two ways: Text Only and Screen Samples:
- Text Only provides instructions for completing the transaction in order from beginning to end. It does not include screen samples.
- Screen Samples include detailed screen shots to help complete the transaction.
|
Transactions Covered in this User Guide |
|
Key Terms |
For a complete glossary of terms, click here: CAPPS Glossary.
- Accessibility Features Off - There is an option for users who want to use accessibility features. The CAPPS system will default to Accessibility Features Off and the user can enable them in Set Accessibility Flag.
- Accessible Layout Mode - This option is designed for visually impaired users who use assistive technology, such as screen readers.
- Benefit Replacement Pay (BRP) - BRP is paid to eligible employees. Under the BRP program, the state pays 5.85 percent of an eligible employee’s gross wages during the pay period for the employee portion of social security tax until the employee’s earnings reach $16,500 in the calendar year.
- Disability - The ADA defines a disability as a physical or mental impairment that substantially limits one or more major life activities.
- Information Release Indicator - The amount of public access to your personal information that you as an employee wish to allow. You can opt to release all information, no information, or restrict access to specific pieces of personal information.
- Leveling (Leveled) BRP - BRP is paid out in equal installments during the calendar year.
- Major Life Activities - Examples include but are not limited to: Walking, hearing, seeing, speaking, breathing, learning or performing manual tasks.
- Non-Leveling (Unleveled) BRP - BRP is paid as wages are earned until an employee has earned $16,500 at which time the BRP stops.
- Standard Layout Mode - This option enables accessibility features for users who need support for visibility impairment, such as those using screen magnifiers, but who do not rely solely on screen readers. This mode provides bold highlighting of page elements to indicate where you are on a page, but it does not alter the page layout or provide full accessibility features for screen readers. For example, this mode does not provide table summaries and column headings for every table column.
|
|
 |
|
|
Accessibility Instructions |
Use your screen reader commands to navigate the elements on the page such as headings and links. |
Introduction |
As an employee, you have the ability to view and maintain your profile information. This includes viewing and updating your personal information such as your personal contact information and emergency contact information, updating your information release indicator, requesting a name change, updating your login password hints, and setting the accessibility flag. The My Personal Information page includes the following information:
- Name (Editable)
- Mailing Address (Editable)
- Phone Numbers (Editable)
- Emergency Contacts (Editable)
- Email Addresses (Add or Delete Only)
- Information Release Indicator (Editable)
- Disability Indicator (Editable)
- Other Personal Information (View Only)
|
Step Actions |
The step actions for completing a transaction are presented in two ways: Text Only and Screen Samples:
- Text Only provides instructions for completing the transaction in order from beginning to end. It does not include screen samples.
- Screen Samples include detailed screen shots to help complete the transaction.
|
Key Terms |
For help with terms used in this User Guide, go to the top of the page. Top of Page |
Text Only Step Actions for Viewing Your Personal Information |
Follow the steps below to locate your Personal Information Summary.
Steps
- Select the Employee Self-Service link from the left navigation.
- Select My Profile from the drop down menu.
- Select the View My Personal Information link. Your Personal Information Summary page is displayed.
- Scroll down to view name, mailing address, phone numbers, emergency contacts, email addresses, information release indicator, disability indicator and employee information.
Helpful Hint: You can view all of your personal information or specific pieces of information. Expand all or collapse all of the Personal Information boxes on the page by selecting either the Expand All or Collapse All links. You can also expand or collapse a single box on the page by clicking the arrow to the left of the box name.
|
Viewing Your Personal Information |
Follow the steps below to locate your Personal Information Summary.
Steps
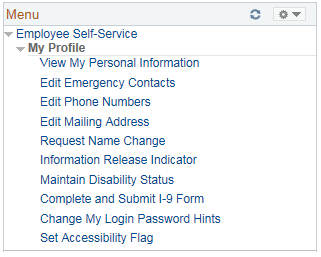
- Select the Employee Self-Service link from the left navigation.
- Select My Profile from the drop down menu.
- Select the View My Personal Information link. Your Personal Information Summary page is displayed.
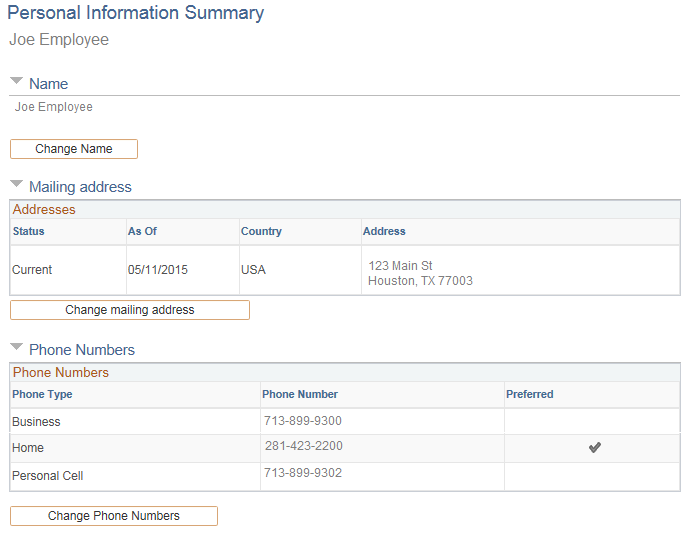
- Scroll down to view name, mailing address, phone numbers, emergency contacts, email addresses, information release indicator, disability indicator and employee information.
Helpful Hint: You can view all of your personal information or specific pieces of information. Expand all or collapse all of the Personal Information boxes on the page by selecting either the Expand All or Collapse All links. You can also expand or collapse a single box on the page by clicking the arrow to the left of the box name.
|
|
 |
|
|
Accessibility Instructions |
Use your screen reader commands to navigate the elements on the page such as headings and links. |
Introduction |
As an employee, you have the ability to add, edit and delete your emergency contacts. |
Step Actions |
The step actions for completing a transaction are presented in two ways: Text Only and Screen Samples:
- Text Only provides instructions for completing the transaction in order from beginning to end. It does not include screen samples.
- Screen Samples include detailed screen shots to help complete the transaction.
|
Key Terms |
For help with terms used in this User Guide, go to the top of the page. Top of Page |
Text Only Step Actions for Adding an Emergency Contact |
Follow the steps below to add an emergency contact.
Steps
- Select the Employee Self-Service link from the left navigation.
- Select the My Profile drop-down menu.
- Select the Edit Emergency Contacts link. The Emergency Contacts page is displayed
- Click Add Emergency Contact button.
- Type in the name of the emergency contact in the *Contact Name field.
- Select the relationship of this contact from the drop-down menu of the *Relationship to Employee field.
Helpful Hints:
- If you check the Contact has the same address as the employee checkbox, you will need to select Home address.
- If you check the Contact has the same telephone number as the employee checkbox, you will need to select which phone type (Home, Business) if you have more than one on file.
- Click the Edit Address button.
- Type in address, city, state, postal code and county. Click the OK button.
- Click the Add Phone Number button.
- Select the type of phone number from the *Phone Type drop-down list. Enter the contact phone number.
- Click the Save button. A Save Confirmation page displays.
- Click the OK button.
|
Adding an Emergency Contact |
Follow the steps below to add an emergency contact.
Steps
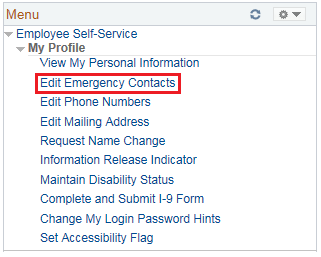
- Select the Employee Self-Service link from the left navigation.
- Select the My Profile drop-down menu.
- Select the Edit Emergency Contacts link. The Emergency Contacts page is displayed.
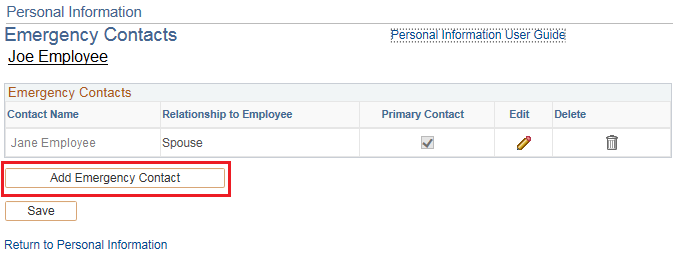
- Click Add Emergency Contact button.
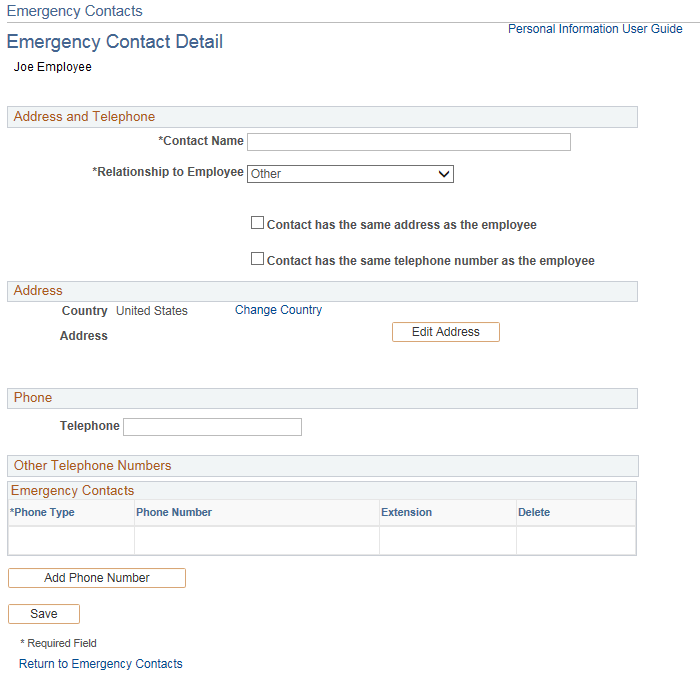
- Type in the name of the emergency contact in the *Contact Name field.
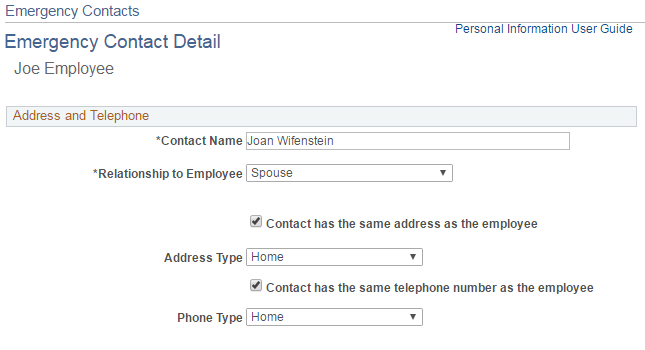
- Select the relationship of this contact from the drop-down menu of the *Relationship to Employee field.
Helpful Hints:
- If you check the Contact has the same address as the employee checkbox, you will need to select Home address.
- If you check the Contact has the same telephone number as the employee checkbox, you will need to select which phone type (Home, Business) if you have more than one on file.
- Click the Edit Address button.
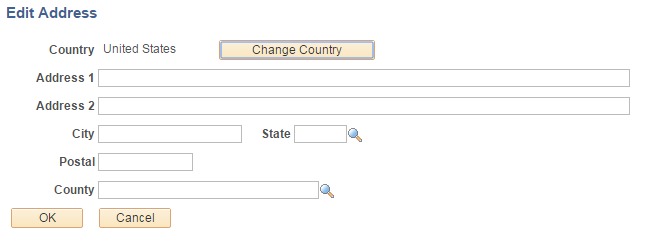
- Type in address, city, state, postal code and county. Click the OK button.
- Click the Add Phone Number button.
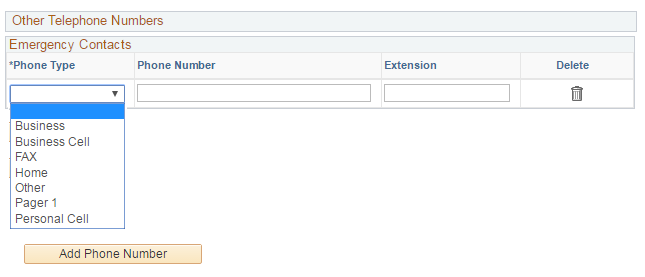
- Select the type of phone number from the *Phone Type drop-down list. Enter the contact phone number.
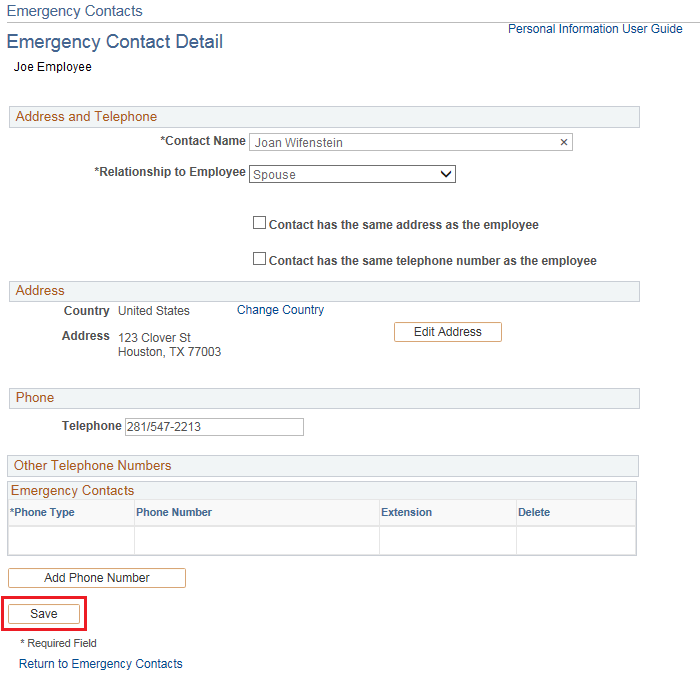
- Click the Save button. A Save Confirmation page displays.

- Click the OK button.
|
|
 |
Text Only Step Actions for Editing an Emergency Contact |
Follow the steps below to edit the details of an emergency contact.
Steps
- Select the Employee Self-Service link from the left navigation.
- Select the My Profile drop-down menu.
- Select the Edit Emergency Contacts link. The Edit Emergency Contacts page is displayed.
- Click the Edit icon next to the contact to be edited.
Helpful Hint: You may change the Primary Contact by clicking the checkbox next to another contact.
- Select a different relationship from the drop-down list in the *Relationship to Employee field.
Helpful Hints:
- If you check the Contact has the same address as the employee checkbox, you will need to select Home address.
- If you check the Contact has the same telephone number as the employee checkbox, you will need to select which phone type (Home, Business) if you have more than one on file.
- Click the Edit Address button.
- Type in address, city, state, postal code and county. Click the Save button.
- Click Add Phone Number to add an additional phone number.
- Select the Phone Type from the drop down menu. Enter the contact phone number.
- Click the Save button. A Save Confirmation page displays letting you know that the save was successful.
- Click the OK button.
|
Editing an Emergency Contact |
Follow the steps below to edit the details of an emergency contact.
Steps
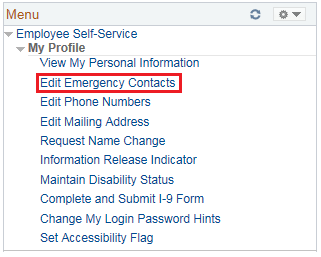
- Select the Employee Self-Service link from the left navigation.
- Select the My Profile drop-down menu.
- Select the Edit Emergency Contacts link. The Edit Emergency Contacts page is displayed.
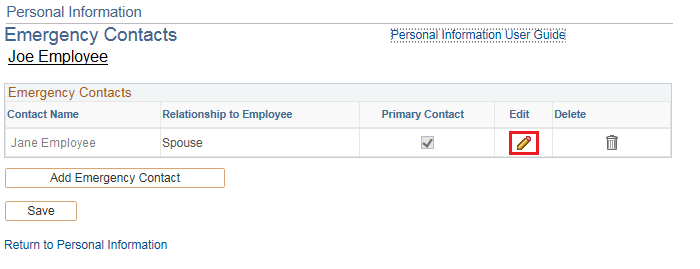
- Click the Edit icon next to the contact to be edited.
Helpful Hint: You may change the Primary Contact by clicking the checkbox next to another contact.
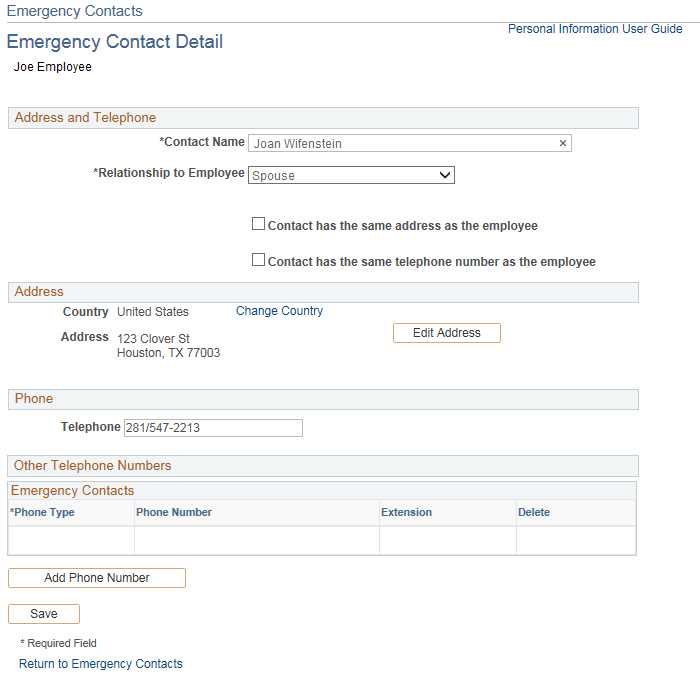
- Select a different relationship from the drop-down list in the *Relationship to Employee field.
Helpful Hints:
- If you check the Contact has the same address as the employee checkbox, you will need to select Home address.
- If you check the Contact has the same telephone number as the employee checkbox, you will need to select which phone type (Home, Business) if you have more than one on file.
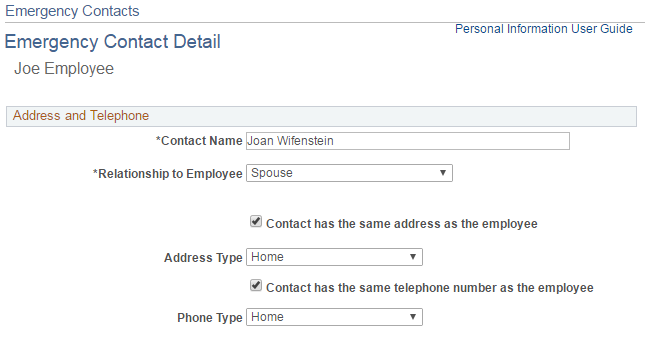
- Click the Edit Address button.
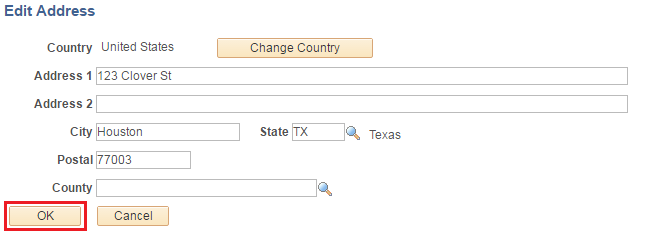
- Type in address, city, state, postal code and county. Click the Save button.
- Click Add Phone Number to add an additional phone number.
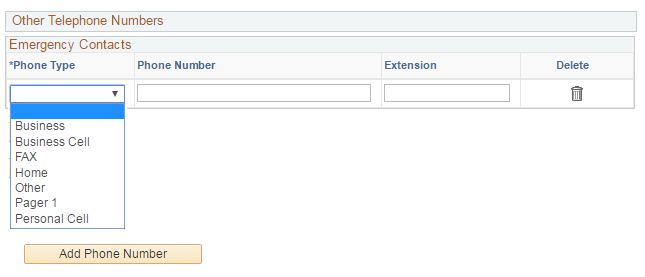
- Select the Phone Type from the drop down menu. Enter the contact phone number.
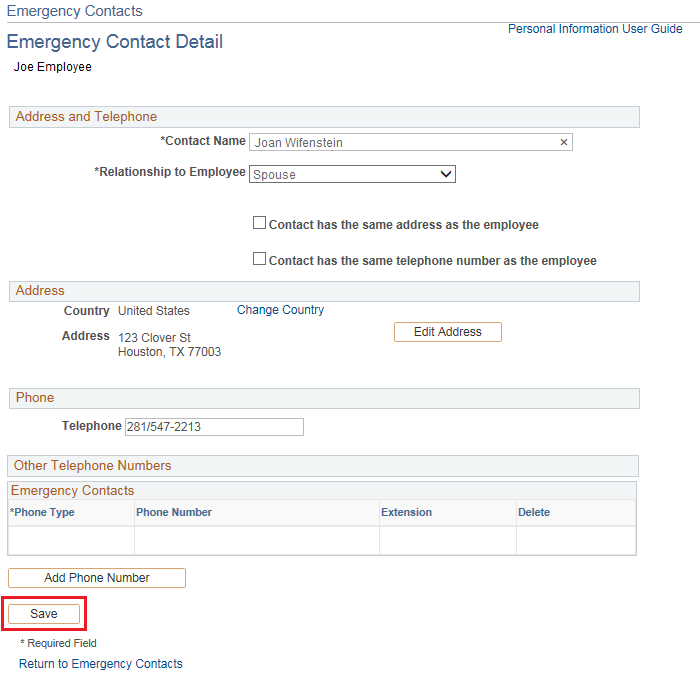
- Click the Save button. A Save Confirmation page displays letting you know that the save was successful.

- Click the OK button.
|
Text Only Step Actions for Deleting an Emergency Contact |
Follow the steps below to delete an emergency contact.
Steps
- Select the Employee Self-Service link from the left navigation.
- Select the My Profile drop-down menu.
- Select the Edit Emergency Contact link. The Emergency Contacts page is displayed.
- Click the Delete icon next to the contact to be deleted.
Helpful Hint: You will receive an error if you try to delete the Primary Contact. You may change the Primary Contact by clicking the checkbox next to another contact.
- On the confirmation screen click Yes - Delete.
Helpful Hint: If you select No – Do Not Delete instead, you will be returned to the Emergency Contacts page.
- Click the Save button. The Save Confirmation page is displayed.
- Click the OK button.
|
Deleting an Emergency Contact |
Follow the steps below to delete an emergency contact.
Steps
- Select the Employee Self-Service link from the left navigation.
- Select the My Profile drop-down menu.
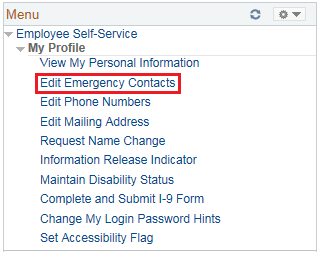
- Select the Edit Emergency Contact link. The Emergency Contacts page is displayed.
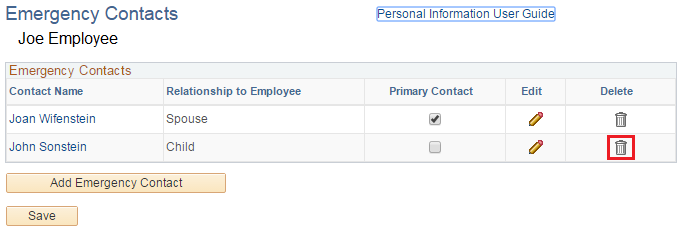
- Click the Delete icon next to the contact to be deleted.
Helpful Hint: You will receive an error if you try to delete the Primary Contact. You may change the Primary Contact by clicking the checkbox next to another contact.

- On the confirmation screen click Yes – Delete.
Helpful Hint: If you select No – Do Not Delete instead, you will be returned to the Emergency Contacts page.

- Click the Save button. The Save Confirmation page is displayed.

- Click the OK button.
|
|
|
Accessibility Instructions |
Use your screen reader commands to navigate the elements on the page such as headings and links. |
Introduction |
As an employee, you have the ability to add, update or delete an existing phone number from your profile. |
Step Actions |
The step actions for completing a transaction are presented in two ways: Text Only and Screen Samples:
- Text Only provides instructions for completing the transaction in order from beginning to end. It does not include screen samples.
- Screen Samples include detailed screen shots to help complete the transaction.
|
Key Terms |
For help with terms used in this User Guide, go to the top of the page. Top of Page |
Text Only Step Actions for Adding a Phone Number |
Follow the steps below to add a phone number.
Steps
- Select the Employee Self-Service link from the left navigation.
- Select the My Profile drop-down menu.
- Select the Edit Phone Numbers link. The Phone Numbers page is displayed.
- Click the Add Phone Number button. A new row is added where your new phone number can be added.
- Select the Phone Type using the drop-down list.
- Enter the telephone number in the *Telephone column.
- Enter the extension in the Extension column, if appropriate.
- If the new phone number is where you prefer to be contacted, click the checkbox in the Preferred column.
- Click the Save button. The Save Confirmation page displays.
- Click the OK button.
|
Adding a Phone Number |
Follow the steps below to add a phone number.
Steps
- Select the Employee Self-Service link from the left navigation.
- Select the My Profile drop-down menu.
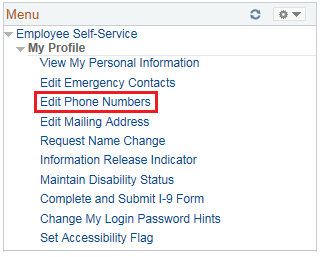
- Select the Edit Phone Numbers link. The Phone Numbers page is displayed.
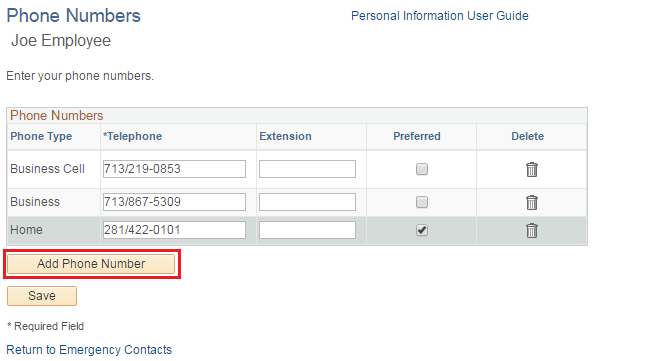
- Click the Add Phone Number button. A new row is added where your new phone number can be added.
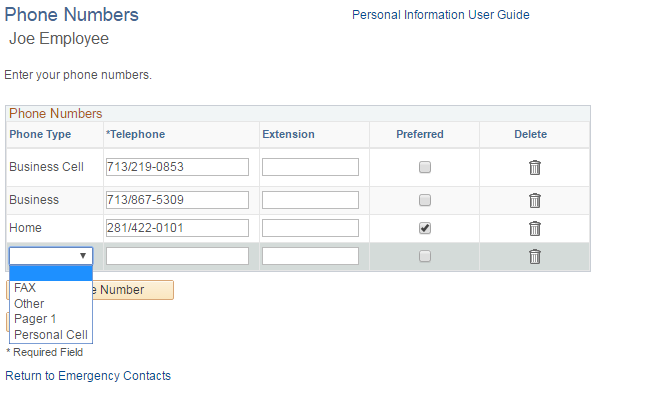
- Select the Phone Type using the drop-down list.
- Enter the telephone number in the *Telephone column.
- Enter the extension in the Extension column, if appropriate.
- If the new phone number is where you prefer to be contacted, click the checkbox in the Preferred column.
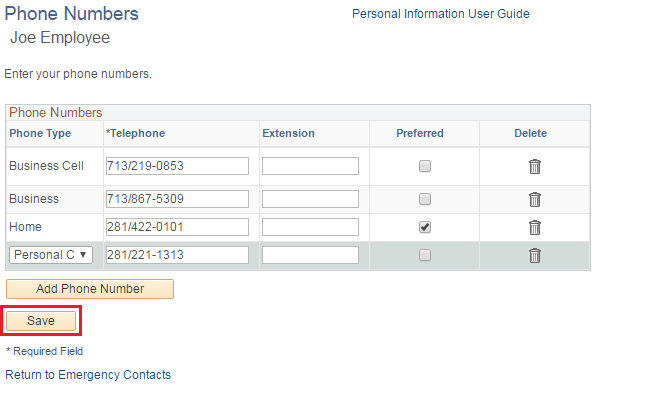
- Click the Save button. The Save Confirmation page displays.

- Click the OK button.
|
|
 |
Text Only Step Actions for Updating a Phone Number |
Follow the steps below to update a phone number.
Steps
- Select the Employee Self-Service link from the left navigation.
- Select the My Profile drop-down menu.
- Select the Edit Phone Numbers link. The Phone Numbers page is displayed.
- To update a phone number modify the number in the *Telephone column, add an extension in the Extension column, or change your preferred contact number in the Preferred column.
- Click the Save button. The Save Confirmation page will display indicating the transaction was successful.
- Click the OK button.
|
Updating a Phone Number |
Follow the steps below to update a phone number.
Steps
- Select the Employee Self-Service link from the left navigation.
- Select the My Profile drop-down menu.
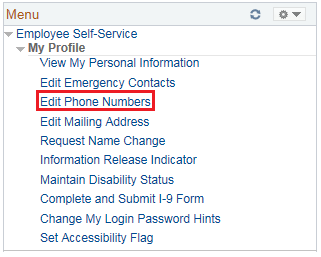
- Select the Edit Phone Numbers link. The Phone Numbers page is displayed.
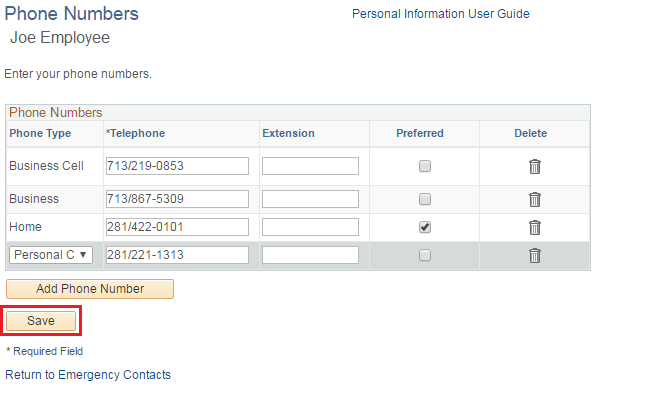
- To update a phone number modify the number in the *Telephone column, add an extension in the Extension column, or change your preferred contact number in the Preferred column.
- Click the Save button. The Save Confirmation page will display indicating the transaction was successful.

- Click the OK button.
|
Text Only Step Actions for Deleting a Phone Number |
Follow the steps below to delete a phone number.
Steps
- Select the Employee Self-Service link from the left navigation.
- Select the My Profile drop-down menu.
- Select the Edit Phone Numbers link. The Phone Numbers page is displayed.
- To delete a phone number click the Delete icon next to the phone number you wish to delete.
Helpful Hint: If there is no business phone you can add it. You are also able to change an existing one, but you cannot delete an existing one.
- On the confirmation screen click Yes - Delete.
Helpful Hint: If you select the No - Do Not Delete button, you will be returned to the Phone Numbers page.
- Click the Save button. The Save Confirmation page will display.
- Click the OK button.
|
Deleting a Phone Number |
Follow the steps below to delete a phone number.
Steps
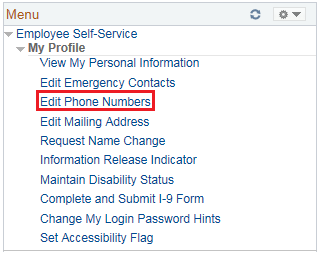
- Select the Employee Self-Service link from the left navigation.
- Select the My Profile drop-down menu.
- Select the Edit Phone Numbers link. The Phone Numbers page is displayed.
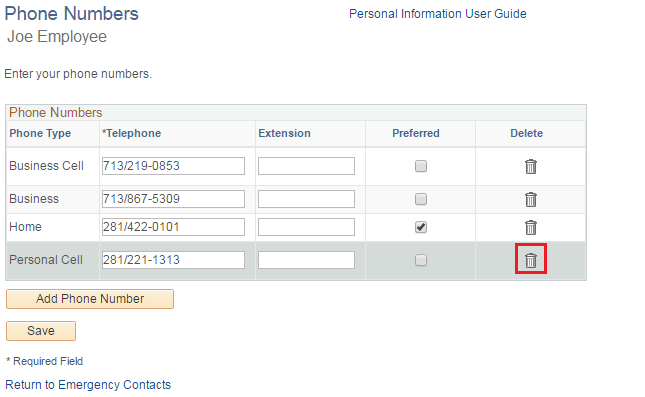
- To delete a phone number click the Delete icon next to the phone number you wish to delete.
Helpful Hint: If there is no business phone you can add it. You are also able to change an existing one, but you cannot delete an existing one.

- On the confirmation screen click Yes - Delete.
Helpful Hint: If you select the No - Do Not Delete button, you will be returned to the Phone Numbers page.
- Click the Save button. The Save Confirmation page will display.

- Click the OK button.
|
|
 |
|
|
Accessibility Instructions |
Use your screen reader commands to navigate the elements on the page such as headings and links. |
Introduction |
As an employee, you have the ability to view and maintain your profile information. Use this transaction to edit your mailing address. |
Step Actions |
The step actions for completing a transaction are presented in two ways: Text Only and Screen Samples:
- Text Only provides instructions for completing the transaction in order from beginning to end. It does not include screen samples.
- Screen Samples include detailed screen shots to help complete the transaction.
|
Key Terms |
For help with terms used in this User Guide, go to the top of the page. Top of Page |
Text Only Step Actions for Editing Mailing Address |
Follow the steps below to edit your mailing address.
Steps
- Select the Employee Self-Service link from the left navigation.
- Select the My Profile drop-down menu.
- Select the Edit Mailing Address link. The Editing Mailing Address page is displayed.
Helpful Hint: This address change will only affect your HR and Payroll information. This change will not affect your address information in ERS. You will need to update your address with ERS by contacting them via phone at (877) 275-4377 or online at http://www.ers.state.tx.us/.
- Click the Edit icon next to the address that needs to be updated.
- Enter the date the new address is to take effect or use the calendar icon in the Change As Of field.
- If applicable, click the Change Country button to change where your new address is located.
- Enter new Address, City, State, Postal Code, and County information. Use the lookup icon if needed.
- Click the Save button. A Submit Confirmation page displays.
- Click OK button.
|
Editing Mailing Address |
Follow the steps below to edit your mailing address.
Steps
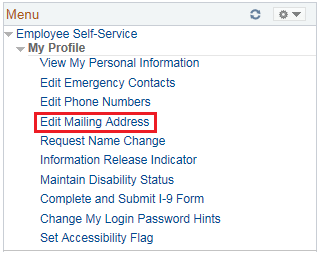
- Select the Employee Self-Service link from the left navigation.
- Select the My Profile drop-down menu.
- Select the Edit Mailing Address link. The Editing Mailing Address page is displayed.
Helpful Hint: This address change will only affect your HR and Payroll information. This change will not affect your address information in ERS. You will need to update your address with ERS by contacting them via phone at (877) 275-4377 or online at http://www.ers.state.tx.us/.
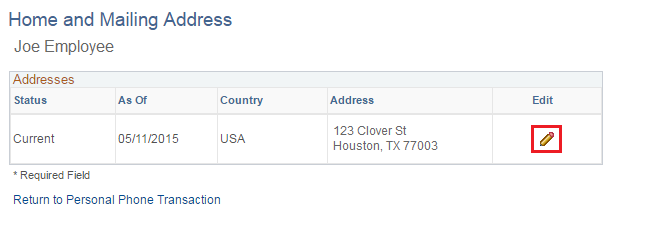
- Click the Edit icon next to the address that needs to be updated.
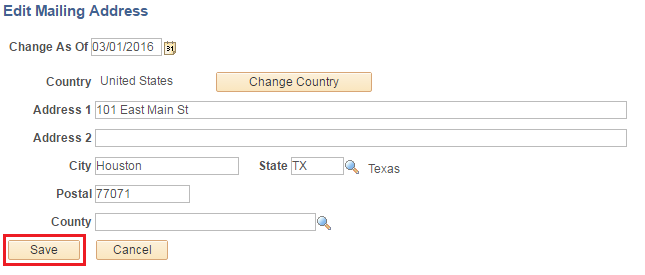
- Enter the date the new address is to take effect or use the calendar icon in the Change As Of field.
- If applicable, click the Change Country button to change where your new address is located.
- Enter new Address, City, State, Postal Code, and County information. Use the lookup icon if needed.
- Click the Save button. A Submit Confirmation page displays.

- Click OK button.
|
|
 |
|
|
Accessibility Instructions |
Use your screen reader commands to navigate the elements on the page such as headings and links. |
Introduction |
A name change may need to be requested for different types of life events (e.g. marriage, legal change of name, etc.). Because your official name in the system is used for payroll purposes, you must show proof that you have legally changed your name with the Social Security Administration. Your request for a name change in the system will be routed to your supervisor for approval. Your supervisor will need to see your Social Security card with your new name in order to approve the change. |
Step Actions |
The step actions for completing a transaction are presented in two ways: Text Only and Screen Samples:
- Text Only provides instructions for completing the transaction in order from beginning to end. It does not include screen samples.
- Screen Samples include detailed screen shots to help complete the transaction.
|
Key Terms |
For help with terms used in this User Guide, go to the top of the page. Top of Page |
Text Only Step Actions for Requesting a Name Change |
Follow the steps below to request a name change.
Steps
- Select the Employee Self-Service link from the left navigation.
- Select the My Profile drop-down menu.
- Select the Request Name Change link. The Name Change screen is displayed.
- Select the date that your name change will take effect. You can either enter the date into the field manually or you can click the Choose a Date icon and select the date your name change will take effect.
Helpful Hints:
- You cannot enter a date prior to the current date.
- You also cannot enter a date more than 30 days from the current date.
- Click the Edit Name button. The Edit Name page is displayed.
- Enter your first name into the First Name field. Enter your last name into the Last Name field. Both the First Name and Last Name fields are required fields. You also have the option to select a prefix and suffix and enter your middle name.
- Click Refresh Name to confirm the name was entered correctly.
- Once you have entered your information and confirmed it is correct, click the OK button. The Name Change page is displayed showing your updated name in the New Name section.
- Click the Submit button. A Submit Confirmation page displays.
- Click the OK button.
Helpful Hints:
- If you review your Name Change information prior to the effective date, you will see a message “This information was submitted.”
- This change will only affect your HR and Payroll information. This change will not affect your information in ERS. You will need to update your name with ERS by contacting them via phone at (877) 275-4377 or online at http://www.ers.state.tx.us/.
- To change the name associated with your email address, contact your agency email administrator.
|
Requesting a Name Change |
Follow the steps below to request a name change.
Steps
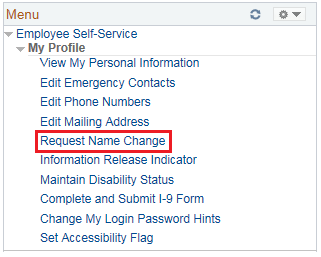
- Select the Employee Self-Service link from the left navigation.
- Select the My Profile drop-down menu.
- Select the Request Name Change link. The Name Change screen is displayed.
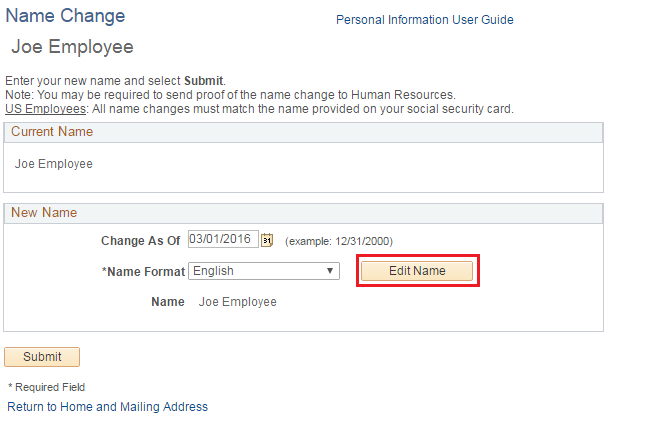
- Select the date that your name change will take effect. You can either enter the date into the field manually or you can click the Choose a Date icon and select the date your name change will take effect.
Helpful Hints:
- You cannot enter a date prior to the current date.
- You also cannot enter a date more than 30 days from the current date.
- Click the Edit Name button. The Edit Name page is displayed.
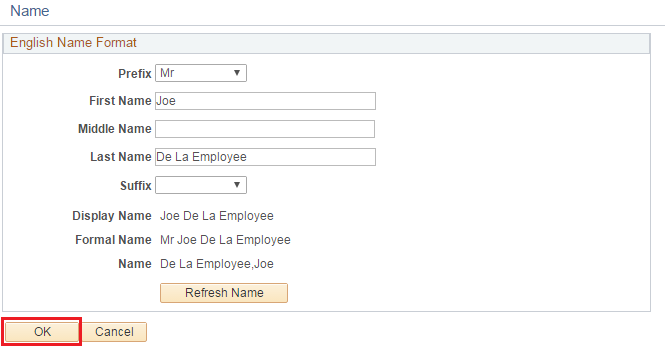
- Enter your first name into the First Name field. Enter your last name into the Last Name field. Both the First Name and Last Name fields are required fields. You also have the option to select a prefix and suffix and enter your middle name.
- Click Refresh Name to confirm the name was entered correctly.
- Once you have entered your information and confirmed it is correct, click the OK button. The Name Change page is displayed showing your updated name in the New Name section.
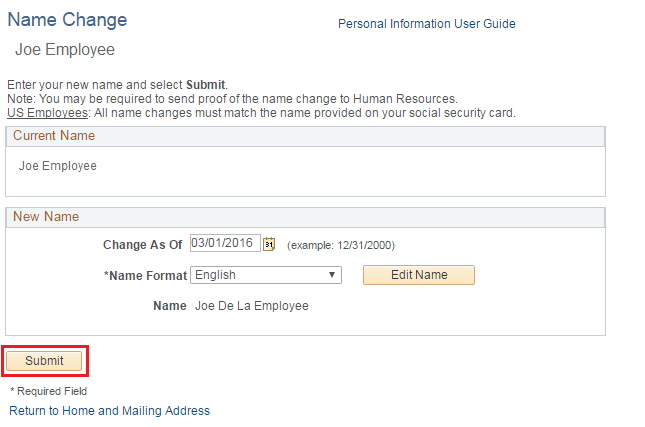
- Click the Submit button. A Submit Confirmation page displays.

- Click the OK button.
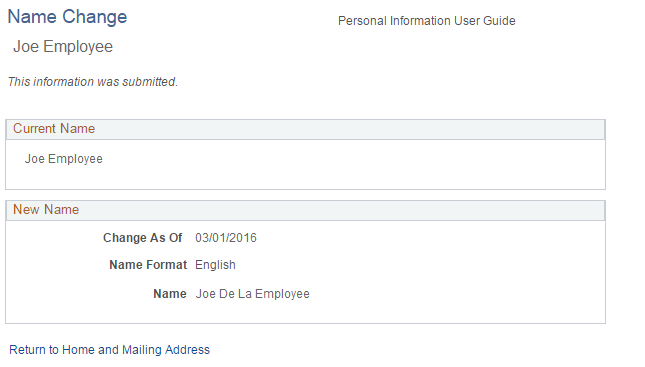
Helpful Hints:
- If you review your Name Change information prior to the effective date, you will see a message “This information was submitted.”
- This change will only affect your HR and Payroll information. This change will not affect your information in ERS. You will need to update your name with ERS by contacting them via phone at (877) 275-4377 or online at http://www.ers.state.tx.us/.
- To change the name associated with your email address, contact your agency email administrator.
|
|
 |
|
|
Accessibility Instructions |
Use your screen reader commands to navigate the elements on the page such as headings and links. |
Introduction |
As an employee, you have the ability to prevent public disclosure of your home address, home telephone number, Social Security Number, emergency contact information, or information concerning your family members. This user guide provides the steps to edit your Information Release Indicator information. |
Step Actions |
The step actions for completing a transaction are presented in two ways: Text Only and Screen Samples:
- Text Only provides instructions for completing the transaction in order from beginning to end. It does not include screen samples.
- Screen Samples include detailed screen shots to help complete the transaction.
|
Key Terms |
For help with terms used in this User Guide, go to the top of the page. Top of Page |
Text Only Step Actions for Selecting Information Release Indicator |
Follow the steps below to change your Information Release Indicator.
Steps
- Select the Employee Self-Service link from the left navigation.
- Select the My Profile drop-down menu.
- Select the Information Release Indicator link. The Information Release Indicator page is displayed.
- Select whether to release or not release information by checking the Release All Information checkbox, Release No Information checkbox, or choosing Y for Yes or N for No in any of the individual options such as Home Address.
Helpful Hints:
- Checking the box “Release all of this information” will automatically populate all of the drop-down boxes with “Y.”
- Checking the box “Do not release any of this information” will immediately populate all the drop down boxes with “N.”
- If you are a Commissioned Peace Officer, ensure the Commissioned Peace Officer checkbox the top right of the screen is checked. If it is not, click the checkbox. This will automatically set your Information Release Indicator to Do Not Release Anything.
- Select the options that are appropriate for you.
- Click the Save button. A Save Confirmation page displays letting you know that the save was successful.
- Click the OK button.
|
Selecting Information Release Indicator |
Follow the steps below to change your Information Release Indicator.
Steps
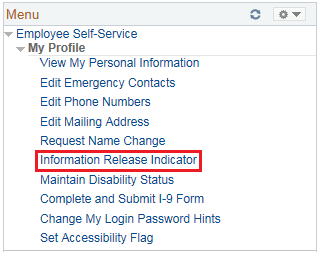
- Select the Employee Self-Service link from the left navigation.
- Select the My Profile drop-down menu.
- Select the Information Release Indicator link. The Information Release Indicator page is displayed.
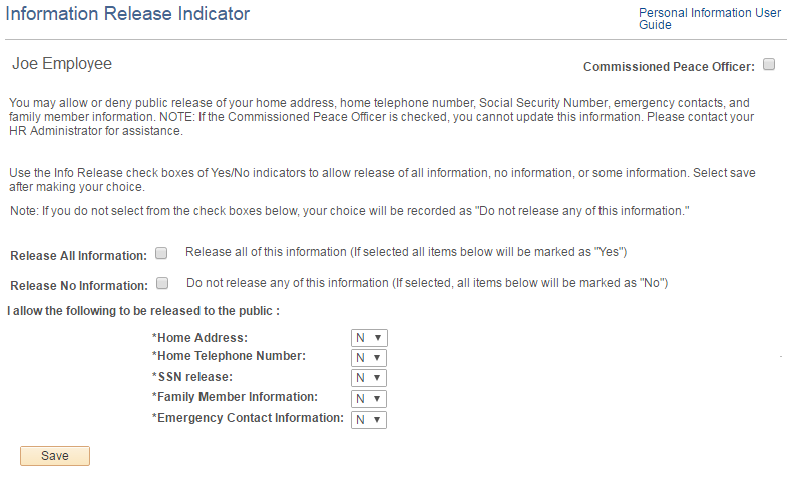
- Select whether to release or not release information by checking the Release All Information checkbox, Release No Information checkbox, or choosing Y for Yes or N for No in any of the individual options such as Home Address.
Helpful Hints:
- Checking the box “Release all of this information” will automatically populate all of the drop-down boxes with “Y.”
- Checking the box “Do not release any of this information” will immediately populate all the drop down boxes with “N.”
- If you are a Commissioned Peace Officer, ensure the Commissioned Peace Officer checkbox the top right of the screen is checked. If it is not, click the checkbox. This will automatically set your Information Release Indicator to Do Not Release Anything.
- Select the options that are appropriate for you.
- Click the Save button. A Save Confirmation page displays letting you know that the save was successful.

- Click the OK button.
|
|
 |
|
|
Accessibility Instructions |
Use your screen reader commands to navigate the elements on the page such as headings and links. |
Introduction |
If you have a disability, you can maintain your disability status using the system, although you are not required to do so. Your manager cannot view your disability status; the information is solely used for federal Equal Employment Opportunity (EEO) reporting purposes and is not connected to an individual employee. |
Step Actions |
The step actions for completing a transaction are presented in two ways: Text Only and Screen Samples:
- Text Only provides instructions for completing the transaction in order from beginning to end. It does not include screen samples.
- Screen Samples include detailed screen shots to help complete the transaction.
|
Key Terms |
For help with terms used in this User Guide, go to the top of the page. Top of Page |
Text Only Step Actions for Editing Disability Status |
Follow the steps below to change your Disability Status.
Steps
- Select the Employee Self-Service link from the left navigation.
- Select the My Profile drop-down menu.
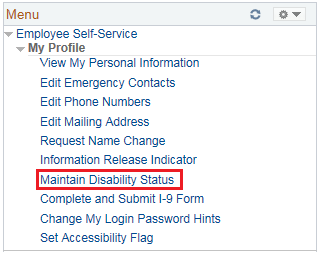
- Select the Maintain Disability Status link. The Disability Indicator page is displayed.
- Review the information regarding what is considered a disability on the page. If based on this information you are disabled, select the Yes checkbox. If not, then select the No checkbox.
- Click the Save button. A Save Confirmation page displays.
- Click the OK button.
|
Editing Disability Status |
Follow the steps below to change your Disability Status.
Steps
- Select the Employee Self-Service link from the left navigation.
- Select the My Profile drop-down menu.
- Select the Maintain Disability Status link. The Disability Indicator page is displayed.
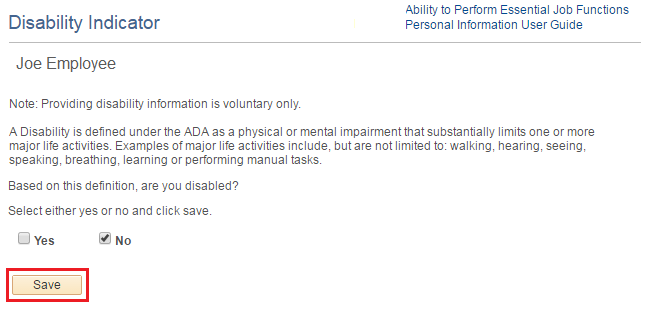
- Review the information regarding what is considered a disability on the page. If based on this information you are disabled, select the Yes checkbox. If not, then select the No checkbox.
- Click the Save button.
|
|
 |
|
|
Accessibility Instructions |
Use your screen reader commands to navigate the elements on the page such as headings and links. |
Introduction |
The BRP Leveling/Non-Leveling link allows eligible employees to make an annual election for Benefit Replacement Pay (BRP). Use this link to select how you want to receive BRP for the year. BRP is a payment that was established to replace the portion of an employee’s social security tax that was paid by the state prior to a change in legislation in September 1995. The link for BRP election is only available in CAPPS during the BRP enrollment period each year.
Use this transaction during the enrollment period to elect how you would like to receive your BRP. You have the option to select from two BRP indicators: Leveled or Unleveled. This election determines how your BRP is paid out for the year. You can only make one election per enrollment period, so you should be confident in your election before saving it. |
Step Actions |
The step actions for completing a transaction are presented in two ways: Text Only and Screen Samples:
- Text Only provides instructions for completing the transaction in order from beginning to end. It does not include screen samples.
- Screen Samples include detailed screen shots to help complete the transaction.
|
Key Terms |
For help with terms used in this User Guide, go to the top of the page. Top of Page |
Text Only Step Actions for Electing How to Receive BRP |
Follow the steps below to select how you receive your Benefit Replacement Pay (BRP).
Steps
- Select the Employee Self-Service link from the left navigation.
- Select the My Profile drop-down menu.
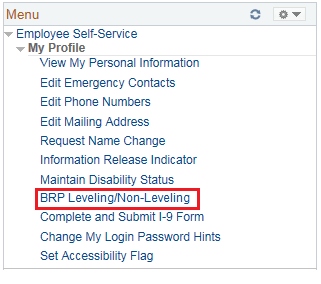
- Select the BRP Leveling/Non-Leveling link. The BRP Leveling/Non-Leveling page is displayed.
- Select the Choose BRP Indicator of Leveled or Unleveled.
- Select the Save button. The Save Confirmation page will display indicating the transaction was successful.
Helpful Hints:
- Once you enter your selection you cannot change it.
- If an employee does not meet the requirements to enroll, a message displays notifying the employee of the ineligibility.
- Select the OK button.
|
Electing How to Receive BRP |
Follow the steps below to select how you receive your Benefit Replacement Pay (BRP).
Steps
- Select the Employee Self-Service link from the left navigation.
- Select the My Profile drop-down menu.
- Select the BRP Leveling/Non-Leveling link. The BRP Leveling/Non-Leveling page is displayed.
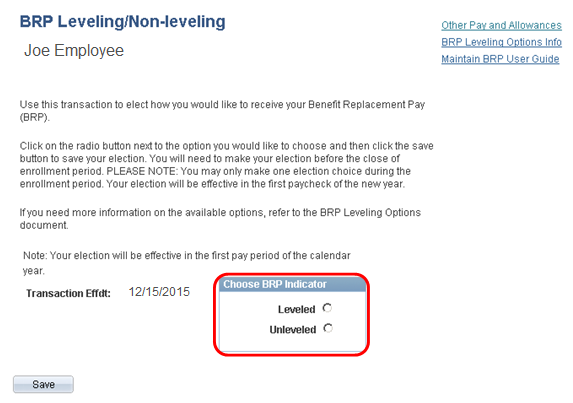
- Select the Choose BRP Indicator of Leveled or Unleveled.
- Select the Save button. The Save Confirmation page will display indicating the transaction was successful.
Helpful Hints:
- Once you enter your selection you cannot change it.

- If an employee does not meet the requirements to enroll, a message displays notifying the employee of the ineligibility.

- Select the OK button.
|
|
 |
|
|
Accessibility Instructions |
Use your screen reader commands to navigate the elements on the page such as headings and links. |
Introduction |
You must complete your Employment Eligibility Verification form (I-9) by the end of your first day of work. You may also make updates to your I-9 as life changes occur. Use these instructions to fill out the form. See I-9 instructions for further information. |
Step Actions |
The step actions for completing a transaction are presented in two ways: Text Only and Screen Samples:
- Text Only provides instructions for completing the transaction in order from beginning to end. It does not include screen samples.
- Screen Samples include detailed screen shots to help complete the transaction.
|
Key Terms |
For help with terms used in this User Guide, go to the top of the page. Top of Page |
Text Only Step Actions for Completing
I-9 Employee Information and Verification Form as a New Employee |
Follow the steps below to complete your I-9 Employee Information and Verification form.
Steps
- Select the Employee Self-Service link from the left navigation.
- Select the My Profile drop-down menu.
- Select the Complete and Submit I-9 Form link.
- The I-9 Form Employee Information and Verification page is displayed.
- Enter your Maiden Name if applicable.
- Select the appropriate Citizenship and Employment Authorization.
- Select the correct Minor and Special Placement Details.
- Read the acceptance statement and then click the Accept button. A Submit Confirmation page displays letting you know that your submission was successful.
- Click the OK button.
|
Completing
I-9 Employee Information and Verification Form as a New Employee |
Follow the steps below to complete your I-9 Employee Information and Verification form.
Steps
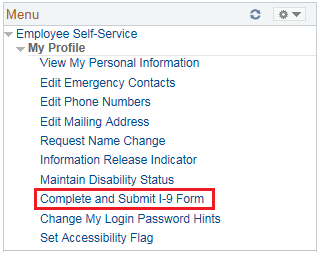
- Select the Employee Self-Service link from the left navigation.
- Select the My Profile drop-down menu.
- Select the Complete and Submit I-9 Form link.
- The I-9 Form Employee Information and Verification page is displayed.
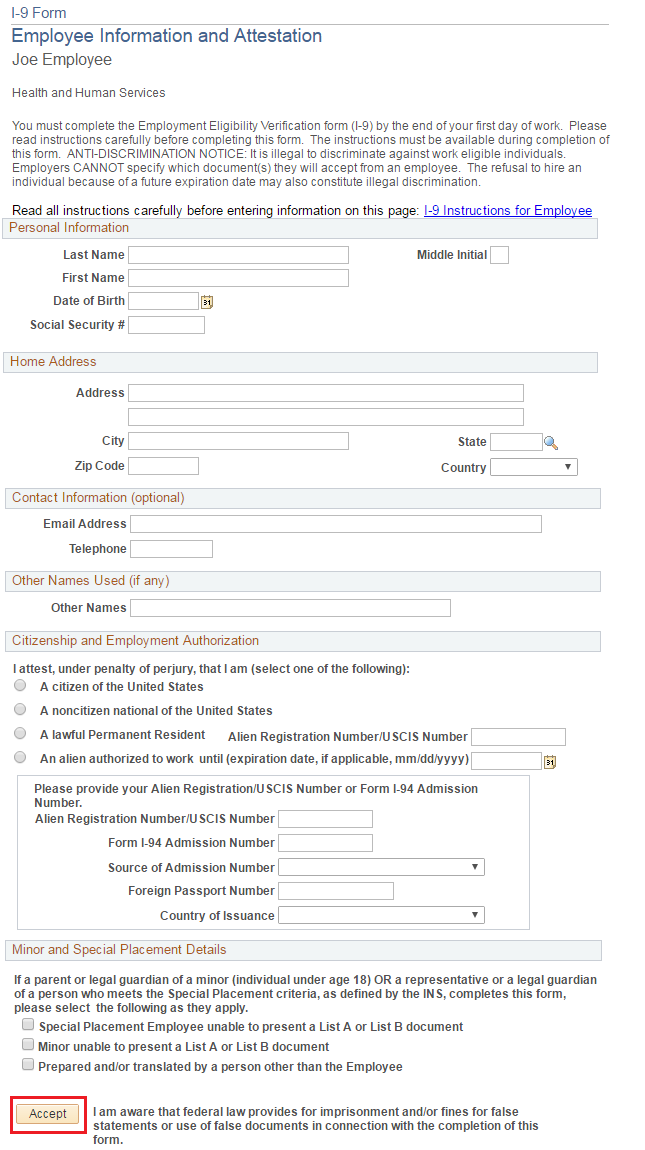
- Enter your Maiden Name if applicable.
- Select the appropriate Citizenship and Employment Authorization.
- Select the correct Minor and Special Placement Details.
- Read the acceptance statement and then click the Accept button. A Submit Confirmation page displays letting you know that your submission was successful.

- Click the OK button.
|
Text Only Step Actions for Updating Your I-9 Employee Information and Verification Form |
Follow the steps below to update your I-9 Employee Information and Verification form.
Steps
- Select the Employee Self-Service link from the left navigation.
- Select the My Profile drop-down menu.
- Select the Complete and Submit I-9 Form link.
- The I-9 Form Employee Information and Verification page is displayed.
- Click the Select button to indicate that you have previously completed an I-9, but you need to submit a new I-9 form.
- Enter your Maiden Name if applicable.
- Select the appropriate Citizenship and Employment Authorization.
- Select the correct Minor and Special Placement Details.
- Read the acceptance statement and then click the Accept button. A Submit Confirmation page displays letting you know that your submission was successful.
- Click the OK button.
|
Updating Your I-9 Employee Information and Verification Form |
Follow the steps below to update your I-9 Employee Information and Verification form.
Steps
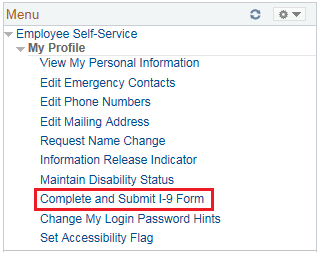
- Select the Employee Self-Service link from the left navigation.
- Select the My Profile drop-down menu.
- Select the Complete and Submit I-9 Form link.
- The I-9 Form Employee Information and Verification page is displayed.
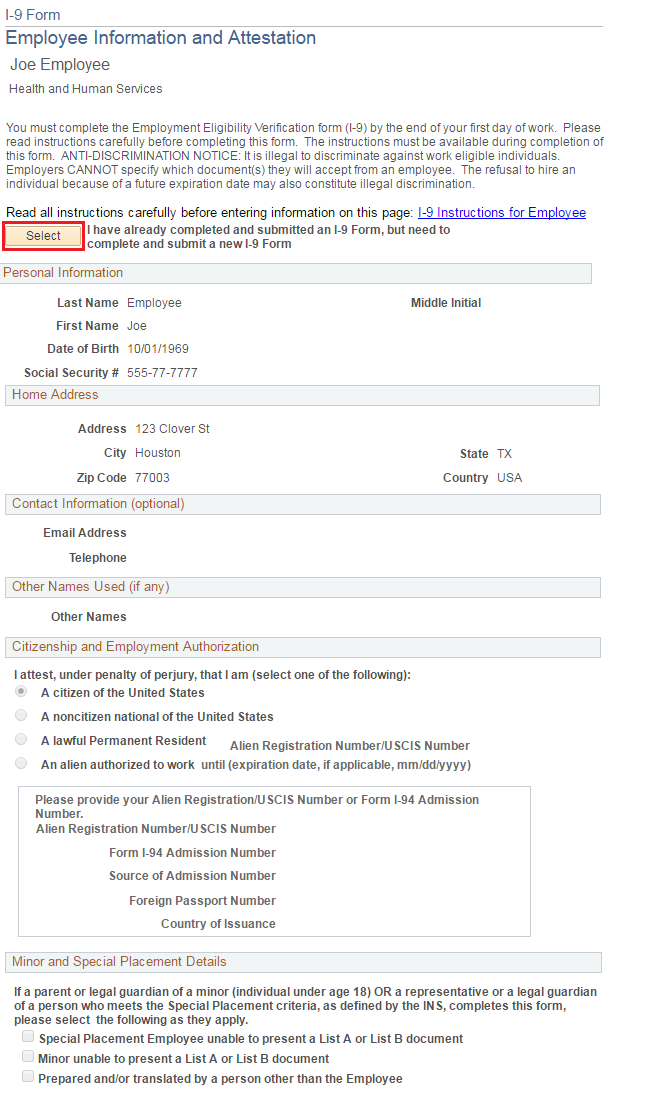
- Click the Select button to indicate that you have previously completed an I-9, but you need to submit a new I-9 form.
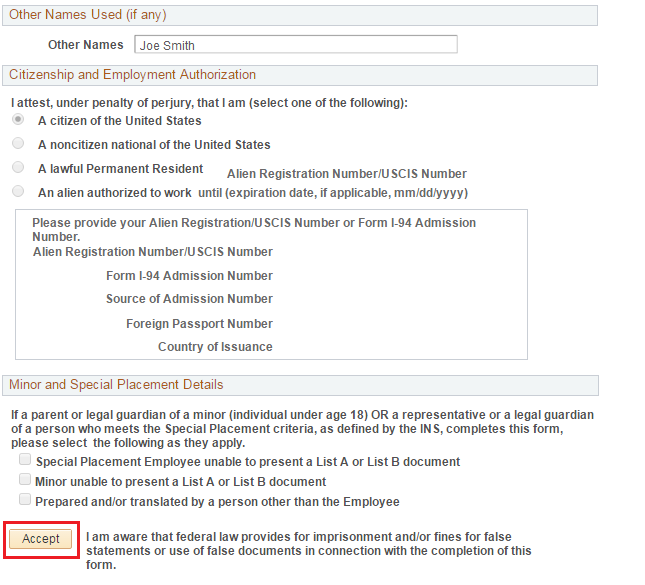
- Enter your Maiden Name if applicable.
- Select the appropriate Citizenship and Employment Authorization.
- Select the correct Minor and Special Placement Details.
- Read the acceptance statement and then click the Accept button. A Submit Confirmation page displays letting you know that your submission was successful.

- Click the OK button.
|
|
 |
|
|
Accessibility Instructions |
Use your screen reader commands to navigate the elements on the page such as headings and links. |
Introduction |
You have the ability to change your login password hint questions. This allows you to choose security questions for your CAPPS login password. You may select Password Hints and enter your unique responses to assist you should you forget your CAPPS password.
You will receive your chosen login password hints if you need to select the I forgot/Change my password link from the CAPPS login page, so it is important to make sure they are set to something you will remember. |
Step Actions |
The step actions for completing a transaction are presented in two ways: Text Only and Screen Samples:
- Text Only provides instructions for completing the transaction in order from beginning to end. It does not include screen samples.
- Screen Samples include detailed screen shots to help complete the transaction.
|
Key Terms |
For help with terms used in this User Guide, go to the top of the page. Top of Page |
Text Only Step Actions for Changing My Login Password Hints |
Follow the steps below to change your login password hints.
Steps
- Select the Employee Self-Service link from the left navigation.
- Select the My Profile drop-down menu.
- Select the Change my login password hints link. The Forgotten Password Hints page is displayed.
Helpful Hint: If you have already selected Password Hints previously, your selected Hints and Responses will be displayed.
- Click the lookup icon to select a Password Hint question.
- Click the Password Hint ID associated with your selected question. The Forgotten Password Hints page is displayed.
Helpful Hint: If your security question is your zip code, be sure to update the answer to your security question should you update your address. Updating your address does not update the answer to your security question.
- Enter your response to the question you selected in the *Response field.
Helpful Hint: If you would like to add another password hint, click the plus sign to add another row to the Forgotten Password Hints page.
- Click the Save button. A Submit Confirmation page displays.
- Click the OK button.
|
Changing My Login Password Hints |
Follow the steps below to change your login password hints.
Steps
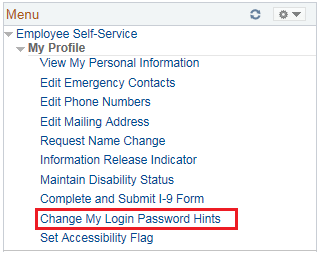
- Select the Employee Self-Service link from the left navigation.
- Select the My Profile drop-down menu.
- Select the Change my login password hints link. The Forgotten Password Hints page is displayed.
Helpful Hint: If you have already selected Password Hints previously, your selected Hints and Responses will be displayed.
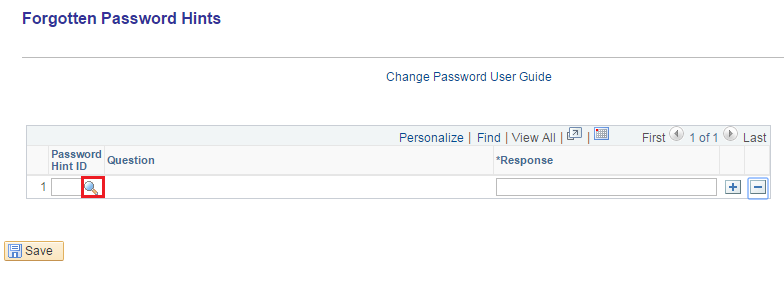
- Click the lookup icon to select a Password Hint question.
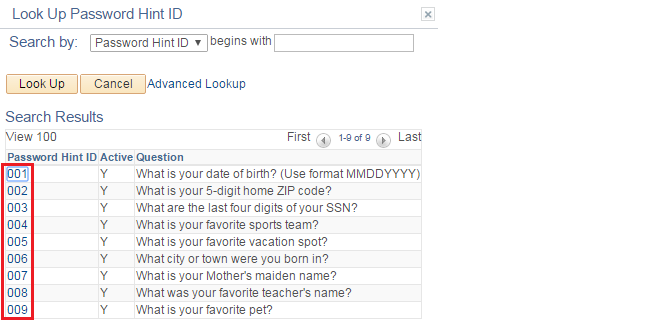
- Click the Password Hint ID associated with your selected question. The Forgotten Password Hints page is displayed.
Helpful Hint: If your security question is your zip code, be sure to update the answer to your security question should you update your address. Updating your address does not update the answer to your security question.
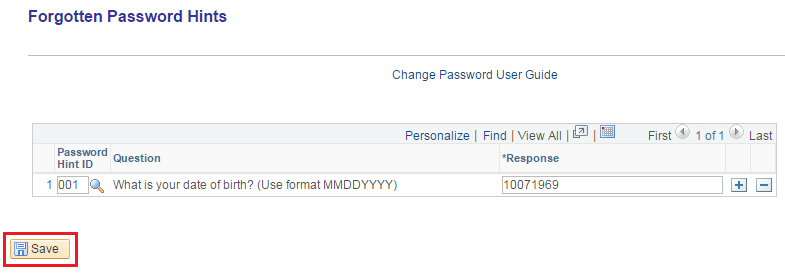
- Enter your response to the question you selected in the *Response field.
Helpful Hint: If you would like to add another password hint, click the plus sign to add another row to the Forgotten Password Hints page.
- Click the Save button. A Submit Confirmation page displays.

- Click the OK button.
|
|
 |
|
|
Accessibility Instructions |
Use your screen reader commands to navigate the elements on the page such as headings and links. |
Introduction |
You can personalize your accessibility mode while using the system, although you are not required to do so. If you use a JAWS screen reader, follow the steps in this user guide to set your accessibility features for 508 compliance. |
Step Actions |
The step actions for completing a transaction are presented in two ways: Text Only and Screen Samples:
- Text Only provides instructions for completing the transaction in order from beginning to end. It does not include screen samples.
- Screen Samples include detailed screen shots to help complete the transaction.
|
Key Terms |
For help with terms used in this User Guide, go to the top of the page. Top of Page |
Text Only Step Actions for
Personalizing Accessibility Options |
Follow the steps below to personalize your general accessibility options.
Steps
- Select the Employee Self-Service link from the left navigation.
- Select the My Profile drop-down menu.
- Select the Set Accessibility Flag link. The Set Accessibility Mode page is displayed.
- Click the drop-down in the Accessibility Selection field.
- Select the correct setting from the Accessibility Selection drop-down list. Definitions for each selection are provided in the Key Terms section of this User Guide.
- Click the Submit button. A Save Confirmation page will display.
- Click the Return button.
Helpful Hint: Changes to your accessibility settings require that you log off and log back on to CAPPS for you to see your new selection.
|
Personalizing Accessibility Options |
Follow the steps below to personalize your general accessibility options.
Steps
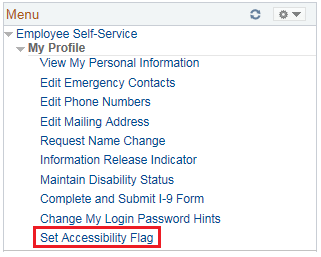
- Select the Employee Self-Service link from the left navigation.
- Select the My Profile drop-down menu.
- Select the Set Accessibility Flag link. The Set Accessibility Mode page is displayed.
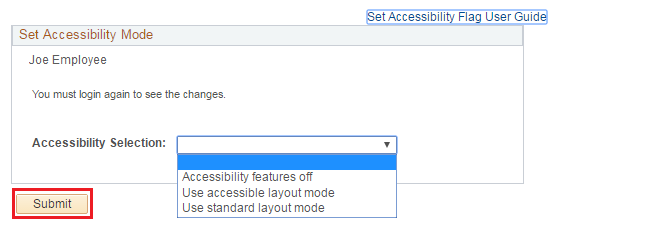
- Click the drop-down in the Accessibility Selection field.
- Select the correct setting from the Accessibility Selection drop-down list. Definitions for each selection are provided in the Key Terms section of this User Guide.
- Click the Submit button. A Save Confirmation page will display.

- Click the Return button.
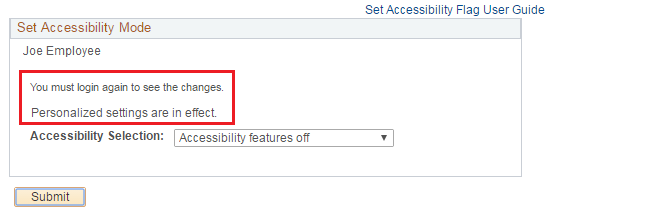
Helpful Hint: Changes to your accessibility settings require that you log off and log back on to CAPPS for you to see your new selection.
|
|
 |
|
|
Key Things to Remember |
Service Center Information:
- The Service Center operates between 7:00 a.m. and 7:00 p.m. Central Time, Monday through Friday. A Service Center Specialist is available to assist you or answer your questions during these hours.
- You may contact the Service Center at 1-888-TX-HHS-HR (1-888-894-4747), or TDD/TTY for the Hearing Impaired 1-866-839-2747.
- You may email your questions directly to the Service Center by selecting Ask Service Center on the CAPPS home page (must be logged in) using the online form to enter and submit your questions.
View Personal Information:
- To protect your personal information, do not share your password with anyone and be sure to change your password hints so only you will be able to change your password.
- You can also view your Personal Information Summary by selecting My Profile from the Employee Self-Service main page.
- To make edits to your personal information select the appropriate link from the View My Personal Information menu.
Edit Emergency Contacts
- You can also change or delete an Emergency Contact's phone number by selecting Edit Emergency Contacts from the main My Profile page.
Edit Phone Numbers
- You can also change or delete a phone number by selecting Edit Phone Numbers from the main My Profile page.
Edit Mailing Address
- This address change will only affect your HR and Payroll information. This change will not affect your address information in ERS. You will need to update your address with ERS by contacting them via phone at (877) 275-4377 or online at http://www.ers.state.tx.us/.
- You can also Edit your Mailing Address by selecting the Edit Mailing Address link from the main My Profile page.
Requesting a Name Change
- Your request for a name change will be routed to your supervisor for approval. Approval requires a review of your Social Security card by your supervisor.
- Contact ERS to notify them of your name change.
- To change your name in your email address, contact your email administrator.
Information Release Indicator
- You can choose to allow public access to your home address, home telephone number, Social Security Number (SSN), Family Member Information and / or Emergency Contact Information, by selecting “Y” or “N” from the five drop down boxes on this screen. If you do not make a selection, your choice will be recorded as “Do not release any of this information.”
- IMPORTANT: If you are a Certified Commissioned Peace Officer (CPO), the Information Release Indicator field will be automatically set to Do Not Release Anything and will not be editable.
BRP Leveling/Non-Leveling
- Each BRP eligible employee can only make one election per enrollment period, so you should be confident in your election before saving it.
- You can also designate how you will receive your BRP from the main My Profile page by selecting the BRP Leveling/Non-Leveling link.
Change My Login Password Hints
- If you would like to remove a Password Hint and Response, click the Minus sign at the end of the row for the specific Password Hint.
|
|
 |