Incident/Injury
|
Accessibility Instructions |
Use your screen reader commands to navigate the elements on the page such as headings and links. |
Overview |
Incident / Injury Reporting enables injured persons to report accidents and incidents (record only or near misses) that occur on State property or while conducting State business. The injured person can be an employee or a non-employee. When an injury or incident occurs, either the employee (if the employee is able) or you as a manager reports the injury or incident. If the injured person is a non-employee, you must have managerial responsibilities within the agency and typically is either the manager who witnessed the incident or the manager investigating the incident. The Incident/Injury Reporting is not used to report security incidents unless an injury occurs. |
Step Actions |
The step actions for completing a transaction are presented in two ways: Text Only and Screen Samples:
- Text Only provides instructions for completing the transaction in order from beginning to end. It does not include screen samples.
- Screen Samples include detailed screen shots to help complete the transaction.
|
Transactions Covered in This User Guide |
|
Key Terms |
For a complete glossary of terms, click here: CAPPS Glossary |
|
|
Accessibility Instructions |
Use your screen reader commands to navigate the elements on the page such as headings and links. |
Introduction |
You can log in to the CAPPS website to add an accident/incident for a direct report or where you were witness. You must include the injured person’s information as well as your own information (if you are not the individual involved in the accident/incident). If the accident/incident is a motor vehicle event the motor vehicle information tab must also be completed.
|
Step Actions |
The step actions for completing a transaction are presented in two ways: Text Only and Screen Samples:
- Text Only provides instructions for completing the transaction in order from beginning to end. It does not include screen samples.
- Screen Samples include detailed screen shots to help complete the transaction.
|
Key Terms |
For a complete glossary of terms, click here: CAPPS Glossary |
Text Only Step Actions for Adding Accident or Incident |
Follow the steps below to add an accident/incident.
Steps
- Select the Manager Self-Service link from the left navigation.
- Select the Incident / Injury Reporting drop-down menu.
- Select Add an Accident/Incident.
- Click the Add button to move to the next screen. The Accident/Incident page is displayed with the following tabs: Injured Person Info, Employee Info, Motor Vehicle, Comments.
- Once all the required information is entered in each tab, click the Save button to submit the transaction. The Workflow/Editing Status confirmation screen is displayed.
- Click the Yes button to submit the transaction and send the report to the next level for review.
Helpful Hint: Once the Yes button is clicked you will not be able to make any more changes to the document. Clicking the button takes you back to the Comments page. After successfully saving the accident/incident, an Incident Number is generated for future reference.
OR
Click the No button on this page if you choose not to submit the transaction in order to return to the accident/incident report at a later time for editing. Clicking the button takes you back to the Comments page.
|
Adding Accident or Incident |
Follow the steps below to add an accident/incident.
Steps
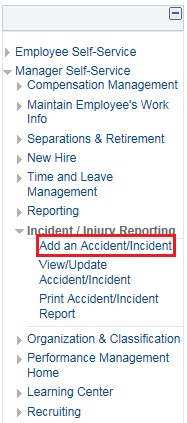
- Select the Manager Self-Service link from the left navigation.
- Select the Incident / Injury Reporting drop-down menu.
- Select Add an Accident/Incident.
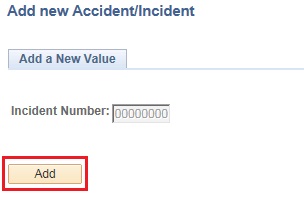
- Click the Add button to move to the next screen. The Accident/Incident page is displayed with the following tabs: Injured Person Info, Employee Info, Motor Vehicle, Comments.
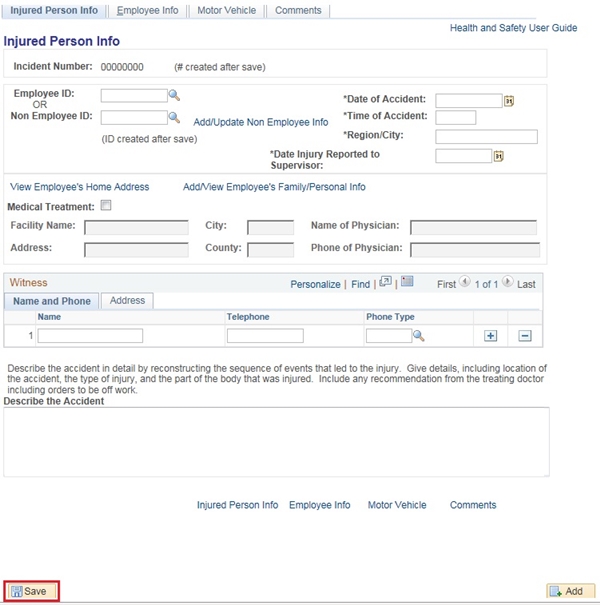
- Once all the required information is entered in each tab, click the Save button to submit the transaction. The Workflow/Editing Status confirmation screen is displayed.

- Click the Yes button to submit the transaction and send the report to the next level for review.
Helpful Hint: Once the Yes button is clicked you will not be able to make any more changes to the document. Clicking the button takes you back to the Comments page. After successfully saving the accident/incident, an Incident Number is generated for future reference.
OR
Click the No button on this page if you choose not to submit the transaction in order to return to the accident/incident report at a later time for editing. Clicking the button takes you back to the Comments page.
|
Completing the Injured Person Info Page |
_
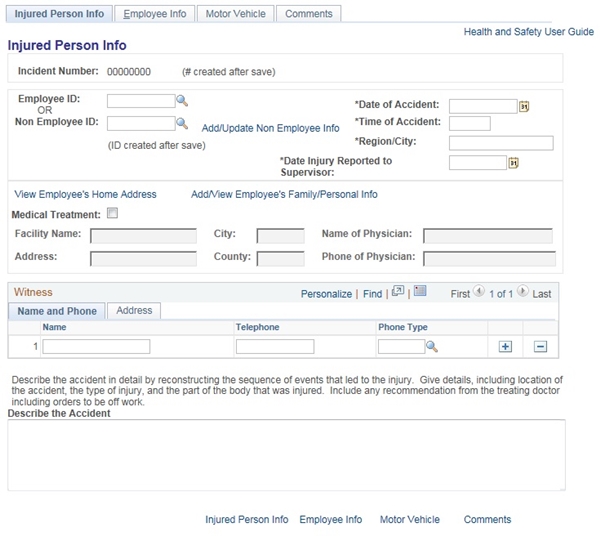
The Injured Person Info page is the first tab on the accident/incident reporting transaction. On this page you can start reporting basic information about the accident/incident. Enter the Employee ID of the employee involved in the accident/incident. This allows the rest of the employee information to populate on the page based on the employee ID entered. The Employee Name that defaults is based on the Employee ID entered.
Complete the required fields on this page in order for the transaction to be successfully saved. These required fields are:
- Date of Accident – This is the date the accident/incident occurred. This field cannot be post-dated.
- Date Injury Reported to Supervisor – This is the date the accident/incident was reported to you. This field cannot be post-dated.
- Time of Accident – This is the time the accident/incident occurred.
- Region/City – This is the region and city in which the accident/incident occurred.
- Describe the Accident – In this section, you can describe the accident in detail including the location of the accident, type of accident, and part of the employee’s body that was injured. Include as much detail as possible. If no medical treatment will be sought, or for record only, please state in the description.
Helpful Hint: To avoid being timed out, draft the description in a Word document, then cut and paste into the description field.
View Employee’s Mailing Address
View the mailing address information stored in the system for the employee. This information is based on the information that is currently stored in the system for the employee. If the mailing address and phone information is not correct, the correct information should be recorded in the Describe the Accident box on the Injured Person Info Page. Click the Return button to go back to the Injured Person Info page.
Add/View Employee’s Family/Personal Info
View the employee’s family/personal information. Clicking this link takes you to the Person’s Family Info page where the Date of Birth, Gender, and Marital Status fields default in and cannot be changed. This information is based on the information that is currently stored in the system for the employee. You can change the information within the number of Dependent Children and Spouse Name sections on behalf of the employee but this information is not required. Click the OK button to return to the Injured Person Info page.
Medical Treatment
By selecting this checkbox, you are indicating that the employee received or plans to seek medical treatment for the accident/incident that is being reported. Once that option is selected, the Name of Physician and the Phone of Physician fields are required in that section. If you do not know the name of the physician or the phone number, you can type “UNKNOWN” in these fields.
Witness
Enter the Name and Phone and Address information for witnesses, if available. You can click the Add Row icon to include additional witnesses, or the Delete Row icon to remove a witness.
Describe the Accident
Provide details of the accident by reconstructing the sequence of events, including location, type of injury, the part of the body that was injured. Also include any recommendation from the treating physician, if applicable.
|
Completing the Employee Information Page |
_
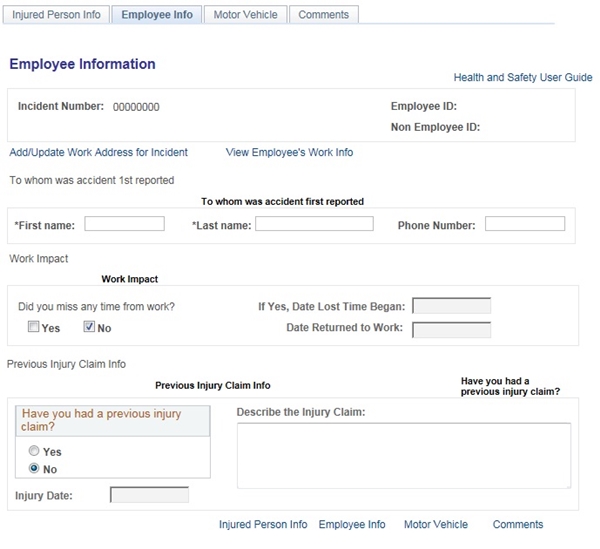
On this page you can view and enter work information regarding the accident/incident.
Add/Update Work Address for Incident link
Fill in the details of the work address where the employee’s accident/incident occurred. The Address, City, and County of the employee’s accident/incident are required fields. The phone field within this section defaults based on what is currently stored in the system, but this field can be edited. Click the OK button to save any edits and return to the Employee Info page or the Cancel button if no changes are needed.
View Employee’s Work Info link
The Employee’s Work Info page where the information within the Employee Job Info section is defaulted in. The information is based on information that is currently stored in the system for the employee. Click the Return button to go back to the Employee Info page.
To Whom was accident 1st reported
The First Name and Last Name fields are required. Fill in the first name and last name of the person you first reported the accident/incident.
Work Impact
Select Yes to indicate that the employee lost time from work due to this incident. You are required to enter the date (MM/DD/YYYY) the lost time began and the date the employee returned to work if returned.
Previous Injury Claim Info
Select the Yes or No radio button in the Have you had a previous injury claim? section. If yes is selected, the Injury Date and Describe the Injury Claim sections become active and are required fields. The date field only allows for one claim date. If the injured person has more than one claim, you may detail the other dates in the description box.
|
Completing the Motor Vehicle Page for an Employee |
_
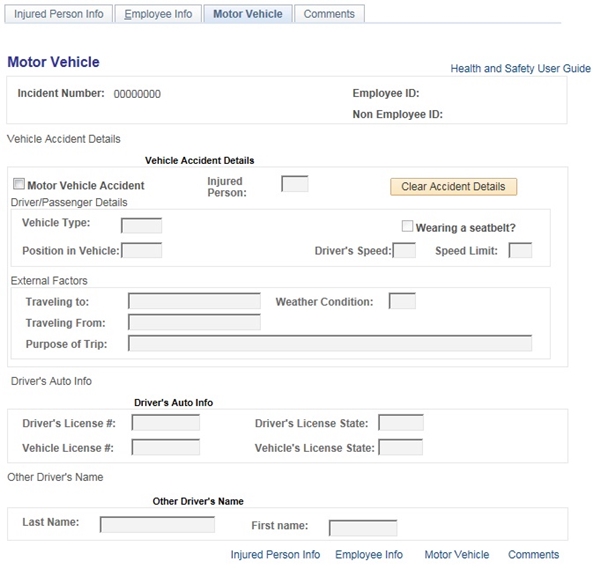
Vehicle Accident Details
If a motor vehicle was involved in the accident/incident, select the Motor Vehicle Accident checkbox. Selecting this checkbox activates all the fields on the Motor Vehicle tab for editing.
- Injured Person – Use the search to select from Driver/Operator of Vehicle, Passenger In Vehicle, or Bystander/Pedestrian. If Bystander/Pedestrian is selected, only the Other Driver’s Name field needs to be completed for this tab.
- Driver/Passenger Details
- Vehicle Type – Use the search to select either Company or Personal car
- Wearing a seatbelt? – Check this if the employee was wearing a seatbelt at the time of the accident
- Position in Vehicle – Use the search to select where the employee was located in the vehicle at the time of the accident
- Driver’s Speed – Enter the vehicle speed at the time of the accident
- Speed Limit – Enter the speed limit for the location of the accident
- External Factors
- Traveling to – Enter the ending location of the trip
- Weather Condition – Use the search to select from a list of weather types
- Traveling From – Enter the starting location of the trip
- Purpose of Trip – Enter the purpose of the trip
Driver’s Auto Info
Enter the Driver’s License #, Driver’s License State, Vehicle License #, and Vehicle License State fields. You may use the search options for Driver’s License State and Vehicle License State fields.
Other Driver’s Name
If the employee was a bystander or pedestrian of the accident, complete the Other Driver’s Name field with the name of the individual driving the vehicle and insurance information. |
Completing the Comments Page for an Employee |
_
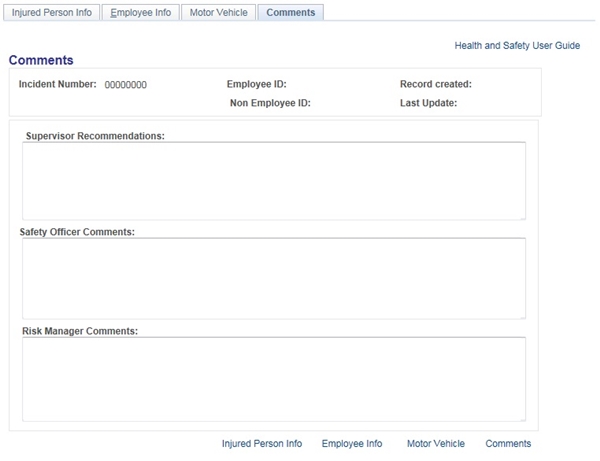
Enter the Supervisor Recommendations about the accident/incident based on your knowledge of the nature of the accident/incident and the nature of the injuries sustained by the employee. This field is especially relevant for managers that witnessed the accident/incident. Click the Save button when you have completed the Supervisor Recommendations box. |
|
 |
Completing the Injured Person Info Page for a Non-Employee |
_
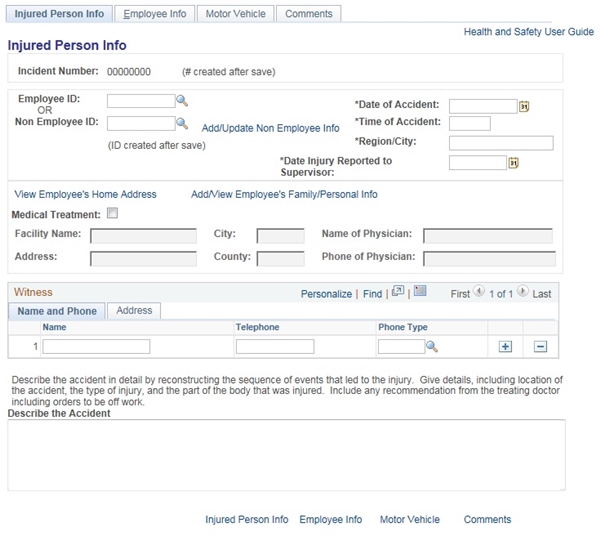
The Injured Person Info page is the first tab on the accident/incident reporting transaction. On this page you can start reporting basic information about the accident/incident.
Non-Employee ID search
Click the search button to locate an existing non-employee. If the non-employee does not already exist in CAPPS, select the Add/Update Non-Employee link.
Add/Update Non-Employee link
Enter or update details about the non-employee involved in the accident/incident. The Last Name and First Name fields are required. Click the OK button to return to the Injured Person Info page.
The Non-Employee ID field displays as NEW to signify the addition of a new non-employee accident/incident. Since the injured person is not an employee there is no information defaulted in the Person’s Mailing Address, Person’s Family Info, Employee’s Work Info, and Employee’s Supervisor Info pages.
Complete the required fields on this page in order for the transaction to be successfully saved. These required fields are:
- Date of Accident – This is the date the accident/incident occurred. This field cannot be post-dated.
- Date Injury Reported to Supervisor – This is the date the accident/incident was reported to you. This field cannot be post-dated.
- Time of Accident – This is the time the accident/incident occurred.
- Region/City – This is the region or city in which the accident/incident occurred.
- Describe the Accident – In this section, describe the accident in detail including the location of the accident, type of accident, cause of injury and part of the non-employee’s body that was injured.
View Employee’s Mailing Address
View the mailing address information stored in the CAPPS system for the non-employee. This information is based on the information that is currently stored in the system for the non-employee. If the mailing address and phone information is not correct, the correct information should be recorded in the Describe the Accident box on the Injured Person Info Page. Click the Return button to go back to the Injured Person Info page.
Add/View Employee’s Family/Personal Info
View the non-employee’s family/personal information. Clicking this link takes you to the Person’s Family Info page where the Date of Birth, Gender, and Marital Status fields may be completed. If the non-employee already exists in CAPPS, you will not be able to change it. You can change the information within the number of Dependent Children and Spouse Name sections on behalf of the employee but this information is not required. Click the OK button to return to the Injured Person Info page.
Medical Treatment
By selecting this checkbox, you are indicating that the non-employee received or will seek medical treatment for the accident/incident that is being reported. Once that option is selected, the Name of Physician and the Phone of Physician fields are required in that section. If you do not know the name of the physician or the phone number, you can type “UNKNOWN” in these fields.
Witness
Enter the Name and Phone and Address information for witnesses, if available. You can click the Add Row icon to include additional witnesses, or the Delete Row icon to remove a witness.
Describe the Accident
Provide details of the accident by reconstructing the sequence of events, including location, type of injury, cause of injury and the part of the body that was injured. Also include any recommendation from the treating physician, if known.
|
_
Completing the Employee Info Page for a Non-Employee |
_
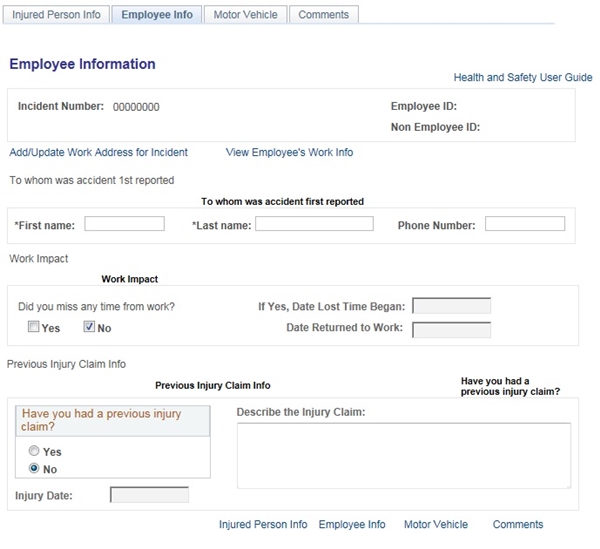
On this page you can view and enter work information regarding the accident/incident.
Add/Update Work Address for Incident link
Fill in the details of the work address where the non-employee’s accident/incident occurred. The Address, City, and County of the non-employee’s accident/incident are required fields. The phone field within this section defaults based on what is currently stored in the system, if any, but this field can be edited. Click the OK button to save any edits and return to the Employee Info page or the Cancel button if no changes are needed.
View Employee’s Work Info link
The Employee’s Work Info page where the information within the Employee Job Info section is defaulted in if the non-employee exists in CAPPS otherwise it will need to be completed. Click the Return button to go back to the Employee Info page.
To Whom was accident 1st reported
The First Name and Last Name fields are required. Fill in the first name and last name of the person you first reported the accident/incident.
Work Impact
Select Yes to indicate that the non-employee lost time from work due to this incident. You are required to enter the date (MM/DD/YYYY) the lost time began and the date the employee returned to work if returned.
Previous Injury Claim Info
Select the Yes or No radio button in the “Have you had a previous injury claim?” section. If yes is selected, the Injury Date and Describe the Injury Claim sections become active and are required fields. The date field only allows for one claim date. If the injured person has more than one claim, you may detail the other dates in the description box.
|
_
Completing the Motor Vehicle Page for a Non-Employee |
_
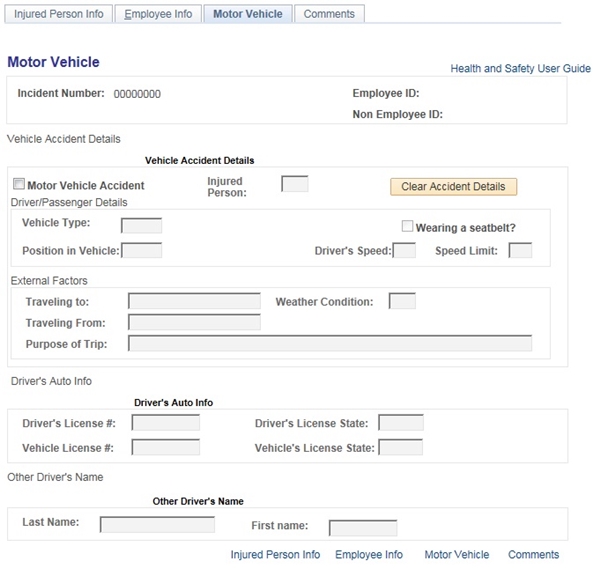
On this page you can enter motor vehicle information if a motor vehicle was involved in the accident/incident being reported.
Vehicle Accident Details
If a motor vehicle was involved in the accident/incident, select the Motor Vehicle Accident checkbox. Selecting this checkbox activates all the fields on the Motor Vehicle tab for editing.
- Injured Person – Use the search to select from Driver/Operator of Vehicle, Passenger In Vehicle, or Bystander/Pedestrian. If Bystander/Pedestrian is selected, only the Other Driver’s Name field needs to be completed for this tab.
- Driver/Passenger Details
- Vehicle Type – Use the search to select either Company or Personal car
- Wearing a seatbelt? – Check this if the non-employee was wearing a seatbelt at the time of the accident
- Position in Vehicle – Use the search to select where the non-employee was located in the vehicle at the time of the accident
- Driver’s Speed – Enter the vehicle speed at the time of the accident
- Speed Limit – Enter the speed limit for the location of the accident
- External Factors
- Traveling to – Enter the ending location of the trip
- Weather Condition – Use the search to select from a list of weather types
- Traveling From – Enter the starting location of the trip
- Purpose of Trip – Enter the purpose of the trip
Driver’s Auto Info
Enter the Driver’s License #, Driver’s License State, Vehicle License #, and Vehicle License State fields. You may use the search options for Driver’s License State and Vehicle License State fields.
Other Driver’s Name
If the non-employee was a bystander or pedestrian of the accident, complete the Other Driver’s Name field with the name of the individual driving the vehicle and insurance information.
|
_
Completing the Comments Page for a Non- Employee |
_
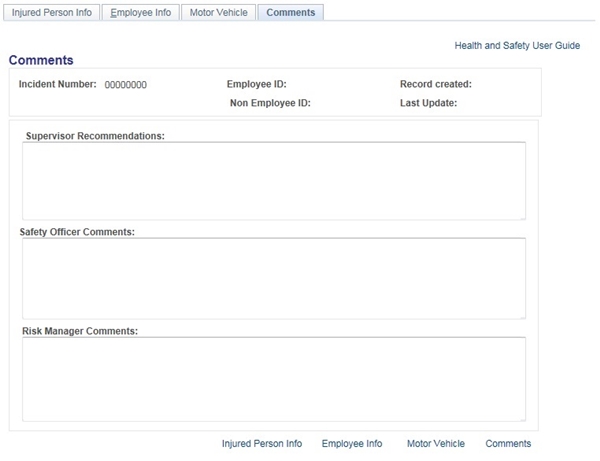
Enter the Supervisor Recommendations about the accident/incident based on your knowledge of the nature of the accident/incident and the nature of the injuries sustained by the non-employee. This field is especially relevant for managers that witnessed the accident/incident. |
|
 |
|
Accessibility Instructions |
Use your screen reader commands to navigate the elements on the page such as headings and links. |
Introduction |
Prior to final submission of an accident/incident transaction you can return to an accident/incident report to make changes via the View/Update Accident/Incident link. This option is only available if the No button was clicked on the Workflow/Editing Status page upon saving the transaction. Note that if you select the No button, and then decide to submit the transaction for review before exiting the transaction screen, you must make a change to the accident/incident transaction information in order for the transaction to be submitted successfully. For submitted accident/incident transactions you are also able to navigate to this link to view the transaction but information in these transactions cannot be changed. |
Step Actions |
The step actions for completing a transaction are presented in two ways: Text Only and Screen Samples:
- Text Only provides instructions for completing the transaction in order from beginning to end. It does not include screen samples.
- Screen Samples include detailed screen shots to help complete the transaction.
|
Key Terms |
For a complete glossary of terms, click here: CAPPS Glossary |
Text Only Step Actions for Viewing an Accident or Incident |
Follow the steps below to view an accident/incident.
Steps
- Select the Manager Self-Service link from the left navigation.
- Select the Incident / Injury Reporting drop-down menu.
- Click the View/Update Accident/Incident link. The Update Incidents page is displayed.
- Search for the specific incident via Incident Number or select the Advanced Search link to receive assistance locating the Incident Number.
- Click the Search button. The Search Results section will display only accidents/incidents transactions that you created for yourself or on behalf of an employee or non-employee.
Helpful Hint: To view reports that are related to your employees and are awaiting your recommendations, view via your worklist. See the Worklist User Guide for assistance.
- Click the Incident Number link in the Search Results section.
|
Viewing an Accident or Incident |
Follow the steps below to view an accident/incident.
Steps
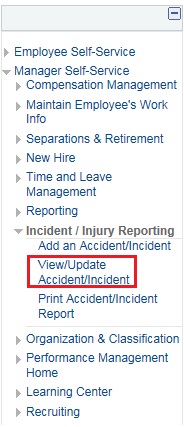
- Select the Manager Self-Service link from the left navigation.
- Select the Incident / Injury Reporting drop-down menu.
- Click the View/Update Accident/Incident link. The Update Incidents page is displayed.
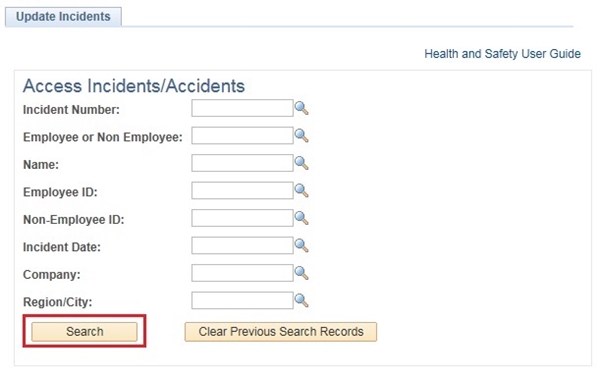
- Search for the specific incident via Incident Number or select the Advanced Search link to receive assistance locating the Incident Number.
- Click the Search button. The Search Results section will display only accidents/incidents transactions that you created for yourself or on behalf of an employee or non-employee.
Helpful Hint: To view reports that are related to your employees and are awaiting your recommendations, view via your worklist. See the Worklist User Guide for assistance.
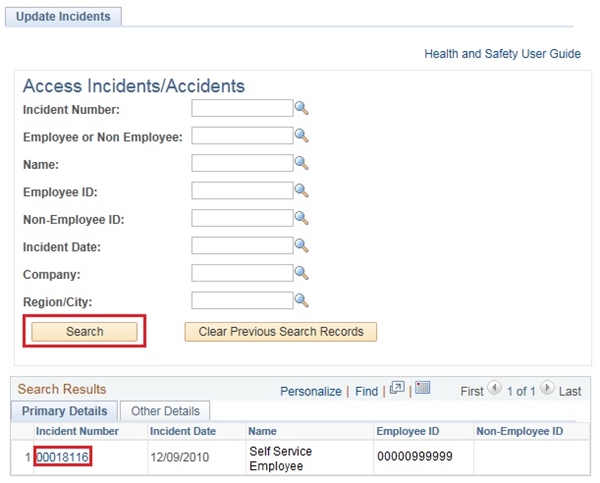
- Click the Incident Number link in the Search Results section.
|
Text Only Step Actions for Updating an Accident or Incident |
Follow the steps below to view an accident/incident.
Steps
- Review and make any required changes to the Injured Person Info, Employee Info, Motor Vehicle Info pages.
- Click the Comments page.
- Enter your recommendation in the Supervisor Recommendation field.
Helpful Hint: If your recommendation is already entered, a slight change to the content is required in order to submit the accident/incident.
- Click the Save button. The Workflow/Editing Status page is displayed.
- Click the Yes button to submit the transaction and send the report to the next level for review.
Helpful Hint: Once the Yes button is clicked you will not be able to make any more changes to the document. Clicking the button takes you back to the Comments tab.
OR
Click the No button on this page if you choose not to submit the transaction in order to return to the accident/incident report at a later time for editing. Clicking the button takes you back to the Comments tab.
- If the incident/accident was accessed via your worklist, navigate back to your worklist by clicking the Worklist link from the left navigation menu.
- Locate the accident/incident that was just reviewed and click the Mark Worked button. This action removes the worklist item from your worklist and refreshes the worklist.
|
Updating an Accident or Incident |
Follow the steps below to view an accident/incident.
Steps
- Review and make any required changes to the Injured Person Info, Employee Info, Motor Vehicle Info pages.
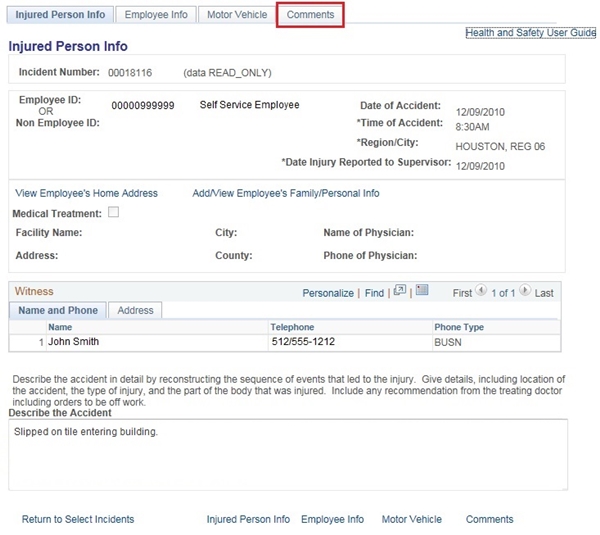
- Click the Comments page.
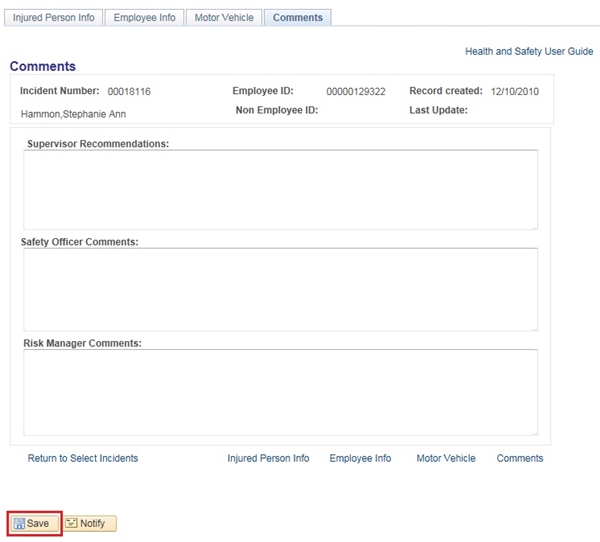
- Enter your recommendation in the Supervisor Recommendation field.
Helpful Hint: If your recommendation is already entered, a slight change to the content is required in order to submit the accident/incident.
- Click the Save button. The Workflow/Editing Status page is displayed.
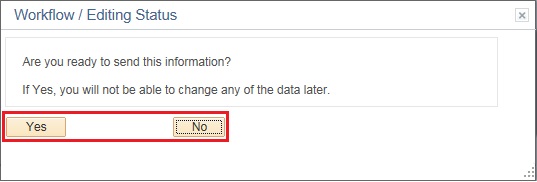
- Click the Yes button to submit the transaction and send the report to the next level for review.
Helpful Hint: Once the Yes button is clicked you will not be able to make any more changes to the document. Clicking the button takes you back to the Comments tab.
OR
Click the No button on this page if you choose not to submit the transaction in order to return to the accident/incident report at a later time for editing. Clicking the button takes you back to the Comments tab.
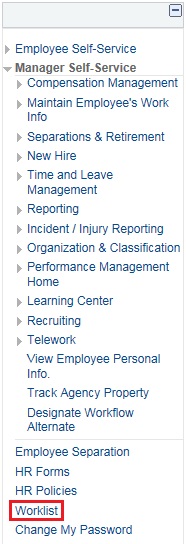
- If the incident/accident was accessed via your worklist, navigate back to your worklist by clicking the Worklist link from the left navigation menu.
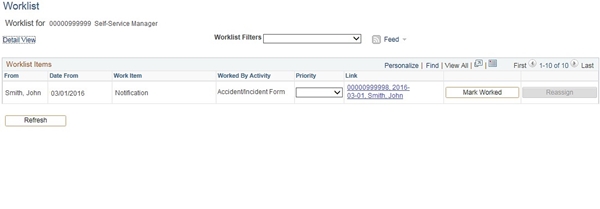
- Locate the accident/incident that was just reviewed and click the Mark Worked button. This action removes the worklist item from your worklist and refreshes the worklist.
|
|
 |
|
|
Accessibility Instructions |
Use your screen reader commands to navigate the elements on the page such as headings and links. |
Introduction |
By using the Print Accident/Incident Report link, you will have a physical copy of any accident/incident report that was submitted online through CAPPS by you on an employee’s or non-employee’s behalf. |
Step Actions |
The step actions for completing a transaction are presented in two ways: Text Only and Screen Samples:
- Text Only provides instructions for completing the transaction in order from beginning to end. It does not include screen samples.
- Screen Samples include detailed screen shots to help complete the transaction.
|
Key Terms |
For a complete glossary of terms, click here: CAPPS Glossary |
Text Only Step Actions for Printing Accident or Incident |
Follow the steps below to print an accident/incident.
Steps
- Select the Manager Self-Service link from the left navigation.
- Select the Incident / Injury Reporting drop-down menu.
- Click the Print Accident/Incident Report link. The search page is displayed.
- Enter search criteria to locate specific report.
- Click the Process Report button to submit the report for printing. A confirmation message will display.
Helpful Hint: If a report has already been requested, click the View Reports link. The View Reports page will display. Click the View Report link to see your specific Accident/Incident report.
- Click the View Reports link.
- Click the View Report link to see your specific Accident/Incident report.
|
Printing Accident or Incident |
Follow the steps below to print an accident/incident.
Steps
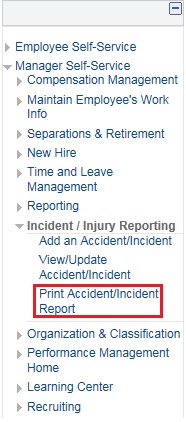
- Select the Manager Self-Service link from the left navigation.
- Select the Incident / Injury Reporting drop-down menu.
- Click the Print Accident/Incident Report link. The search page is displayed.
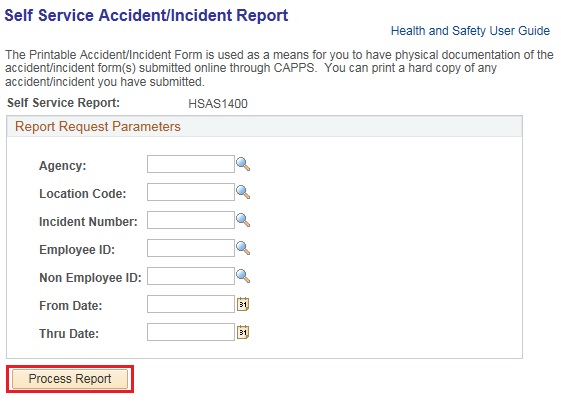
- Enter search criteria to locate specific report.
- Click the Process Report button to submit the report for printing. A confirmation message will display.
Helpful Hint: If a report has already been requested, click the View Reports link. The View Reports page will display. Click the View Report link to see your specific Accident/Incident report.

- Click the View Reports link.

- Click the View Report link to see your specific Accident/Incident report.
|
|
Key Things to Remember |
Service Center Information:
- The Service Center operates between 7:00 a.m. and 7:00 p.m. Central Time, Monday through Friday. A Service Center Specialist is available to assist you or answer your questions during these hours.
- You may contact the Service Center at 1-888-TX-HHS-HR (1-888-894-4747), or TDD/TTY for the Hearing Impaired 1-866-839-2747.
- You may email your questions directly to the Service Center by selecting Ask Service Center on the CAPPS home page (must be logged in) using the online form to enter and submit your questions.
|
|
 |