Job Center |
Accessibility Instructions |
Use your screen reader commands to navigate the elements on the page such as headings and links. |
Overview |
The Job Center helps you search, view and apply to open job positions within Health and Human Services agencies. You may search specific job opportunities from currently listed open positions or conduct a general search for open positions. Detailed information about the job postings is also provided to ensure you are informed of job requirements, responsibilities, job location, etc. If you find a job posting that interests you, you can apply for the position by creating an online profile and completing an online State of Texas application form. By creating a profile, the application will remain on file for your future use (e.g., updating profile or application information or applying to additional job opportunities). The Job Center also allows you to view and track the status of your submitted applications online. |
Step Actions |
The step actions for completing a transaction are presented in two ways: Text Only and Screen Samples:
- Text Only provides instructions for completing the transaction in order from beginning to end. It does not include screen samples.
- Screen Samples include detailed screen shots to help complete the transaction.
|
Transactions Covered in This User Guide |
- Job Center Home – Accessing and viewing the Job Center Home page.
- My Profile – Completing a profile to help match you to open positions within Health and Human Services.
- Job Search – Entering detailed search criteria to complete a more specific search of the job postings in the system.
- Alternative Search – Searching for all jobs within the system.
- Job Agent – Creating and saving defined search criteria.
- Hot Jobs – Viewing jobs which Health and Human Services is looking to fill quickly due to a high demand.
- Job Profile – Viewing detailed job descriptions and job attributes.
- Job Cart – Viewing saved job profile information.
- Application Process – Completing job assessments and the State of Texas application process.
- My Workbench – Managing the jobs to which you have applied and the tasks associated with those positions.
- Key Things to Remember – Contact information and a summary of important things to help you with *** activities.
|
Key Terms |
- Job Center – The Job Center helps you search, view and apply to open job positions within Health and Human Services agencies.
- Profile – The Profile is used to help match you to open positions within Health and Human Services. You must complete a profile to apply for a job.
- Job Search – The Job Search allows you to choose detailed search criteria so that you are able to complete a more specific search of the job postings in the system.
- Alternative Search – The Alternative Search searches all jobs within the system.
- Job Agent – Job Agents are searches that allow you to view jobs that match defined criteria. Job Agents continuously run searches based on your criteria and will send you email notifications of matching jobs if you request the job agent to notify you.
- Hot Jobs – These are jobs which Health and Human Services is looking to fill quickly due to a high demand for this position.
- Job Profile – The Job Profile displays the detailed job description and job attributes.
- Workbench – The My Workbench page is only available to you once you have logged in and created your profile. This page helps you in managing the jobs to which you have applied and the tasks associated with those positions.
|
|
 |
|
|
Accessibility Instructions |
Use your screen reader commands to navigate the elements on the page such as headings and links. |
Introduction |
As an employee, you have access to the Job Center from the CAPPS Home page. This allows you to search and view available positions, to apply for jobs, and to create and maintain your profile information. |
Step Actions |
The step actions for completing a transaction are presented in two ways: Text Only and Screen Samples:
- Text Only provides instructions for completing the transaction in order from beginning to end. It does not include screen samples.
- Screen Samples include detailed screen shots to help complete the transaction.
|
Key Terms |
For help with terms used in this User Guide, go to the top of the page. Top of Page |
Text Only Step Actions for Accessing the Job Center Home |
Follow the steps below to access the Job Center Home page.
Steps
- From the CAPPS Home page, you can access the Job Center Home page through several different links. One path to access the Job Center is through the links in the CAPPS left navigation menu. Under Employee Self Service, select the My Recruiting Activities. The left navigation menu expands with Careers highlighted. Select the Job Center link.
- A second path from which you can access the Job Center is to select Search HHS Job Postings in the I want to.... section on the CAPPS Home page.
- A third path to access the Job Center is within the Service Center Featured Links section on the CAPPS Home page. You can select the Careers link under Job Center to access this section.
- Once you have selected any one of these paths, the Job Center Home page displays.
|
Accessing the Job Center Home |
Follow the steps below to access the Job Center Home page.
Steps

- From the CAPPS Home page, you can access the Job Center Home page through several different links. One path to access the Job Center is through the links in the CAPPS left navigation menu. Under Employee Self Service, select the My Recruiting Activities. The left navigation menu expands with Careers highlighted. Select the Job Center link.

- A second path from which you can access the Job Center is to select Search HHS Job Postings in the I want to.... section on the CAPPS Home page.
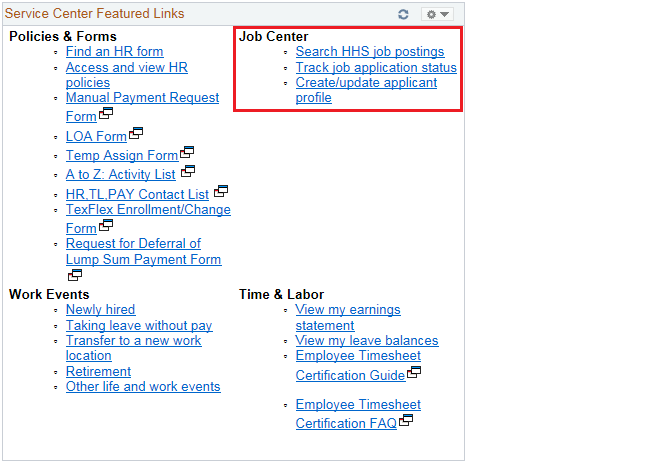
- A third path to access the Job Center is within the Service Center Featured Links section on the CAPPS Home page. You can select the Careers link under Job Center to access this section.
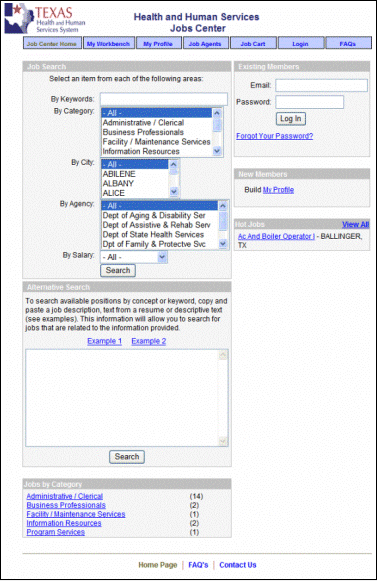
- Once you have selected any one of these paths, the Job Center Home page displays.
|
|
 |
|
|
Accessibility Instructions |
Use your screen reader commands to navigate the elements on the page such as headings and links. |
Introduction |
The Profile is used to help match you to open positions within Health and Human Services. You must complete a profile to apply for a job. |
Step Actions |
The step actions for completing a transaction are presented in two ways: Text Only and Screen Samples:
- Text Only provides instructions for completing the transaction in order from beginning to end. It does not include screen samples.
- Screen Samples include detailed screen shots to help complete the transaction.
|
Key Terms |
For help with terms used in this User Guide, go to the top of the page. Top of Page |
Text Only Step Actions for Creating a Job Profile |
Follow the steps below to create a job profile.
Steps
- From the Job Center Home Page click the My Profile tab.
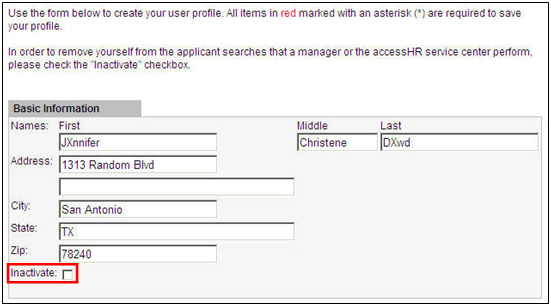
- Complete the Basic Information form fields.
Helpful Hint:You may click the Inactivate checkbox to hide your profile from recruiters so your profile does not appear on their search results page. Most of this information will be pre-populated with current data from HR.
- Complete the Additional Information form fields. In Additional Information, you complete the following fields:
- Available Date
- Are you an ERS retiree?
- Desired Compensation
Helpful Hint: This information provides additional insight to your employment preferences on your candidate profile. The Desired Compensation provides drop-down fields to specify the Pay Frequency for your desired amount of pay.
|
Creating a Job Profile |
Follow the steps below to create a job profile.
Steps
- From the Job Center Home Page click the My Profile tab.
- Complete the Basic Information form fields.
Helpful Hint:You may click the Inactivate checkbox to hide your profile from recruiters so your profile does not appear on their search results page. Most of this information will be pre-populated with current data from HR.

- Complete the Additional Information form fields. In Additional Information, you complete the following fields:
- Available Date
- Are you an ERS retiree?
- Desired Compensation
Helpful Hint: This information provides additional insight to your employment preferences on your candidate profile. The Desired Compensation provides drop-down fields to specify the Pay Frequency for your desired amount of pay.
|
|
 |
|
|
Accessibility Instructions |
Use your screen reader commands to navigate the elements on the page such as headings and links. |
Introduction |
The Job Center allows you to search for jobs two different ways: Job Search and Alternative Search. Both searches are accessed from the Job Center Home page. The Job Search allows you to choose detailed search criteria so that you are able to complete a more specific search of the job postings in the system. |
Step Actions |
The step actions for completing a transaction are presented in two ways: Text Only and Screen Samples:
- Text Only provides instructions for completing the transaction in order from beginning to end. It does not include screen samples.
- Screen Samples include detailed screen shots to help complete the transaction.
|
Key Terms |
For help with terms used in this User Guide, go to the top of the page. Top of Page |
Text Only Step Actions for Creating a Job Search |
Follow the steps below to begin a Job Search.
Steps
- From the Job Center Home tab, choose the criteria for your search and click the Search button. A list of job postings matching your search criteria is displayed.
Helpful Hints:
- By selecting more than one search criteria, you are searching for both criteria to be met; for example, searching for the cities of both Abilene and Albany and the Agency of Dept of Aging & Disability Services produces postings in Abilene and Albany within DADS.
- You can also select more than one search criteria in each Job Search area by selecting the SHIFT+↑
(arrow up) or ↓ (arrow down) key; for example, you can search for jobs in two specific cities (e.g. Abilene and Albany).
- You are able to sort the results of the search based on the Job Title, City, Agency, and Date fields. Clicking once on any of the field headings (titles in the grey area) sorts the information in an ascending order. Clicking again on the same field heading sorts the information in a descending order.
- You are able to view details about each job by clicking on the job title. This launches the Job Profile. From the Job Profile, you are able to apply for the job,view the job details or add the job to your Job Cart. If you return to the previous page without saving your search, your search results are deleted.
- To save your search criteria, click Save this Search button on your search results page. The Job Agents page displays. The fields from your search are listed with your criteria selected. You enter a title for your job agent.
- You can select how often the job agent notifies you of jobs that match your criteria; daily, weekly or never. If you choose never, you are not notified via email of the new posting. Click the Save this Search button to save your Job Agent. When you save your job agent, the Job Agent page displays. The system will constantly searches for jobs that meet your criteria.
|
Creating a Job Search |
Follow the steps below to begin a Job Search.
Steps
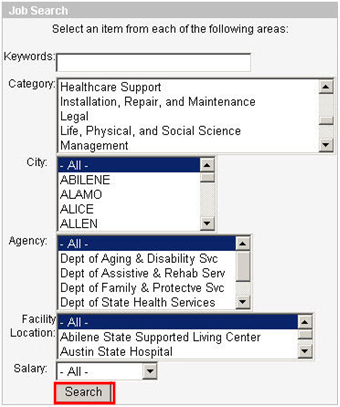
- From the Job Center Home tab, choose the criteria for your search and click the Search button. A list of job postings matching your search criteria is displayed.
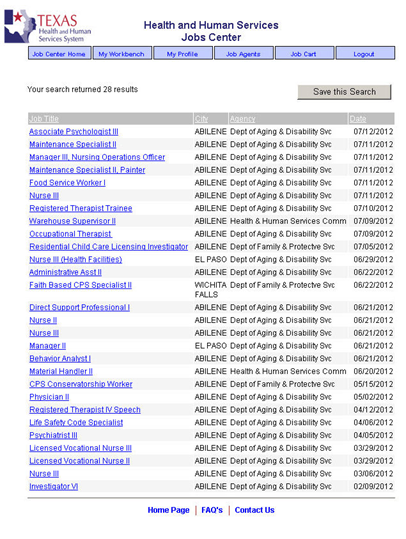
Helpful Hints:
- By selecting more than one search criteria, you are searching for both criteria to be met; for example, searching for the cities of both Abilene and Albany and the Agency of Dept of Aging & Disability Services produces postings in Abilene and Albany within DADS.
- You can also select more than one search criteria in each Job Search area by selecting the SHIFT+↑ (arrow up) or ↓ (arrow down) key; for example, you can search for jobs in two specific cities (e.g. Abilene and Albany).
- You are able to sort the results of the search based on the Job Title, City, Agency, and Date fields. Clicking once on any of the field headings (titles in the grey area) sorts the information in an ascending order. Clicking again on the same field heading sorts the information in a descending order.
- You are able to view details about each job by clicking on the job title. This launches the Job Profile. From the Job Profile, you are able to apply for the job,view the job details or add the job to your Job Cart. If you return to the previous page without saving your search, your search results are deleted.
- To save your search criteria, click Save this Search button on your search results page. The Job Agents page displays. The fields from your search are listed with your criteria selected. You enter a title for your job agent.
- You can select how often the job agent notifies you of jobs that match your criteria; daily, weekly or never. If you choose never, you are not notified via email of the new posting. Click the Save this Search button to save your Job Agent. When you save your job agent, the Job Agent page displays. The system will constantly searches for jobs that meet your criteria.
|
|
 |
|
|
Accessibility Instructions |
Use your screen reader commands to navigate the elements on the page such as headings and links. |
Introduction |
Job Agents are searches that allow the user to view jobs that match defined criteria. Job Agents help save time because you can save a job search rather than entering the same data numerous times. Job Agents continuously run searches based on your criteria and will send you email notifications of matching jobs if you request the job agent to notify you. Job Agents can be edited if you wish to change your search criteria or they can be deleted. |
Step Actions |
The step actions for completing a transaction are presented in two ways: Text Only and Screen Samples:
- Text Only provides instructions for completing the transaction in order from beginning to end. It does not include screen samples.
- Screen Samples include detailed screen shots to help complete the transaction.
|
Key Terms |
For help with terms used in this User Guide, go to the top of the page. Top of Page |
Text Only Step Actions for Creating a Job Agent |
Follow the steps below to create a Job Agent.
Steps
- Complete a job search (refer to the Creating a Job Search task).
- On the results page, click the Save this Search button.
- Enter a title for your job search and click the Save this Search button.
- A confirmation message tells you your search has been saved. The saved job agent title appears as a link under the Job Agents Job Title heading. You can access your saved Job Agents by clicking the Job Agent tab.
|
Creating a Job Agent |
Follow the steps below to create a Job Agent.
Steps
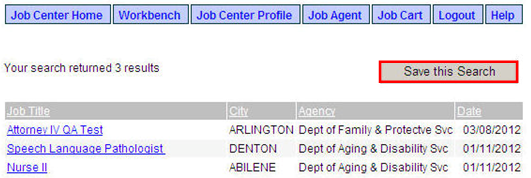
- Complete a job search (refer to the Creating a Job Search task).
- On the results page, click the Save this Search button.
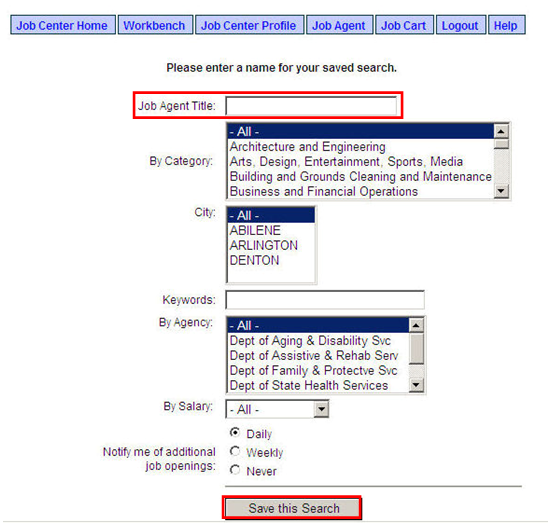
- Enter a title for your job search and click the Save this Search button.
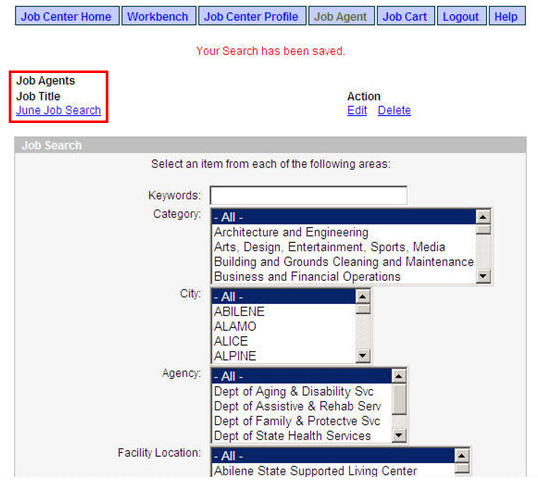
- A confirmation message tells you your search has been saved. The saved job agent title appears as a link under the Job Agents Job Title heading. You can access your saved Job Agents by clicking the Job Agent tab.
|
Text Only Step Actions for Editing or Deleting a Job Agent |
Follow the steps below to edit or delete a Job Agent.
Steps
- To view your saved job agents, select Job Agents on the Menu Bar. You can identify multiple job agents. Other job agents you saved are listed in this area. You are able to run your job agent by selecting the appropriate job agent in the list.
- You select Edit to alter the search criteria for the job agent or select Delete to delete the job agent from this page. The Job Agent page displays the search criteria fields, so you can create multiple saved job agents.
|
Editing or Deleting a Job Agent |
Follow the steps below to edit or delete a Job Agent.
Steps
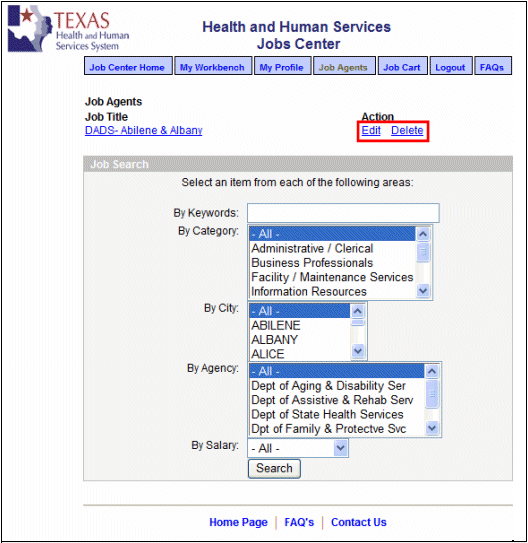
- To view your saved job agents, select Job Agents on the Menu Bar. You can identify multiple job agents. Other job agents you saved are listed in this area. You are able to run your job agent by selecting the appropriate job agent in the list.
- You select Edit to alter the search criteria for the job agent or select Delete to delete the job agent from this page. The Job Agent page displays the search criteria fields, so you can create multiple saved job agents.
|
|
 |
|
Accessibility Instructions |
Use your screen reader commands to navigate the elements on the page such as headings and links. |
Introduction |
From the Job Center Home page, you are able to perform an Alternative Search. The Alternative Search searches all jobs within the system using information from your resume or a set of skills that you enter. |
Step Actions |
The step actions for completing a transaction are presented in two ways: Text Only and Screen Samples:
- Text Only provides instructions for completing the transaction in order from beginning to end. It does not include screen samples.
- Screen Samples include detailed screen shots to help complete the transaction.
|
Key Terms |
For help with terms used in this User Guide, go to the top of the page. Top of Page |
Text Only Step Actions for Running an Alternative Search |
Follow the steps below to run an Alternative Search.
Steps
- From the Job Center Home page, select Example 1 and Example 2 to see examples of what should be entered in the text box to return the best results. Based on the comparison to the information you provide, the top 50 matches appear.
- Copy and paste your resume or a set of skills into the Alternative Search text box and then click the Search button. All the jobs in the system that match against your resume/skills are displayed. The jobs that most closely match your resume/skills will be sorted to the top of the list.
- From the search results page, you are able to view details about each job by clicking on the Job Title. The Job Profile page displays and you are able to apply for the job or just view the details.
|
Running an Alternative Search |
Follow the steps below to run an Alternative Search.
Steps
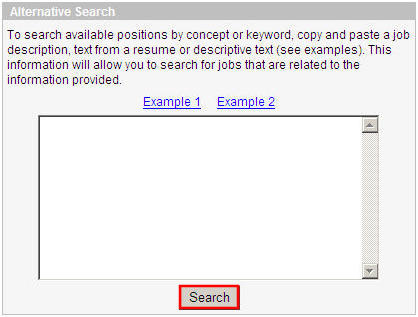
- From the Job Center Home page, select Example 1 and Example 2 to see examples of what should be entered in the text box to return the best results. Based on the comparison to the information you provide, the top 50 matches appear.
- Copy and paste your resume or a set of skills into the Alternative Search text box and then click the Search button. All the jobs in the system that match against your resume/skills are displayed. The jobs that most closely match your resume/skills will be sorted to the top of the list.
- From the search results page, you are able to view details about each job by clicking on the Job Title. The Job Profile page displays and you are able to apply for the job or just view the details.
|
|
 |
|
Accessibility Instructions |
Use your screen reader commands to navigate the elements on the page such as headings and links. |
Introduction |
On the Job Center Home page, you can also view Hot Jobs. These are jobs which Health and Human Services is looking to fill quickly due to a high demand for this position. Only the most recent Hot Jobs display in this section. Click View All to be brought to a list of all Hot Jobs within Health and Human Services. Click on a job title to view the job profile. |
Step Actions |
The step actions for completing a transaction are presented in two ways: Text Only and Screen Samples:
- Text Only provides instructions for completing the transaction in order from beginning to end. It does not include screen samples.
- Screen Samples include detailed screen shots to help complete the transaction.
|
Key Terms |
For help with terms used in this User Guide, go to the top of the page. Top of Page |
Text Only Step Actions for Viewing Hot Jobs |
Follow the steps below to view Hot Jobs.
Steps
- Click the Job Center Home tab and view the Hot Jobs section of the page.
- Click View All to see a,ist of all hot jobs within Health and Human Services.
|
Viewing Hot Jobs |
Follow the steps below to view Hot Jobs.
Steps
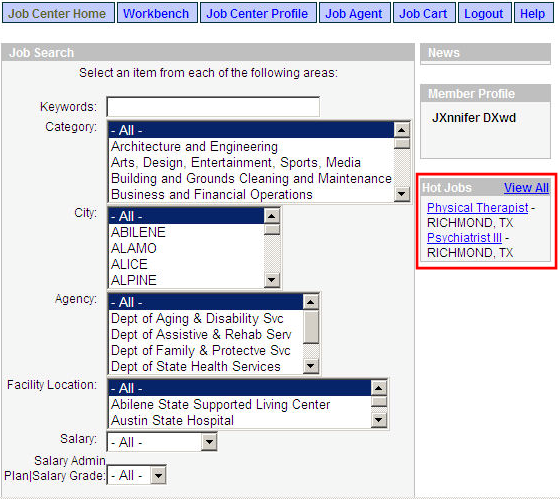
- Click the Job Center Home tab and view the Hot Jobs section of the page.
- Click View All to see a,ist of all hot jobs within Health and Human Services.
|
|
 |
|
Accessibility Instructions |
Use your screen reader commands to navigate the elements on the page such as headings and links. |
Introduction |
The Job Profile displays the detailed job description and job attributes. |
Step Actions |
The step actions for completing a transaction are presented in two ways: Text Only and Screen Samples:
- Text Only provides instructions for completing the transaction in order from beginning to end. It does not include screen samples.
- Screen Samples include detailed screen shots to help complete the transaction.
|
Key Terms |
For help with terms used in this User Guide, go to the top of the page. Top of Page |
Text Only Step Actions for Viewing a Job Profile |
Follow the steps below to view a job profile.
Steps
- Complete a job search or alternative search (refer to Creating a Job Search and Running an Alternative Search tasks).
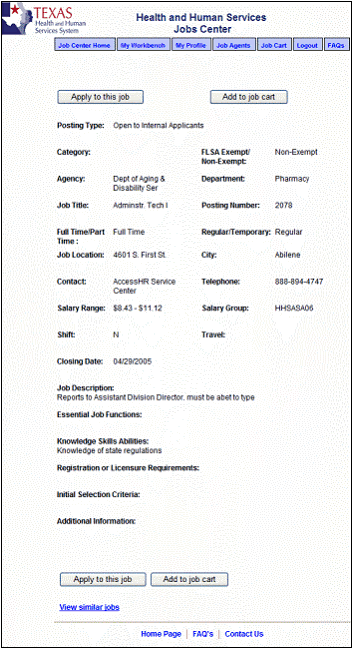
- From your results, click on a Job Title to view the Job Profile. The Job Profile page displays.
|
Viewing a Job Profile |
Follow the steps below to view a job profile.
Steps
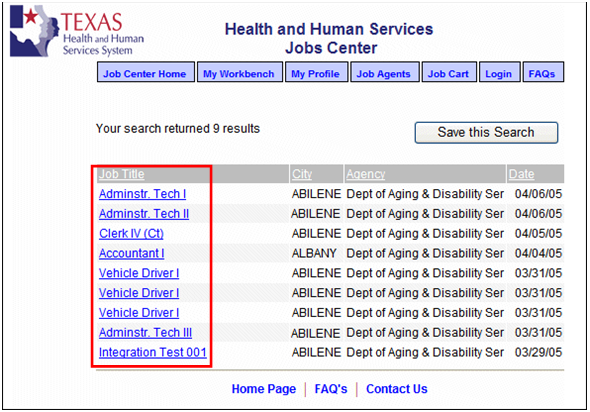
- Complete a job search or alternative search (refer to Creating a Job Search and Running an Alternative Search tasks).
- From your results, click on a Job Title to view the Job Profile. The Job Profile page displays.
|
|
 |
|
Accessibility Instructions |
Use your screen reader commands to navigate the elements on the page such as headings and links. |
Introduction |
Once you have viewed the Job Profile, you have the option to Add to job cart. Clicking the Add to job cart button saves this job profile in your Job Cart. The Job Cart stores a link to the selected job profile. After clicking the Add to job cart button, a message displays indicating that the job was added to the job cart. To view your saved job profiles, select Job Cart on the Menu Bar. |
Step Actions |
The step actions for completing a transaction are presented in two ways: Text Only and Screen Samples:
- Text Only provides instructions for completing the transaction in order from beginning to end. It does not include screen samples.
- Screen Samples include detailed screen shots to help complete the transaction.
|
Key Terms |
For help with terms used in this User Guide, go to the top of the page. Top of Page |
Text Only Step Actions for Adding a job profile to the Job Cart |
Follow the steps below to add a job profile to the Job Cart.
Steps
- Complete a job search or alternative search (refer to Creating a Job Search and Running an Alternative Search tasks). From your results, click on a Job Title to view the Job Profile. The Job Profile page displays.
- Click Add to Job Cart to save this job profile. To view your saved job profiles, select Job Cart on the Menu Bar.
|
Adding a job profile to the Job Cart |
Follow the steps below to add a job profile to the Job Cart.
Steps
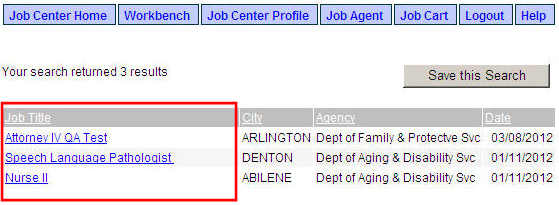
- Complete a job search or alternative search (refer to Creating a Job Search and Running an Alternative Search tasks). From your results, click on a Job Title to view the Job Profile. The Job Profile page displays.
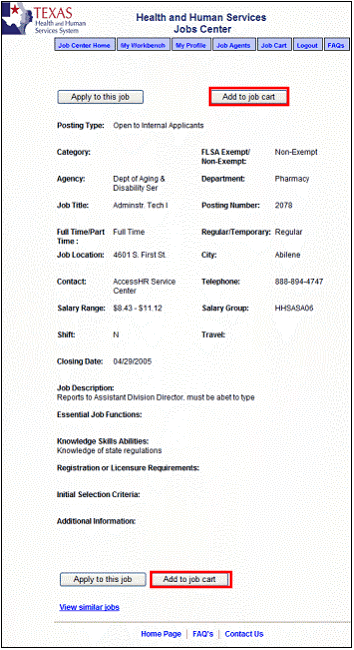
- Click Add to Job Cart to save this job profile. To view your saved job profiles, select Job Cart on the Menu Bar.
|
|
 |
|
Accessibility Instructions |
Use your screen reader commands to navigate the elements on the page such as headings and links. |
Introduction |
After you view a job profile, you can Apply to this Job. To complete the application process, you may need to:
- Complete an Assessment
- Complete a State of Texas online application
If you decide to apply to a job that has an assessment, once you select the Apply to this job button you will be asked to complete the assessment. An assessment is a predefined set of questions used to evaluate your skills as a possible match for the job. Not all jobs will have an assessment. The Hiring Manager decides whether to place the assessment at the beginning or the end of the application process. |
Step Actions |
The step actions for completing a transaction are presented in two ways: Text Only and Screen Samples:
- Text Only provides instructions for completing the transaction in order from beginning to end. It does not include screen samples.
- Screen Samples include detailed screen shots to help complete the transaction.
|
Key Terms |
For help with terms used in this User Guide, go to the top of the page. Top of Page |
Text Only Step Actions for Completing an Assessment |
Follow the steps for applying for a job and completing an assessment. Not all jobs will have an assessment.
Steps
- Click Apply to this Job from the Job Profile screen (refer to Viewing a Job Profile task).
- Click the Begin Assessment button to launch the assessment. Upon answering the question, click the Go button to move to the next question.
- After completing the assessment, click the Continue here to continue with your application link to proceed with the State of Texas online application form, if necessary (if you have already completed the application, you can use your saved application).
Helpful Hint: Assessment questions are used to screen applicant qualifications. If you do not have the proper requirements that are necessary for a job, you will be disqualified.
|
Completing an Assessment |
Follow the steps for applying for a job and completing an assessment. Not all jobs will have an assessment.
Steps
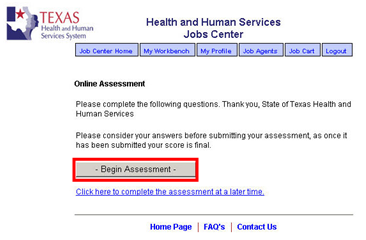
- Click Apply to this Job from the Job Profile screen (refer to Viewing a Job Profile task).
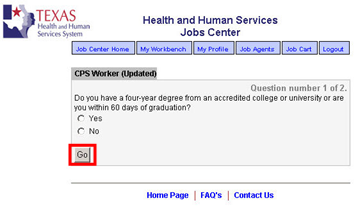
- Click the Begin Assessment button to launch the assessment. Upon answering the question, click the Go button to move to the next question.
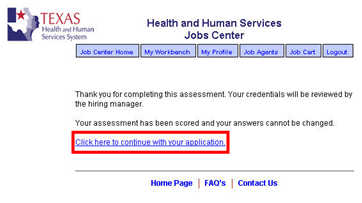
- After completing the assessment, click the Continue here to continue with your application link to proceed with the State of Texas online application form, if necessary (if you have already completed the application, you can use your saved application).
Helpful Hint: Assessment questions are used to screen applicant qualifications. If you do not have the proper requirements that are necessary for a job, you will be disqualified.
|
Text Only Step Actions for Applying for a Job |
Follow the steps below to complete a State of Texas online application.
Steps
- Click the Apply to this Job link from the Job Profile screen (refer to Viewing a Job Profile task). A new browser window opens with the State of Texas application.
Helpful Hint: In the upper right corner of the page, it will list Step 1 of 10 of the application. Refer to this area of the application to understand where you are in the application process.
- Upon reading the General Instructions for completing the State of Texas Application for Employment, click the Continue button to proceed. The How Do We Contact You page displays.
Helpful Hint: If you need to return to a previous page when completing the application form, click the Back button within the application. Do not click the Back button in your internet browser. This causes you to lose all the information that you entered.
- Complete the personal information data fields.
Helpful Hint: At this point in the application, you have the ability to Continue which brings you to the next page in the application process, go Back to the previous page, Save & Continue Later which saves your application and brings you to My Workbench, or Cancel your application by clicking on any of the buttons provided.
- Clicking the Continue button displays the Additional Information page. Here, you provide additional information about yourself, such as the date you are available to begin working, your travel preferences, etc.
- Click the Continue button to proceed to the Education page. Enter all of your information about your education on this page.
- To add education information, click the Add button. You are taken to another page, where you enter information about your education.
- Click the Save button when finished, or the Cancel button to return to the main Education page.
Helpful Hints:
- Click the Add button again to add additional education information.
- Clicking the Edit or Delete buttons allows you to change your existing information.
- To change the order in which your education information is displayed, click the Select radio button next to the row of education data you would like to move.
- Click Move Selection Up in List to move an education experience up or Move Selection Down in List to move the selection down.
- Once you have listed all of your education information, click the Continue button to proceed to the Licenses/Certifications page. This section allows you to document your professional certifications and/or licenses.
- To add a license or certification, click the Add button. You are taken to another page where you enter information about your license or certification.
- Click the Save button when finished, or the Cancel button to return to the main License/Certification page.
Helpful Hints:
- Click the Add button again to add additional license/certification information.
- Clicking the Edit or Delete buttons allows you to change your existing information.
- To change the order in which your information is displayed, click the Select radio button next to the row of data you would like to move.
- Click Move Selection Up in List to move your selection up or Move Selection Down in List to move your selection down.
- Once you have listed all of your licenses and certifications, click the Continue button. The Special Training, Skills or Qualifications page displays.
- Provide additional information about yourself which is relevant to the job posting. For example, you are able to indicate your typing speed, sign language proficiency, and proficiency in a language other than English.
- Clicking the Continue button displays the Foster Youth Status and Military Service page. Provide information pertaining to any information about being a foster youth under the Texas Department of Family and Protective Services and/or military service you have performed.
- Click the Continue button to proceed to the Employment History page. The Employment History page allows you to capture all of the information about your current place of employment in addition to your previous work history.
- To add employment history information, click the Add button. Another page displays where you may enter additional employment information and other important prior work history information such as a Summary of Experience.
- Click the Save button when finished, or the Cancel button to return to the main Employment History page.
Helpful Hints:
- Click the Add button again to add additional work history information.
- Clicking the Edit or Delete buttons allows you to change your existing information.
- To change the order in which your information is displayed, click the Select radio button next to the row of data you would like to move.
- Click Move Selection Up in List to move a selection up or Move Selection Down in List to move a selection down.
- Clicking the Continue button displays the Applicant EEO Data Form page where you have the opportunity to provide optional information about yourself for Federal government reporting purposes.
Helpful Hint: A message at the top of this page reinforces that “The information requested is optional and is being collected for the purpose of reporting to Federal and Equal Employment Opportunity Agencies and will not be considered as part of the application for employment. It will be separated from the application.”
- Click the Continue button to reach the final page of the application. On the Certification page, you read and certify your understanding of the statements on the page and certify that your application is accurate and complete.
- Enter your full name in the Name field.
- Click the Submit button to submit your application to the job posting. Entering your name in the Name field is the same as you signing your name on a paper application.
Helpful Hints:
- The Date field is already populated with the current date, so you do not need to complete this field.
- Once the application is submitted, a confirmation page displays to confirm that your application was received. If you provided an email address in the How Do We Contact You page, you also receive an email confirmation.
|
Applying for a Job |
Follow the steps below to complete a State of Texas online application.
Steps
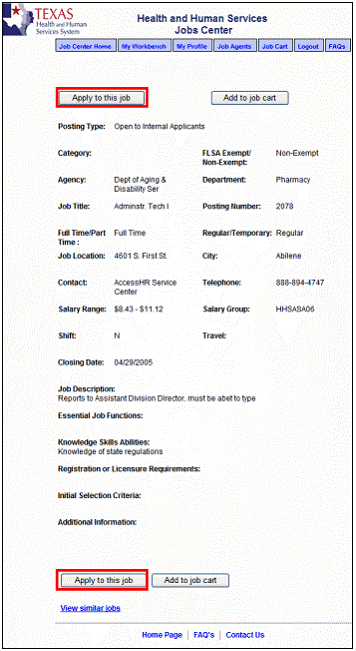
- Click the Apply to this Job link from the Job Profile screen (refer to Viewing a Job Profile task). A new browser window opens with the State of Texas application.
Helpful Hint: In the upper right corner of the page, it will list Step 1 of 10 of the application. Refer to this area of the application to understand where you are in the application process.
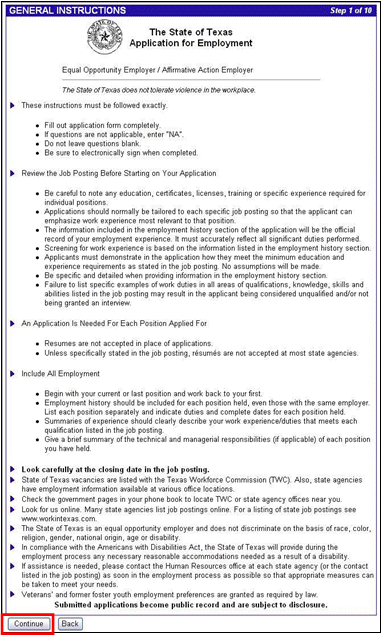
- Upon reading the General Instructions for completing the State of Texas Application for Employment, click the Continue button to proceed. The How Do We Contact You page displays.
Helpful Hint: If you need to return to a previous page when completing the application form, click the Back button within the application. Do not click the Back button in your internet browser. This causes you to lose all the information that you entered.
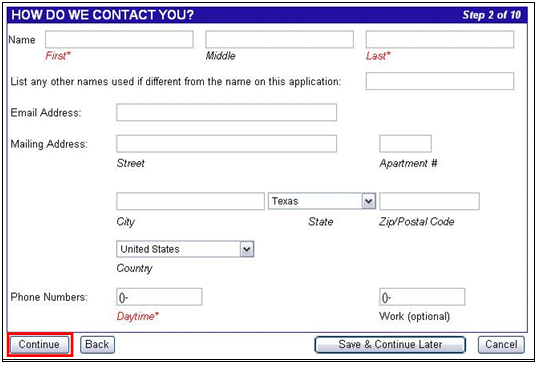
- Complete the personal information data fields.
Helpful Hint: At this point in the application, you have the ability to Continue which brings you to the next page in the application process, go Back to the previous page, Save & Continue Later which saves your application and brings you to My Workbench, or Cancel your application by clicking on any of the buttons provided.
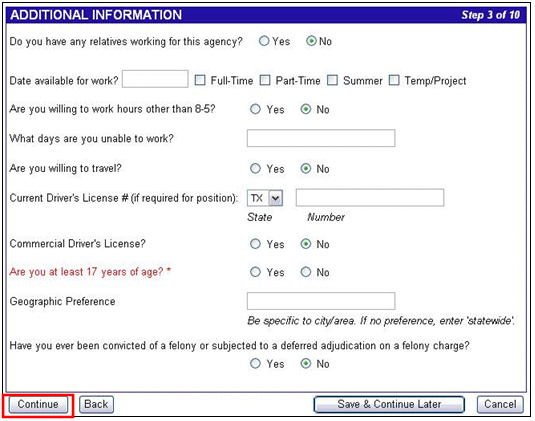
- Clicking the Continue button displays the Additional Information page. Here, you provide additional information about yourself, such as the date you are available to begin working, your travel preferences, etc.
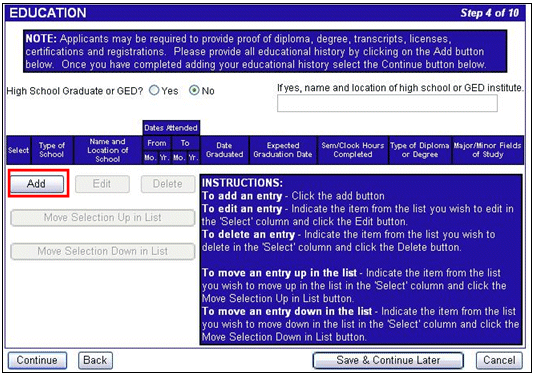
- Click the Continue button to proceed to the Education page. Enter all of your information about your education on this page.
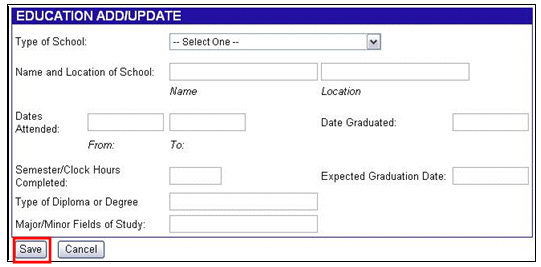
- To add education information, click the Add button. You are taken to another page, where you enter information about your education.
- Click the Save button when finished, or the Cancel button to return to the main Education page.
Helpful Hints:
- Click the Add button again to add additional education information.
- Clicking the Edit or Delete buttons allows you to change your existing information.
- To change the order in which your education information is displayed, click the Select radio button next to the row of education data you would like to move.
- Click Move Selection Up in List to move an education experience up or Move Selection Down in List to move the selection down.
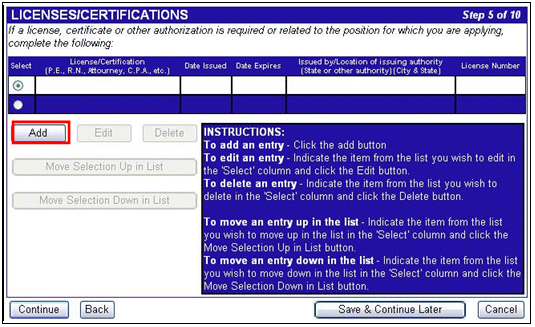
- Once you have listed all of your education information, click the Continue button to proceed to the Licenses/Certifications page. This section allows you to document your professional certifications and/or licenses.
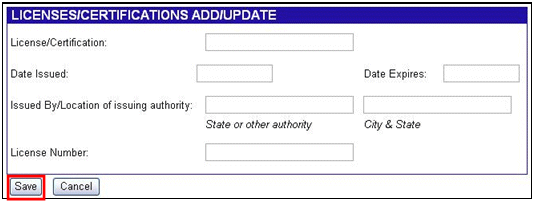
- To add a license or certification, click the Add button. You are taken to another page where you enter information about your license or certification.
- Click the Save button when finished, or the Cancel button to return to the main License/Certification page.
Helpful Hints:
- Click the Add button again to add additional license/certification information.
- Clicking the Edit or Delete buttons allows you to change your existing information.
- To change the order in which your information is displayed, click the Select radio button next to the row of data you would like to move.
- Click Move Selection Up in List to move your selection up or Move Selection Down in List to move your selection down.
- Once you have listed all of your licenses and certifications, click the Continue button. The Special Training, Skills or Qualifications page displays.
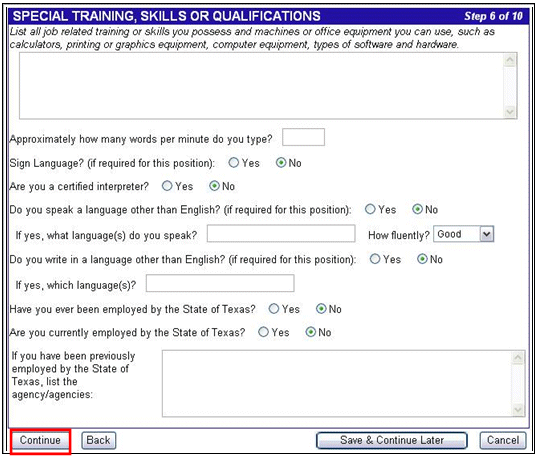
- Provide additional information about yourself which is relevant to the job posting. For example, you are able to indicate your typing speed, sign language proficiency, and proficiency in a language other than English.
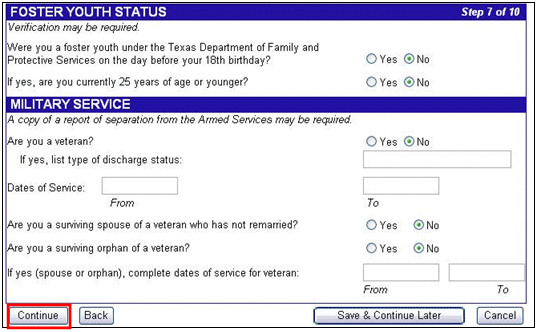
- Clicking the Continue button displays the Foster Youth Status and Military Service page. Provide information pertaining to any information about being a foster youth under the Texas Department of Family and Protective Services and/or military service you have performed.
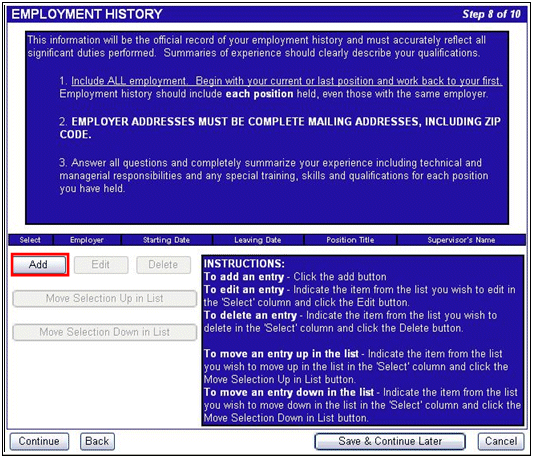
- Click the Continue button to proceed to the Employment History page. The Employment History page allows you to capture all of the information about your current place of employment in addition to your previous work history.
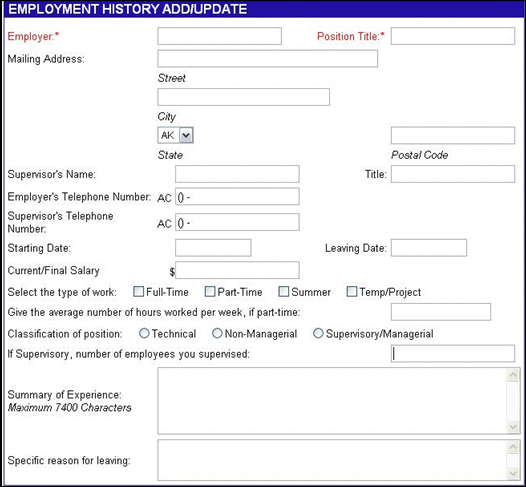
- To add employment history information, click the Add button. Another page displays where you may enter additional employment information and other important prior work history information such as a Summary of Experience.
- Click the Save button when finished, or the Cancel button to return to the main Employment History page.
Helpful Hints:
- Click the Add button again to add additional work history information.
- Clicking the Edit or Delete buttons allows you to change your existing information.
- To change the order in which your information is displayed, click the Select radio button next to the row of data you would like to move.
- Click Move Selection Up in List to move a selection up or Move Selection Down in List to move a selection down.
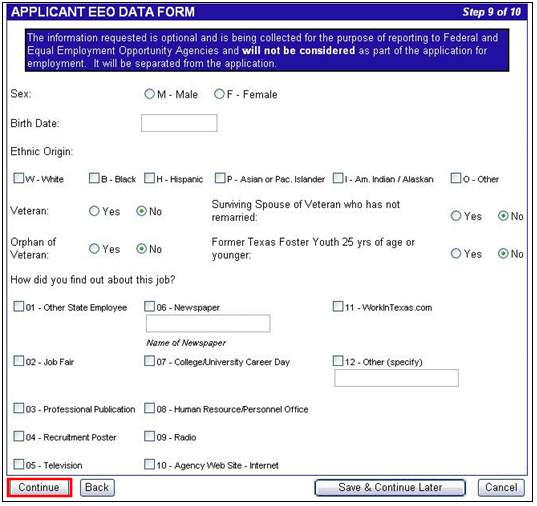
- Clicking the Continue button displays the Applicant EEO Data Form page where you have the opportunity to provide optional information about yourself for Federal government reporting purposes.
Helpful Hint: A message at the top of this page reinforces that “The information requested is optional and is being collected for the purpose of reporting to Federal and Equal Employment Opportunity Agencies and will not be considered as part of the application for employment. It will be separated from the application.”
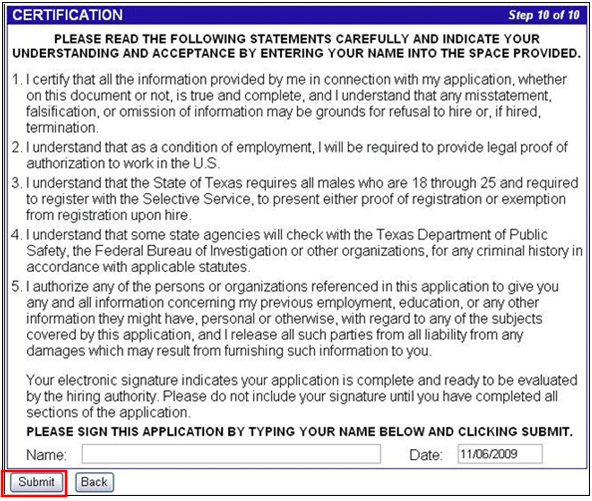
- Click the Continue button to reach the final page of the application. On the Certification page, you read and certify your understanding of the statements on the page and certify that your application is accurate and complete.
- Enter your full name in the Name field.
- Click the Submit button to submit your application to the job posting. Entering your name in the Name field is the same as you signing your name on a paper application.
Helpful Hints:
- The Date field is already populated with the current date, so you do not need to complete this field.
- Once the application is submitted, a confirmation page displays to confirm that your application was received. If you provided an email address in the How Do We Contact You page, you also receive an email confirmation.
|
|
 |
|
Accessibility Instructions |
Use your screen reader commands to navigate the elements on the page such as headings and links. |
Introduction |
The My Workbench page is only available to you once you have logged in and created your profile. (Refer to the Creating a Profile task.)This page holds many options for you in managing the jobs to which you have applied and the tasks associated with those positions. |
Step Actions |
The step actions for completing a transaction are presented in two ways: Text Only and Screen Samples:
- Text Only provides instructions for completing the transaction in order from beginning to end. It does not include screen samples.
- Screen Samples include detailed screen shots to help complete the transaction.
|
Key Terms |
For help with terms used in this User Guide, go to the top of the page. Top of Page |
Text Only Step Actions for Viewing My Workbench |
Follow the steps below to view My Workbench.
Steps
- From the Job Center Home page, click the My Workbench tab.
Helpful Hints:
- Hot Jobs: The Hot Jobs section contains the same information seen in the Hot Jobs section of the Job Center Home page.
- Job Postings Applied to (last 120 days): All job postings that you applied to within the last 120 days are listed in the Job Postings Applied to (last 120 days) section. This section lists the date you Applied for the job, as well as your Status in the hiring process for each job. If the job title is a link, then you can click the link to view the Job Profile. If it is not a link, then the job is no longer open. This serves as a history of all the jobs you have applied to and helps you keep track of them.
- Assessments to take: Indicates of any of the positions you applied to contain an assessment to complete.
- Employment Applications Submitted: All applications you submitted are listed in the Employment Applications Submitted section. This section lists the date you Signed, or applied, for each job. If the job title is a link, then you can view the application you submitted for this job. Although you can view the application, you cannot modify the submitted application. If it is not a link, then the job is no longer open. This serves as a history for you to keep track of the jobs to which you applied.
|
Viewing My Workbench |
Follow the steps below to view My Workbench.
Steps
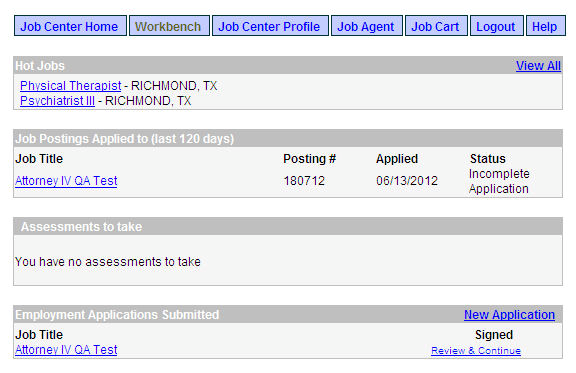
- From the Job Center Home page, click the My Workbench tab.
Helpful Hints:
- Hot Jobs: The Hot Jobs section contains the same information seen in the Hot Jobs section of the Job Center Home page.
- Job Postings Applied to (last 120 days): All job postings that you applied to within the last 120 days are listed in the Job Postings Applied to (last 120 days) section. This section lists the date you Applied for the job, as well as your Status in the hiring process for each job. If the job title is a link, then you can click the link to view the Job Profile. If it is not a link, then the job is no longer open. This serves as a history of all the jobs you have applied to and helps you keep track of them.
- Assessments to take: Indicates of any of the positions you applied to contain an assessment to complete.
- Employment Applications Submitted: All applications you submitted are listed in the Employment Applications Submitted section. This section lists the date you Signed, or applied, for each job. If the job title is a link, then you can view the application you submitted for this job. Although you can view the application, you cannot modify the submitted application. If it is not a link, then the job is no longer open. This serves as a history for you to keep track of the jobs to which you applied.
|
|
 |
|
Key Things to Remember |
Service Center Information:
- The Service Center operates between 7:00 a.m. and 7:00 p.m. Central Time, Monday through Friday. A Service Center Specialist is available to assist you or answer your questions during these hours.
- You may contact the Service Center at 1-888-TX-HHS-HR (1-888-894-4747), or TDD/TTY for the Hearing Impaired 1-866-839-2747.
- You may email your questions directly to the Service Center by selecting Ask Service Center on the CAPPS home page (must be logged in) using the online form to enter and submit your questions.
|
|
 |