Learning Center |
Accessibility Instructions |
Use your screen reader commands to navigate the elements on the page such as headings and links. |
Overview |
The Learning Center in CAPPS enables you to enroll team members in activities (classes) and view and run training reports for current and historical training status for your team. |
Step Actions |
The step actions for completing a transaction are presented in two ways: Text Only and Screen Samples:
- Text Only provides instructions for completing the transaction in order from beginning to end. It does not include screen samples.
- Screen Samples include detailed screen shots to help complete the transaction.
|
Transactions Covered in this User Guide |
|
Key Terms |
For a complete glossary of terms, click here: CAPPS Glossary.
- Activity – A learning component that is either a course or part of a course. Activities may be Web-based or Instructor-led learning.
- Course – A course may be a collection of learning activities related to a specific topic of study. A course may have multiple learning activities.
- Enroll – Learners enroll in an activity in order to attend a class or take an online course.
|
|
 |
|
|
Accessibility Instructions |
Use your screen reader commands to navigate the elements on the page such as headings and links. |
Introduction |
CAPPS enables you to quickly enroll a team member, or multiple team members in activities. Your team will be automatically registered for 3 of the 5 required activities upon initial hire, with automated email reminders. Learners must enroll for the other 2 required activities. You may also enroll your team in non-mandatory courses, using the enrollment steps outlined below. |
Step Actions |
The step actions for completing a transaction are presented in two ways: Text Only and Screen Samples:
- Text Only provides instructions for completing the transaction in order from beginning to end. It does not include screen samples.
- Screen Samples include detailed screen shots to help complete the transaction.
|
Key Terms |
For help with terms used in this User Guide, go to the top of the page. Top of Page |
Text Only Step Actions for Completing Enrollments for Your
Team |
Follow the steps below to enroll your team member in an Activity.
Steps
- Select the Manager Self-Service link from the left navigation.
- Select the Learning Center drop-down menu.
- Click the Search Catalog link.
- Enter the name of the activity in which you wish to enroll your team member.
Helpful Hint: The Search Catalog page defaults to the Activities search category. If you don’t know the name of the Activity, immediately click the Search button to display a list of all available Activities. Then, you can scroll through the list until you find the Activity you need.
- Click the Enroll Now button.
Helpful Hint: You may review additional details about the Activity by clicking View Details.
- The Select Learner page displays a listing of your team members. Click the checkbox to select the each member you wish to enroll.
- Click the Go button.
Helpful Hint: You may enroll multiple team members by clicking the checkbox next to each team member you wish to enroll. You may also click the the Select All link to enroll all of your team members in the Activity.
- Click the Submit Enrollment button to complete enrollment.
- The Enrollment Confirmation page displays, confirming your team member has been successfully enrolled. A unique confirmation ID number displays for each learner enrolled.
|
Completing Enrollments for Your
Team |
Follow the steps below to enroll your team member in an Activity.
Steps
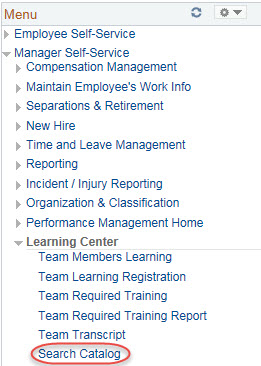
- Select the Manager Self-Service link from the left navigation.
- Select the Learning Center drop-down menu.
- Click the Search Catalog link.

- Enter the name of the activity in which you wish to enroll your team member.
Helpful Hint: The Search Catalog page defaults to the Activities search category. If you don’t know the name of the Activity, immediately click the Search button to display a list of all available Activities. Then, you can scroll through the list until you find the Activity you need.
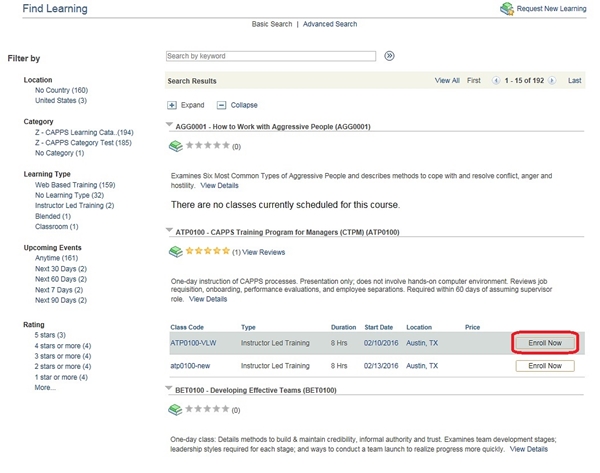
- Click the Enroll Now button.
Helpful Hint: You may review additional details about the Activity by clicking View Details.
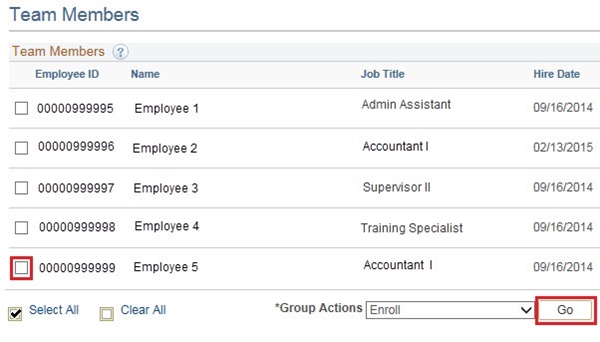
- The Select Learner page displays a listing of your team members. Click the checkbox to select each team member you wish to enroll.
- Click the Go button.
Helpful Hint: You may enroll multiple team members by clicking the checkbox next to each team member you wish to enroll. You may also click the the Select All link to enroll all of your team members in the Activity.
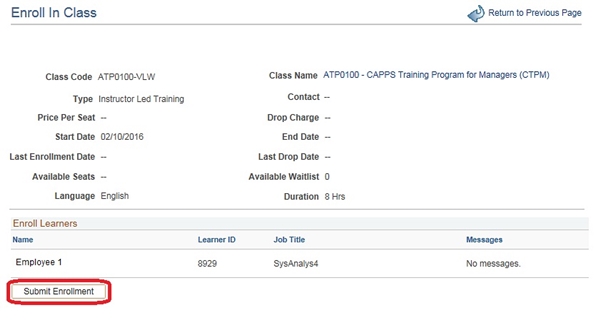
- Click the Submit Enrollment button to complete the enrollment.
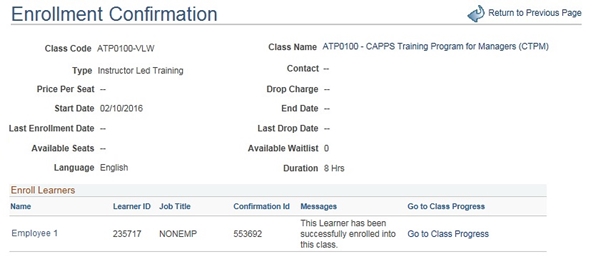
- The Enrollment Confirmation page displays, confirming your team member has been successfully enrolled. A confirmation ID number displays for each learner enrolled.
|
|
 |
|
|
Accessibility Instructions |
Use your screen reader commands to navigate the elements on the page such as headings and links. |
Introduction |
The Team Member Registration function enables you to view the current training for all of your team, or select a team member to view the current training specific to that person. |
Step Actions |
The step actions for completing a transaction are presented in two ways: Text Only and Screen Samples:
- Text Only provides instructions for completing the transaction in order from beginning to end. It does not include screen samples.
- Screen Samples include detailed screen shots to help complete the transaction.
|
Key Terms |
For help with terms used in this User Guide, go to the top of the page. Top of Page |
Text Only Step Actions for Viewing Team Member Current Training |
Follow the steps below to view a team member’s current training.
Steps
- Select the Manager Self-Service link from the left navigation.
- Select the Learning Center drop-down menu.
- Click the Team Members Learning link, and a list of all team members displays.
- From the list of team members, put a checkmark next to the learner whose information you wish to view.
- In the Action coumn, select the desired action. Then, click the Go button.
|
Viewing Team Member Current Training |
Follow the steps below to view a team member’s current training.
Steps
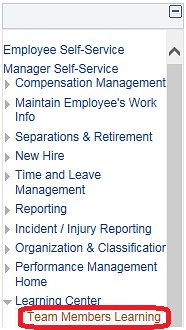
- Select the Manager Self-Service link from the left navigation.
- Select the Learning Center drop-down menu.
- Click the Team Members Learning link and a list of all team members displays.
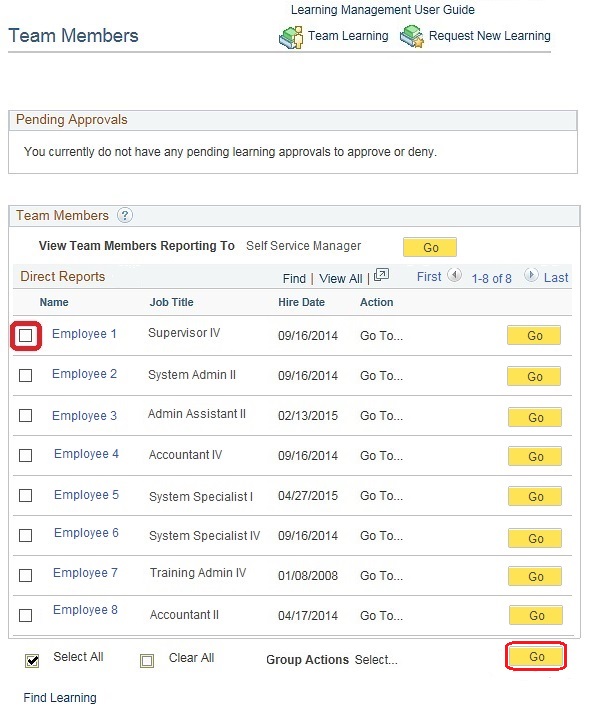
- From the list of team members, put a checkmark next to the learner whose information you wish to view.
- In the Action column, select the desired action. Then click the Go button.
|
|
 |
|
|
Accessibility Instructions |
Use your screen reader commands to navigate the elements on the page such as headings and links. |
Introduction |
CAPPS provides you with a comprehensive view of your team members’ administrative and job-specific training history for training maintained in the CAPPS system. The View Team Transcript function enables you to specify the date range of the training report you wish to review. You may use your browser print function to print a hard copy of the report for your records. |
Step Actions |
The step actions for completing a transaction are presented in two ways: Text Only and Screen Samples:
- Text Only provides instructions for completing the transaction in order from beginning to end. It does not include screen samples.
- Screen Samples include detailed screen shots to help complete the transaction.
|
Key Terms |
For help with terms used in this User Guide, go to the top of the page. Top of Page |
Text Only Step Actions for Viewing a Team Member Transcript |
Follow the steps below to view a team member transcript.
Steps
- Select the Manager Self-Service link from the left navigation.
- Select the Learning Center drop-down menu.
- Click the Team Transcript link; the Training Summary Report Select Employee page displays a table listing your direct reports.
- Click the name of the team member whose Transcript you wish to review.
- Use the calendar selectors to enter the From Date and To Date for specifying the date range you wish to view. Then click the View Report button.
- The team member’s transcript displays, showing the training history for the specified date range.
|
Viewing a Team Member Transcript |
Follow the steps below to view a team member transcript.
Steps
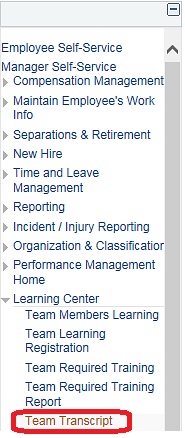
- Select the Manager Self-Service link from the left navigation.
- Select the Learning Center drop-down menu.
- Click the Team Transcript link; the Training Summary Report Select Employee page displays a table listing your direct reports.
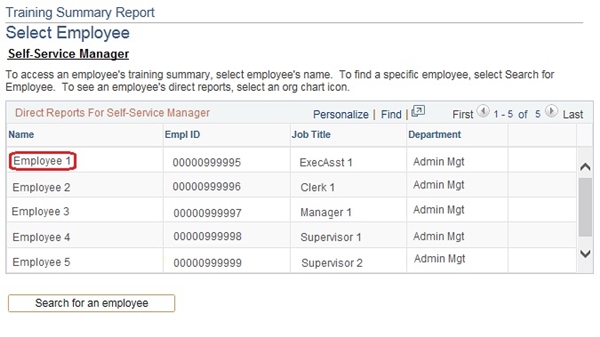
- Click the name of the team member whose Transcript you wish to review.
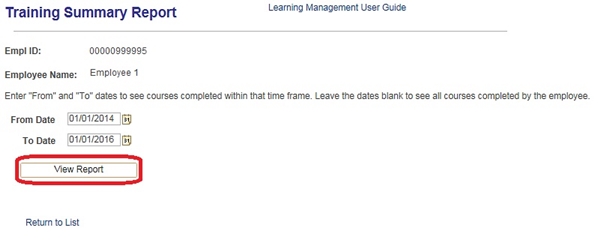
- Use the calendar selectors to enter the From Date and To Date for specifying the date range you wish to view. Then click the View Report button.
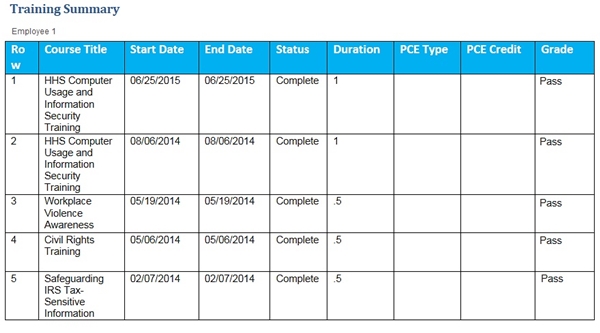
- The team member’s transcript displays, showing the training history for the specified date range.
|
|
 |
|
|
Accessibility Instructions |
Use your screen reader commands to navigate the elements on the page such as headings and links. |
Introduction |
You can use CAPPS to view the collective or individual status of your team’s required training. |
Step Actions |
The step actions for completing a transaction are presented in two ways: Text Only and Screen Samples:
- Text Only provides instructions for completing the transaction in order from beginning to end. It does not include screen samples.
- Screen Samples include detailed screen shots to help complete the transaction.
|
Key Terms |
For help with terms used in this User Guide, go to the top of the page. Top of Page |
Text Only Step Actions for Viewing and Running Required Training Reports for Your Team |
Follow the steps below to view and run reports for required training for your team.
Steps
- Select the Manager Self-Service link from the left navigation.
- Select the Learning Center drop-down menu.
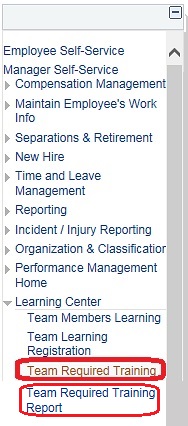
- Click the Team Required Training link to run the report for one employee.
- Click Team Required Training Report to run the report for more than one employee on the team.
- Put a checkmark next to the names of the team members whose Required Training you wish to review. To select all employees on the team, click the Select All button.
- Click Process Report. Then click OK.
- Click View Reports. The View Reports table shows the list of reports recently processed. Find the most recent run date (today's date and time). If No Report displays, click Refresh, until the View Report link displays, then click the link to see the Team Required Training Report.
Helpful Hint: You may select any member of your team to include in the report by clicking the checkbox in the Include column. By clicking the Select All button, your report will include all the members of your team.
|
Viewing and Running Required Training Reports for Your Team |
Follow the steps below to view and run reports for required training for your team.
Steps
- Select the Manager Self-Service link from the left navigation.
- Select the Learning Center drop-down menu.
- Click the Team Required Training link to run the Required Training report for one employee.
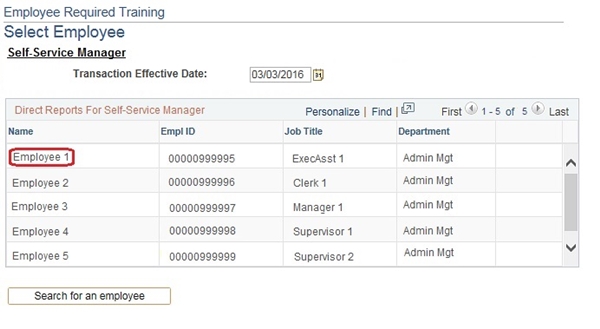
- Click Team Required Training Report to run the report for more than one employee on the team.
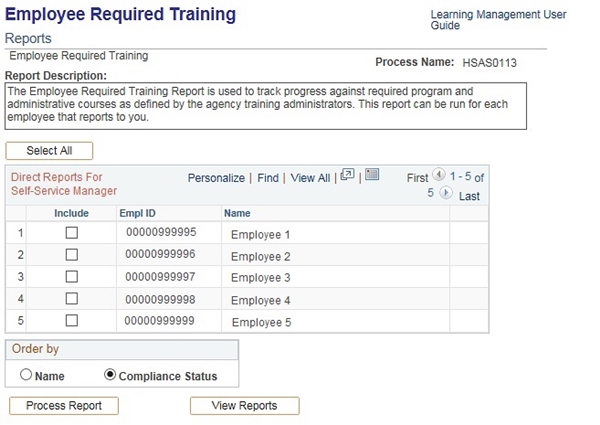
- Put a checkmark next to the names of the team members whose Required Training you wish to review. To select
all employees on the team, click the Select All button.
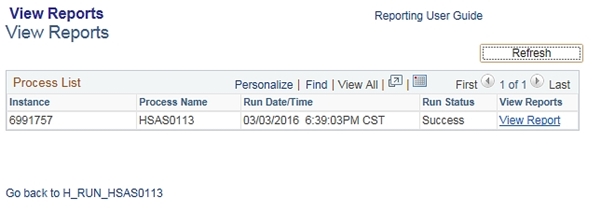
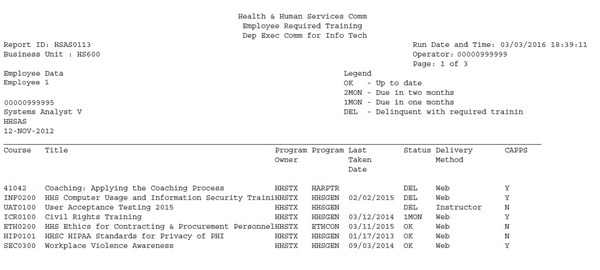
- The View Reports table shows the list of reports recently processed. Find the most recent run date (today's date and time). If No Report displays, click Refresh, until the View Report link displays, then click View Report to see the Team Required Training Report.
- To print the Required Training Report for your team, click the print icon button on the browser.
|
|
 |
|
Key Things to Remember |
Service Center Information:
- The Service Center operates between 7:00 a.m. and 7:00 p.m. Central Time, Monday through Friday. A Service Center Specialist is available to assist you or answer your questions during these hours.
- You may contact the Service Center at 1-888-TX-HHS-HR (1-888-894-4747), or TDD/TTY for the Hearing Impaired 1-866-839-2747.
- You may email your questions directly to the Service Center by selecting Ask Service Center on the CAPPS home page (must be logged in) using the online form to enter and submit your questions.
|
|
 |